
This guide covers a very specific APS MIDI Prep Tool workflow: You have MIDI files on your computer, and you want to prepare a physical floppy disk for an older Yamaha Disklavier that expects or understands Yamaha E-SEQ files.
The goal is to use one tool to format the floppy disk if necessary, add songs, convert them to E-SEQ, generate or refresh PIANODIR.FIL, and save the disk.
Important: Only format blank disks or disks you are intentionally erasing. If you insert an original Yamaha PianoSoft disk and your computer asks to format it, cancel. That usually means the computer does not understand the Yamaha disk, not that the disk is empty.
What this workflow is for
This workflow is useful when you want to make a new floppy disk for an older Yamaha Disklavier from MIDI files stored on your computer.
Many early Disklavier systems do not play ordinary MIDI files from floppy disk. Instead, they expect Yamaha E-SEQ files, usually with a .FIL extension. These disks also need a Yamaha song directory file named PIANODIR.FIL.
Historically, we would first collect all of the MIDI files together, rename them with shorter filenames, convert them to E-SEQ (using MID2ESEQ), then fix the titles and prepare a directory file using E-SEQ Explorer. I have an article describing this older, lengthier process. APS MIDI Prep Tool can now perform all of these tasks.
- Start with a blank or erasable floppy disk.
- Format it as a Disklavier-friendly floppy disk if necessary, or just
Read Floppy...if not. - Add MIDI files. Let APS MIDI Prep Tool convert them and generate
PIANODIR.FIL. - Save the finished disk.
- Test the disk in the Disklavier.
If your Disklavier can play standard MIDI files from floppy disk, you may not need E-SEQ conversion. Check the Disklavier Compatibility Table first if you are not sure what your controller supports.
Before you start
You will need:
- A blank or erasable floppy disk.
- A floppy drive that can write the disk correctly.
- APS MIDI Prep Tool installed and ready to run.
- The MIDI files you want to put on the disk.
- A Yamaha Disklavier that uses floppy disks.
For most early Disklavier systems, use a proper 2DD / double-density floppy disk. These are normally formatted to 720 KB. The more common 2HD / high-density disks are not the best choice for many older Disklavier floppy drives, even if you cover the density hole with tape.
These instructions are intended for disks, recordings, and MIDI files you legally own or otherwise have permission to use. Please do not use this process to distribute Yamaha PianoSoft, commercial MIDI files, or other copyrighted music without permission.
Step 1: Insert the floppy disk
Insert the blank or erasable floppy disk into your floppy drive.
If the disk has a write-protect tab, make sure the disk is not write-protected. The tool cannot format or save to a write-protected disk.
If your computer asks whether you want to format the disk, stop and think before clicking anything. If this is a blank or erasable disk, formatting may be fine. If this is an original Yamaha disk, a customer disk, a personal recording, or anything you need to preserve, cancel the prompt and do not format it.
Step 2 (optional): Format the floppy disk if necessary
This step is appropriate if you’re working with a blank, intentionally erasable, or incorrectly formatted floppy disk. It is often not necessary if you’re working with properly formatted, blank floppy disks. This tool is available if you need it.
Open APS MIDI Prep Tool and select Utilities > Format Floppy...
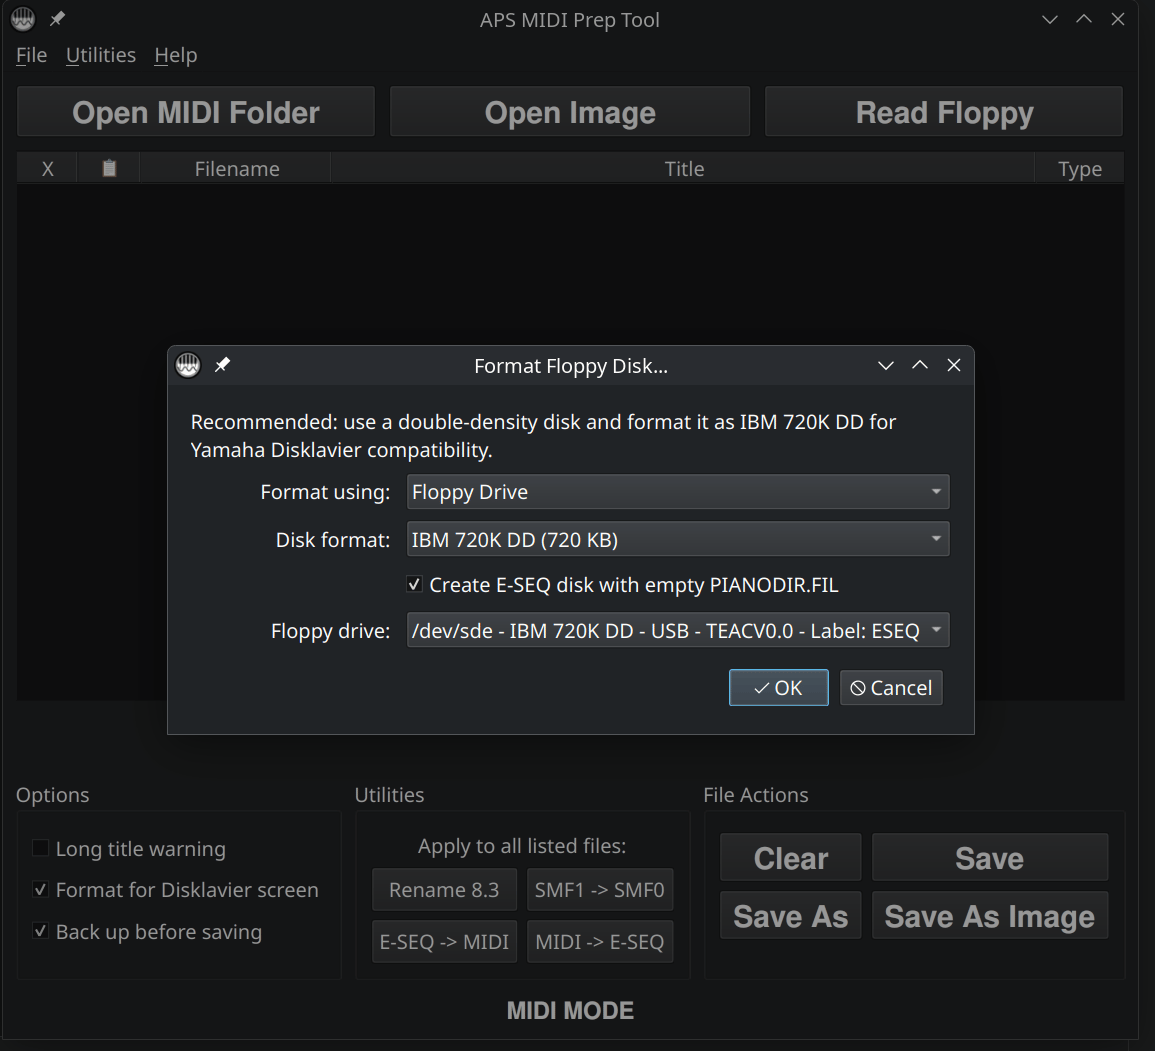
Format Floppy Disk... menu allows you to select the drive, the disk format, and whether you’d like for the disk to be an E-SEQ disk. In this case, we’ve checked that box. IBM 720K DD is valid for most older Disklaviers. Check the Disklavier Compatibility Table if you’re uncertain.Formatting erases the disk. This is the right step for a blank disk, a reused scratch disk, or a disk that you intentionally want to clear. It is not the right step for an original PianoSoft disk or any disk you are trying to back up.
If the tool cannot format the disk, the most common reasons are:
- The disk is write-protected.
- The floppy drive cannot write 720 KB disks.
- The disk is physically bad.
If formatting succeeds, you now have a blank Disklavier-friendly floppy disk ready to receive files.
Step 3: Load the Floppy Disk
This option is appropriate if the floppy disk is already blank or properly formatted. Properly preformatted 2DD disks may not need to be formatted.
From the menu, select File > Read Floppy... and choose the appropriate drive and disk size. APS MIDI Prep Tool will load the disk into the file list. A newly formatted disk may show little or nothing in the list.
APS MIDI Prep Tool will attempt disk recovery if it can’t read the disk initially. If it continues to struggle to read the disk, you will probably need to format it (described above).
The important point is that APS MIDI Prep Tool is managing the floppy disk contents and will write the finished result back to the disk when you save.
If APS MIDI Prep Tool shows a mode such as FLOPPY DISK (E-SEQ), that is the kind of mode you want for an older Yamaha E-SEQ disk. If it shows FLOPPY DISK (MIDI), that’s alright too—we’ll fix that in a moment!
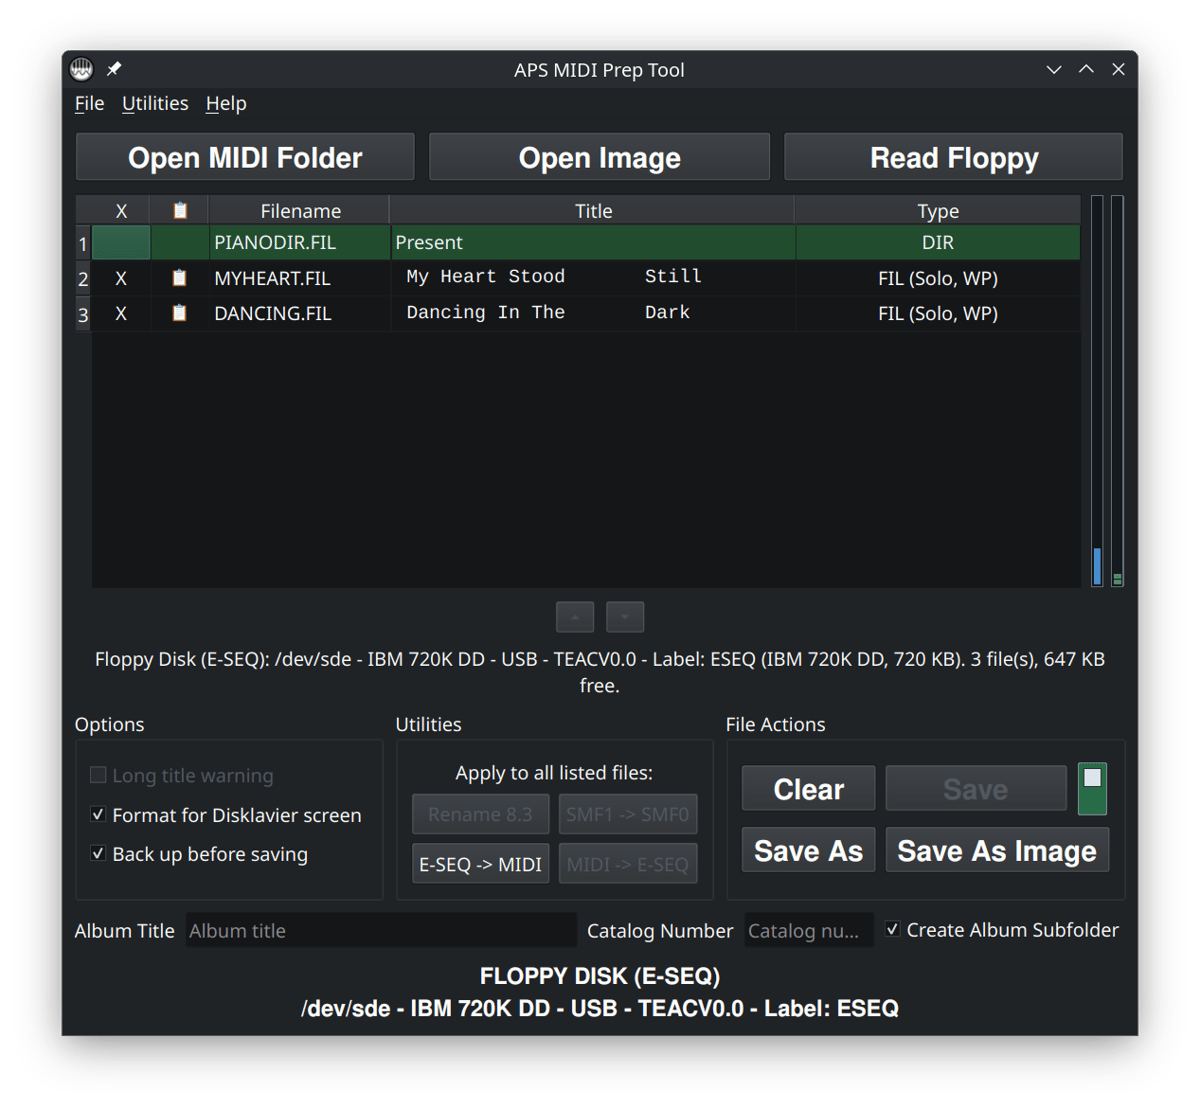
FLOPPY DISK (E-SEQ) mode, after reading a disk. To the right of the file list, you’ll also see a vertical blue bar and a vertical green bar. E-SEQ disks are limited to sixty songs, represented by the green bar. Double-density floppy disk can only store 720 KB, and that capacity is represented by the blue bar.Step 4: Add the files
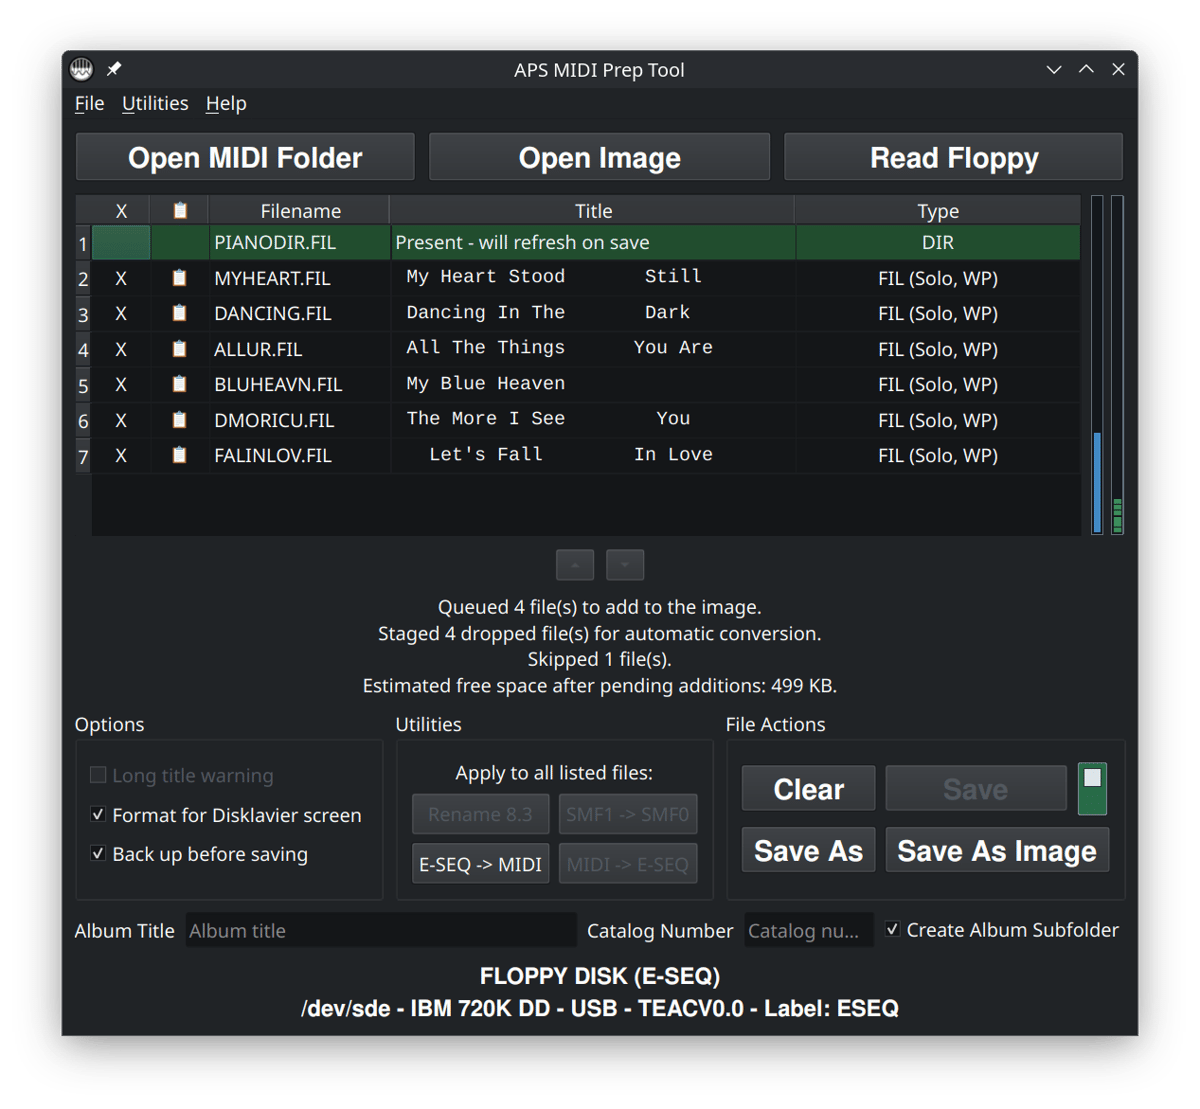
Drag the MIDI files you want to use into the APS MIDI Prep Tool window. You can add one file or several files at once. If there are already E-SEQ files present, APS MIDI Prep Tool will automatically convert the MIDI files to E-SEQ and update the directory file. It will even shorten the filenames automatically.
At this point, you are staging the songs for the floppy disk. The files are not safely written to the disk until you save. That means this is the time to check the order, names, titles, and capacity before committing the final disk. Simply click on the titles to edit them. With Format for Disklavier screen selected, you’ll see what the songs will look like on older Disklavier displays and can edit them easily.
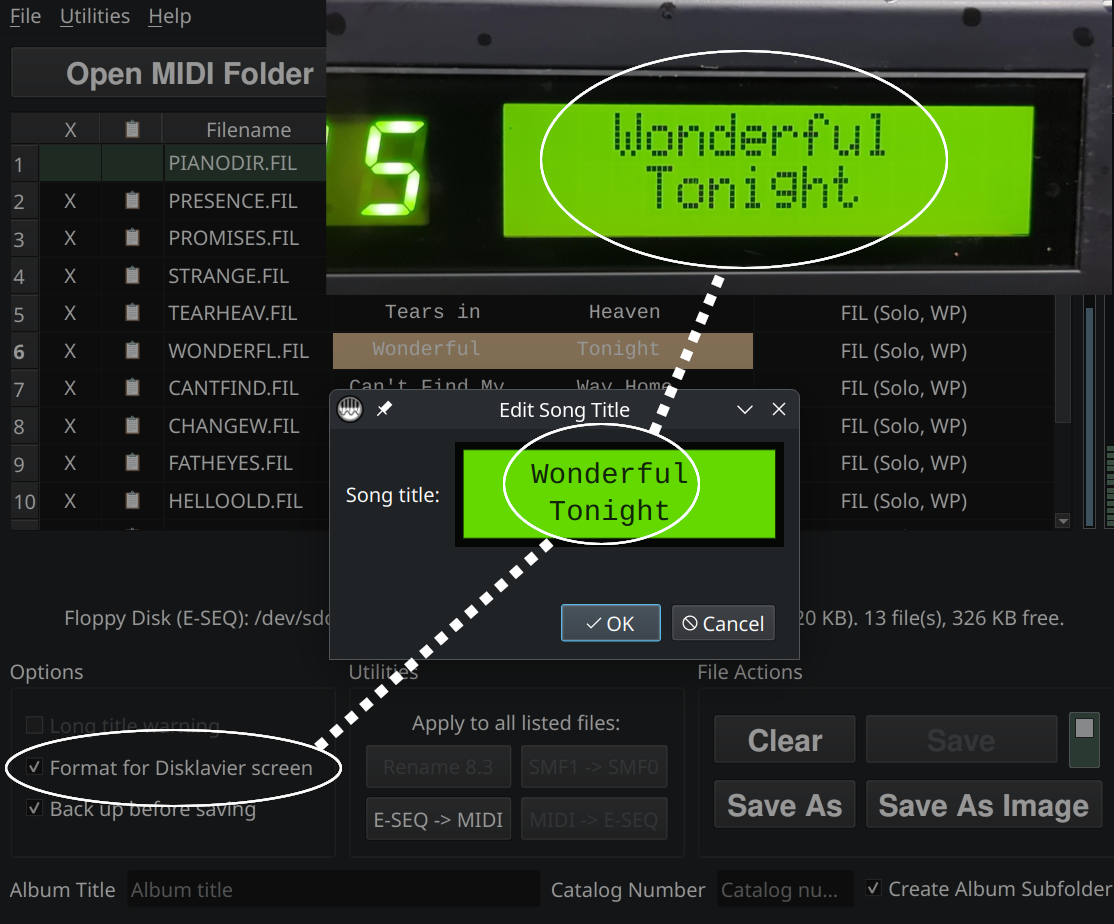
Format for Disklavier Screen, a naming utility that is especially helpful when preparing floppy disks because it lets you space song titles exactly as they will appear on an early Yamaha display.If you’re adding MIDI files and no E-SEQ files are present, it will stage them as MIDI files. Press the MIDI -> E-SEQ button at the bottom of the window, or select Utilities > Convert All MIDI to E-SEQ from the menu. Files will be renamed and converted automatically, and PIANODIR.FIL will be updated. Any subsequent MIDI files you add will be converted automatically.
If you wish to change the order of the files, click on the filename and then use the up and down arrows below the file list. This option is only available in E-SEQ mode, so make sure you’ve already clicked one of the conversion buttons described in the last paragraph.
PIANODIR.FIL when you save.Step 5: Save the finished floppy disk
When the file list looks right, save the finished disk.
If you are in Floppy Mode, APS MIDI Prep Tool may protect the disk from accidental writes by disabling the normal Save button until you intentionally enable writing. If there is a write-protect toggle next to Save, turn it off only when you are sure you want to write the changes to the physical floppy disk.
If you’re saving many floppy disks and find this feature troublesome, you can turn off File > Auto Write-Protect. Otherwise, write-protect will automatically enable with each floppy disk you read.
Saving is the step that actually writes the prepared E-SEQ files and PIANODIR.FIL to the floppy disk. Adding files to the list, editing titles, and converting formats are not enough by themselves. You must save the disk before removing it from the drive.
After saving, wait for the tool to finish writing before ejecting the disk. Floppy disks are slow, and removing the disk too early can corrupt the result.
Step 6: Test the disk in the Disklavier
Put the finished floppy disk into the Disklavier and test it before preparing a full batch of disks.
- Confirm the piano recognizes the disk.
- Confirm the songs appear in a useful order.
- Confirm the titles display correctly enough to be useful.
- Play at least part of several songs.
- Listen for missing piano parts, strange tempo behavior, or files that refuse to start.
If the test disk works, you can repeat the process with more songs. If the test disk does not work, it is much easier to troubleshoot one small disk than a full set.
Copyright note
These instructions are intended for organizing, preserving, and preparing disks and files you legally own, personal recordings you made, or music you otherwise have the right to use. Please do not use this process to distribute commercial Yamaha PianoSoft disks, commercial MIDI files, or other copyrighted material without permission. See my full Disclaimer and DMCA policy.


