This guide walks through taking a Yamaha floppy disk, reading it with APS MIDI Prep Tool, converting the contents to standard MIDI files from E-SEQ when necessary, and saving those files into a folder on your computer.
If you have old Yamaha Disklavier, PianoSoft, or personal-recording disks and want to copy their contents to a USB stick or to your computer, this software makes the process straightforward.
Important: If your computer says the floppy disk needs to be formatted, cancel. Do not format the disk. Many Yamaha disks will look strange or unreadable to a normal computer, even when the disk itself is perfectly usable.
What this workflow does
APS MIDI Prep Tool can read a floppy, show the songs it finds, and let you save copies into a normal folder. Many older Yamaha devices, including both Yamaha Disklaviers and Clavinovas, use a format called E-SEQ. Unlike standard MIDI files, this format is not widely recognized or usable with modern devices, and these floppy disks are generally not readable by a computer without special software.
If the disk contains Yamaha E-SEQ files, the tool can convert those files to standard MIDI files first. That way, the end result is a folder of .MID files rather than a disk full of older Yamaha-specific files.
This is the workflow:
- Insert the Yamaha floppy disk.
- Open APS MIDI Prep Tool.
- Use
Read Floppy. - Review the files that appear in the list.
- Use
E-SEQ -> MIDIif the disk contains Yamaha E-SEQ files. - Use
Save Asto place the finished MIDI files into a folder.
Before you start
You will need:
- A Yamaha floppy disk you legally own or are responsible for preserving.
- A working floppy drive, such as an internal floppy drive, a USB floppy drive, or an internal floppy drive connected to a Greaseweazle.
- APS MIDI Prep Tool installed and ready to run.
- An empty folder on your computer where the extracted MIDI files will go.
I recommend making a folder with a clear name before you start. For example:
Yamaha Disk 01 - Extracted MIDI
That makes it much easier to keep albums, disks, and customer projects separated.
Step 1: Insert the floppy disk
Insert the Yamaha floppy disk into your floppy drive.
If Windows, macOS, or Linux asks whether you want to format the disk, say no. That message does not necessarily mean the disk is blank or bad. It often just means the computer does not understand the format Yamaha used.
Step 2: Open APS MIDI Prep Tool
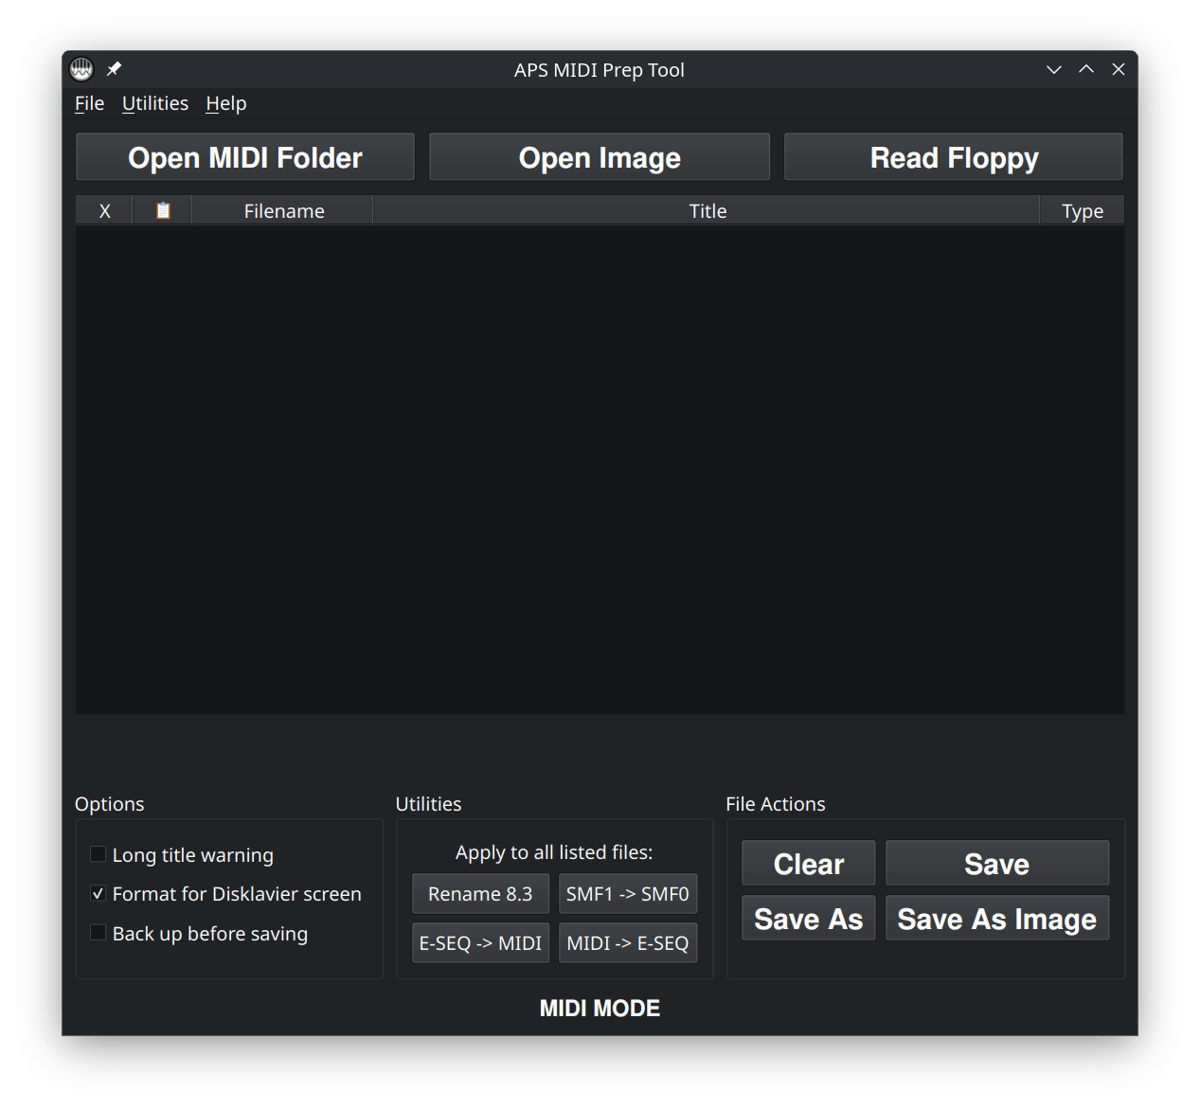
Launch APS MIDI Prep Tool. Across the top of the window you see options such as Open MIDI Folder, Open Image, and Read Floppy.
For this job, use Read Floppy. We are starting from a physical disk, not from a folder of files that has already been copied.
Note about floppy drives: Direct USB floppy reading is most straightforward on Windows and Linux. If you are using macOS, you may need to work from a floppy disk image instead, or use a Greaseweazle-based setup. If you are not sure which method applies to your computer, start with Read Floppy; if that does not work, the image-based workflow may be the better path.
Step 3: Click Read Floppy
Click Read Floppy. The tool will read the disk from the floppy drive and load the contents into the table. If you’re using a USB floppy disk drive, select that option. You’ll then be offered a list of detected floppy disk drives. For most people, this will be a single option. Click OK, and it will then read the floppy disk.
Note that the floppy disk reader attempts to read the floppy disk in “fast” mode first, but if it fails, it will attempt to image the entire disk. Make sure to give it time. Floppy disks are not very fast media, and it may take as much as a minute to read the disk.
Depending on your setup, you may be reading from a USB floppy drive or from a Greaseweazle-connected drive. The important thing is that APS MIDI Prep Tool is doing the reading, not your computer’s normal file explorer.
If the disk contains errors, APS MIDI Prep Tool will attempt file recovery. It uses several advanced recovery methods to salvage playable song files whenever possible. It is the most forgiving software currently available in this niche, with disk-handling and recovery workflows designed to preserve files that older Disklavier utilities and simpler tools may miss.
Once the disk is loaded, you should see a list of files. The important columns for this workflow are usually:
- Filename – the file name stored on the disk.
- Title – the internal song title or metadata, when available.
- Type – the file type or MIDI format information the tool can detect.
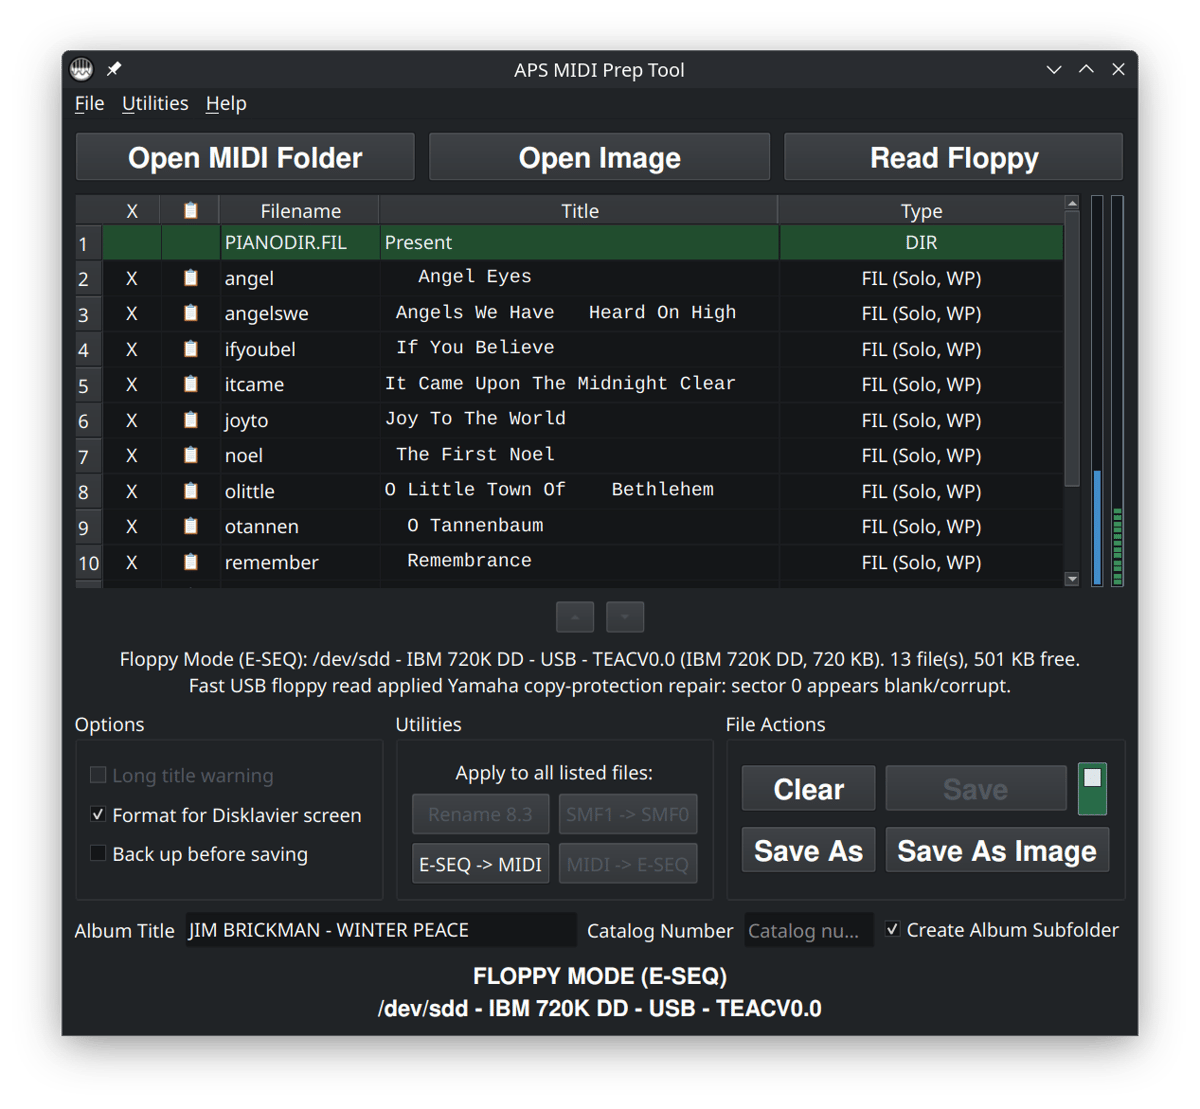
FLOPPY MODE (E-SEQ). Several new fields appear. Fast USB floppy read worked, and APS MIDI Prep Tool repaired or normalized the directory view in memory. The original floppy was not written to. Note also that Save is disabled—you can flip the toggle if you wish to save directly back to the floppy disk, but for most purposes, I’d leave this toggled. FLOPPY MODE (E-SEQ) also shows storage indicators to the right of the file list: The blue bar indicates disk usage, and the green bar indicates the number of E-SEQ files (with a maximum of 60 per disk). PIANODIR.FIL is also present and labeled at the top of the screen.Step 4: Check whether the disk contains MIDI or E-SEQ
Some Yamaha disks contain standard MIDI files. Others contain Yamaha E-SEQ files, usually with a .FIL extension. E-SEQ is a Yamaha format used by many older Disklaviers. It is not the same thing as a normal .MID file, even though the musical information may be similar.
If the files already show up as MIDI files, you can skip the conversion step below and go straight to Save As.
If the files show up as E-SEQ or .FIL files, use the next step to convert them to MIDI before saving them into your folder.
You may also see PIANODIR.FIL. That file is the Yamaha song directory/index. It is not one of the songs. APS MIDI Prep Tool treats it separately so you can see what is going on without confusing it with the actual music files.
Step 5: Convert E-SEQ files to MIDI, if needed
If the disk contains Yamaha E-SEQ files, click E-SEQ -> MIDI.
This converts the listed E-SEQ songs into standard MIDI files. The goal here is simple: instead of ending with a folder of .FIL files, you end with a folder of .MID files that are much easier to inspect, organize, and use with modern software.
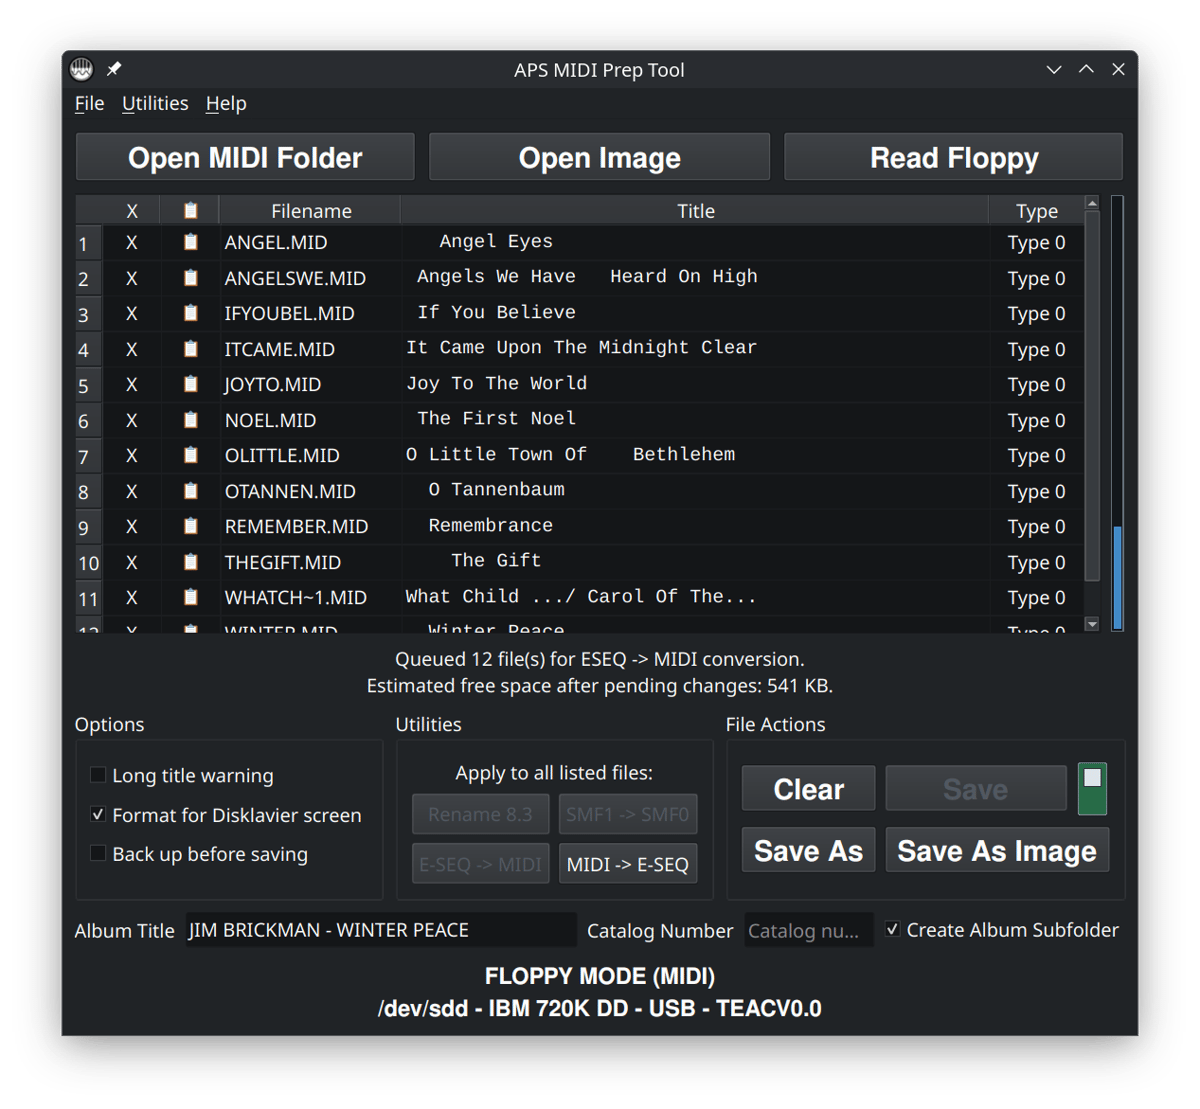
FLOPPY MODE but now in MIDI instead of E-SEQ. These files have been converted, but have not been saved anywhere yet. The Save As button will save these newly converted files to your computer.If the disk already contains standard MIDI files, you do not need to do this. In that case, leave the files as they are and continue to the next step. If the files are already MIDI files, the E-SEQ -> MIDI button will be grayed out.
Step 6: Clean up titles if you want
This step is optional, but it is one of the reasons I built the tool.
You can click in the Title column to edit song titles before saving the files. This is helpful when the original disk has blank titles, strange characters, or titles that are too long to be useful on older displays.
For older Yamaha systems, I usually keep titles short, plain, and readable. Avoid unusual symbols when possible. A boring title that displays correctly is better than a clever title that turns into gibberish on the piano.
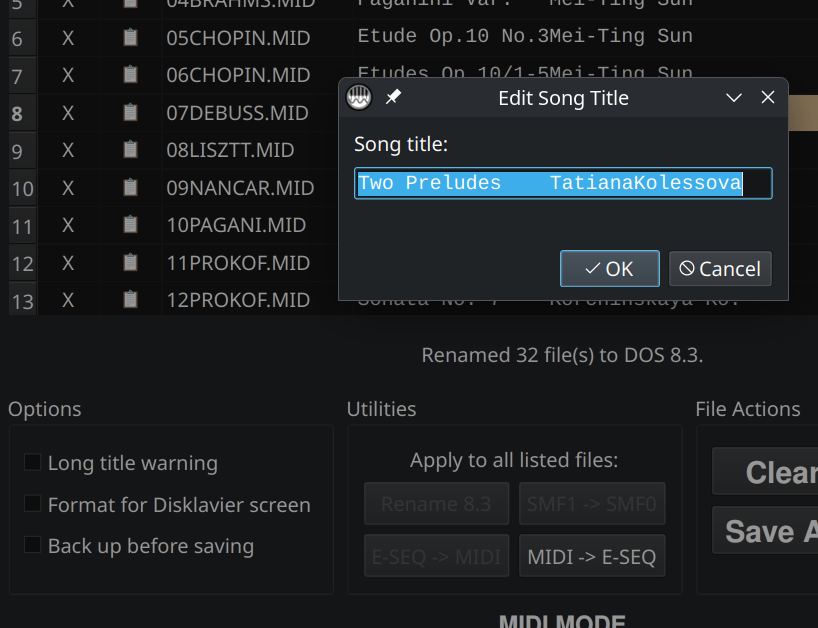
Format for Disklavier screen is not checked, the title appears as a single line and is not being limited for a two-line Disklavier display.Step 7: Save the MIDI files into a folder
When the files look correct, click Save As.
Choose the empty folder you created at the beginning of the process. APS MIDI Prep Tool will write copies of the listed files into that folder.
For this workflow, use
Save Asrather thanSave. Save As writes copies to a folder. Save is for writing changes back to the original source, which is not what we are trying to do here. In fact, the Save button is disabled by default when inFLOPPY MODE.
Step 8: Check the output folder
Open the folder you selected. You should now see the extracted files. If you converted from E-SEQ, the finished files should be standard MIDI files with a .MID extension.
At this point, I recommend opening a few of the files in a MIDI player or MIDI editor just to confirm that the songs are present and named the way you expect.
Prepare the files for an older player system (optional)
If you are only archiving the songs on your computer, you may be done. If you are preparing the files for an older Disklavier or another legacy player system, there may be a couple of extra steps.
- Use
Convert All SMF1 to SMF0if the piano needs Type 0 MIDI files. You will not have to do this if the original files came from a Yamaha PianoSoft disk. - Use
Rename All to DOS 8.3if the destination system needs short filenames. You will not have to do this to files from Yamaha PianoSoft disks. - Keep titles short and avoid unusual characters.
Those steps are not required just to extract MIDI files into a folder, but they can matter a great deal when the files are going back onto older hardware.
Common problems
My computer says the disk is unformatted
Cancel the format prompt. Do not let the computer initialize or format the disk. Open APS MIDI Prep Tool and use Read Floppy instead.
The files are .FIL instead of .MID
That usually means the disk contains Yamaha E-SEQ files. This is true of most Yamaha PianoSoft disks. Use E-SEQ -> MIDI, then use Save As to save the converted files into your folder.
I see PIANODIR.FIL
That is normal on many Yamaha E-SEQ disks. PIANODIR.FIL is the song directory/index, not an individual song. Leave it alone unless you specifically know you need to rebuild or update the directory for a disk you are writing back to a Yamaha system.
The disk will not read
Floppy disks are old, fragile, and very susceptible to damage from age, magnets, sunlight, dirt, and bad drives. Try a known-good floppy drive if you have one. If the disk is important, avoid repeated attempts with questionable hardware.
I offer floppy disk transfer and recovery services if you would rather have me handle the disk.
Quick answers
Can I copy Yamaha floppy disk files with normal File Explorer?
Sometimes, but not reliably. Yamaha PianoSoft disks do not look normal to a modern computer. If your computer asks to format the disk, cancel and use a proper floppy-reading workflow instead, such as the one described above.
Are .FIL files MIDI files?
Not exactly. Many Yamaha .FIL files are E-SEQ files. APS MIDI Prep Tool can convert those E-SEQ files into standard .MID files. The two types of file are, in many respects, very similar.
Should I save back to the original floppy disk?
For extraction, no. Use Save As and save the files into a folder on your computer. That keeps the original disk untouched. I always treat the original floppy disk as irreplaceable source material.
Copyright note
These instructions are intended for preserving and organizing disks you legally own, personal recordings you made, or files you otherwise have the right to use. Please do not use this process to distribute commercial Yamaha disks or other copyrighted music without permission. See my full Disclaimer and DMCA policy.


Ich konte die Datai nur bis zur Hälfte kopieren, dann kam eine Fehlermeldung.
Hi Godi,
Thank you for the bug report. From the log, it looks like the disk may be damaged or corrupt, but I may be able to tell more if I can inspect the raw disk image.
Could you please make an image of the disk and email it to me?
Put the Yamaha music disk in the floppy drive.
Open APS MIDI Prep Tool.
Choose Disk > Image Floppy…, rather than recovering or converting to MIDI.
Select Floppy Drive and the correct drive for your setup. If this is a Yamaha disk, the default options should be fine.
Save the image as an .img file.
Email that .img file to me at [email protected].
I just need the raw image file from the tool, and I’ll see if the image can be opened and saved.
Thank you!
Hallo Godi,
vielen Dank für den Fehlerbericht. Aus dem Protokoll sieht es so aus, als ob die Diskette beschädigt oder korrupt sein könnte, aber ich kann möglicherweise mehr sagen, wenn ich das rohe Disketten-Image untersuchen kann.
Könnten Sie bitte ein Image der Diskette erstellen und es mir per E-Mail schicken?
Legen Sie die Yamaha-Musikdiskette in das Diskettenlaufwerk ein.
Öffnen Sie APS MIDI Prep Tool.
Wählen Sie Disk > Image Floppy…, statt eine Wiederherstellung oder Konvertierung zu MIDI durchzuführen.
Wählen Sie Floppy Drive und das richtige Laufwerk für Ihre Einrichtung. Wenn es sich um eine Yamaha-Diskette handelt, sollten die Standardeinstellungen in Ordnung sein.
Speichern Sie das Image als .img-Datei.
Senden Sie diese .img-Datei per E-Mail an [email protected].
Ich brauche nur die rohe Image-Datei aus dem Tool, und ich werde sehen, ob das Image geöffnet und gespeichert werden kann.
Vielen Dank!