This guide walks through one very specific job: Taking a Yamaha PianoSoft floppy disk, reading it with APS MIDI Prep Tool, and saving a Nalbantov-friendly image onto a USB stick.
This is written for Disklavier owners who already have a Nalbantov USB floppy emulator installed, or for technicians preparing a USB stick for one. The goal is not to rebuild the music or convert everything by hand. The goal is simply to make a virtual floppy disk image that the Nalbantov can present to the Disklavier as though it were the original floppy.
If you are new to this, do not worry. The basic idea is simple:
- Read the old floppy
- Save it as an
.hfeimage - Copy that image to the Nalbantov USB stick
Before you start
You will need:
- The original Yamaha floppy disk you want to copy.
- A computer that can read the floppy disk, either through a compatible USB floppy drive or a Greaseweazle setup.
- APS MIDI Prep Tool.
- A Nalbantov USB stick that is already prepared for your emulator.
- A little patience, especially if the original floppy is old or marginal.
I strongly recommend making a copy for your computer as well as putting the image on the USB stick. A Nalbantov USB stick is convenient, but it should not be your only backup. Keep a folder on your computer, and ideally another backup somewhere else, with the images you create.
These instructions are intended for backing up disks you legitimately own and for using them with your own Yamaha instrument. Please do not use this process to distribute Yamaha PianoSoft, commercial MIDI files, or other copyrighted material.
Make sure the Nalbantov USB stick is ready
If your USB stick came with your Nalbantov and is already working in the piano, do not reformat it just for this article. Use the stick as-is. The Nalbantov USB stick contains other important settings that we don’t want to change.
If the Nalbantov does not see the USB stick, or if the piano behaves as though no disk is inserted, the stick may not be formatted correctly. Nalbantov USB sticks generally need to be FAT16 or FAT32, and many setups expect the stick to be formatted as a “superfloppy,” meaning there is no partition table. I have a separate guide on that here: Fixing Keyboard, Disklavier, and Nalbantov USB Issues: FAT32 and Superfloppy Format. However, if you format it, you will need new copies of the Nalbantov files. If you do not have these files, contact Nalbantov, or contact me for assistance.
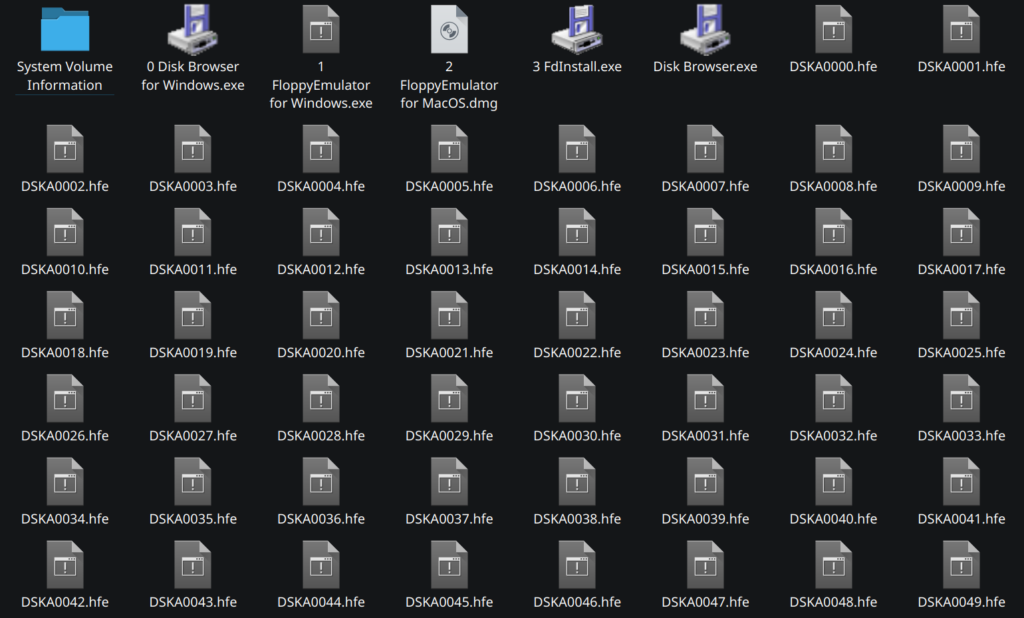
For the actual disk images, the Nalbantov typically uses .hfe files. Those files are named like virtual disk slots. For example, you might see names like DSKA0001.hfe, DSKA0002.hfe, and so on. If your stick already has a naming pattern, follow it. Do not rename everything unless you know exactly what your emulator expects.
Step 1: Launch APS MIDI Prep Tool
Open APS MIDI Prep Tool. At the top of the window, you will see three main choices: Open MIDI Folder, Open Image, and Read Floppy.
For this workflow, use Read Floppy. This tells the program that you want to read a physical floppy disk first, not just open files that are already on your computer.
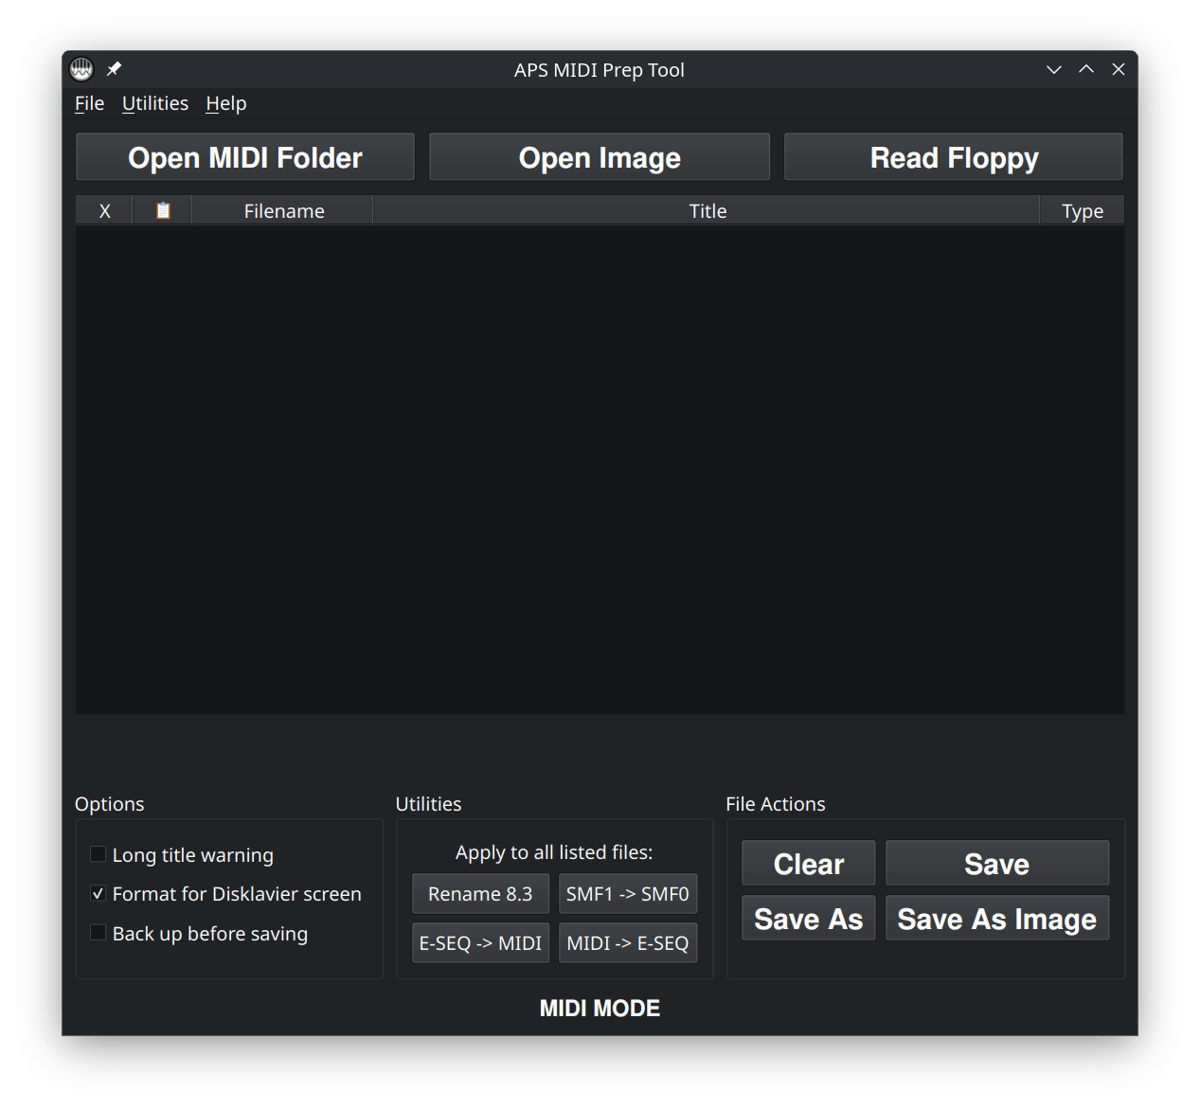
Read Floppy is visible at the top right. Note that it’s in Dark Mode, and may look different depending on your desktop settings.Step 2: Insert the Yamaha floppy disk
Insert the Yamaha floppy disk into your floppy drive. Give the drive a moment to settle before clicking anything. These old disks are not especially fast, and some USB floppy drives take a second or two before the disk becomes available.
If your computer says the disk is unformatted, do not format it. That is a very common message with Yamaha disks. The computer may not understand the disk, even though the Disklavier does. Formatting the disk would erase it.
If your computer asks to initialize, erase, repair, or format the floppy disk, cancel that prompt.
Step 3: Choose how to read the floppy
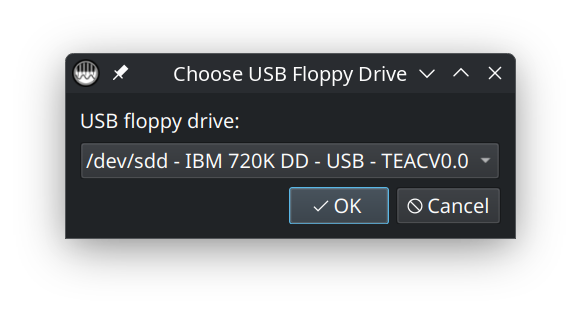
Click Read Floppy. APS MIDI Prep Tool will ask whether you are using a floppy drive or a Greaseweazle-connected drive.
If you are using a USB floppy drive
Choose the USB floppy drive from the list. If the tool sees the disk, it will begin reading it and then open the contents in Floppy Mode.
If APS MIDI Prep Tool cannot read the disk, it will offer to perform a recovery. This will take some time, but can often rescue files from otherwise damaged disks.
USB floppy drives are convenient, but they are not all equal. Some read old double-density Yamaha disks better than others. If a disk works in the Disklavier but refuses to read on your computer, the disk may not be bad. The USB drive may simply be the weak link.
See my article on USB floppy disk drives here.
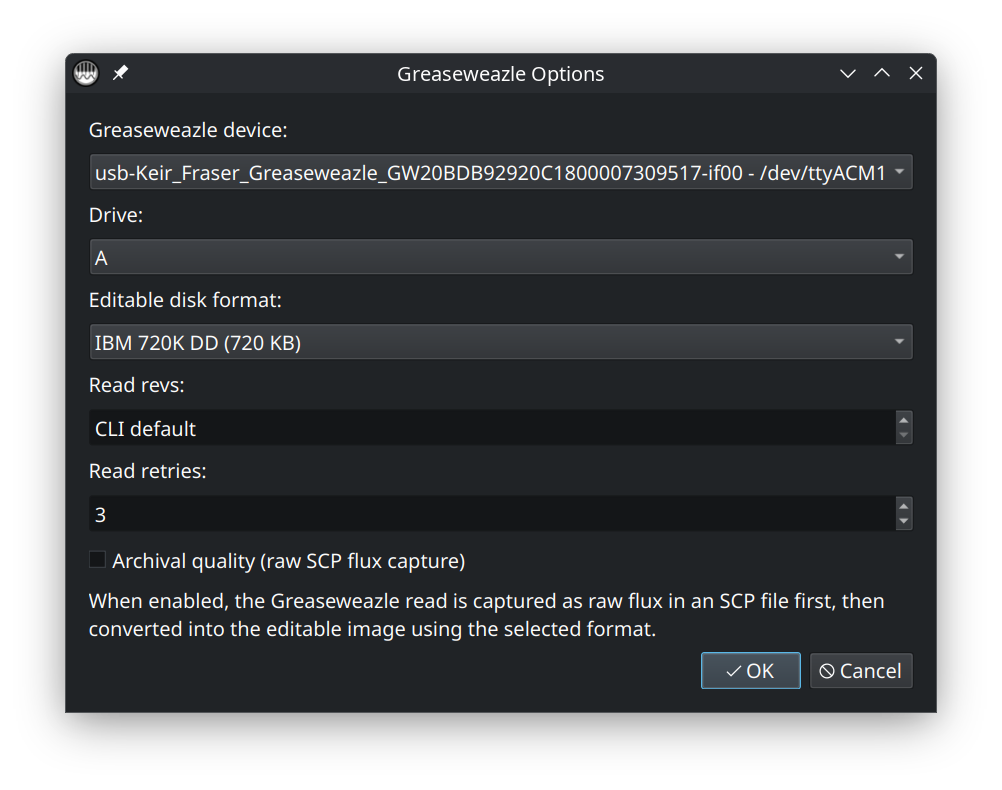
If you are using Greaseweazle
Choose the Greaseweazle option and select the drive. For most early Yamaha PianoSoft and Disklavier floppy disks, the expected format is usually IBM 720K DD. Some later systems use 1.44 MB high-density disks, so match the setting to the actual disk you are reading.
Greaseweazle is especially useful when a disk is fragile or difficult for a normal USB floppy drive to read. If I am preserving something important, I prefer to save a raw or archival copy in addition to the working HFE image.
If you check Archival quality, you’ll be given the opportunity to save a raw SCP image of the disk. This is a high-detail copy of the disk’s magnetic flux. I use this whenever a disk is irreplaceable so that I can maintain a long-term, safe copy.
Step 4: Review the disk contents
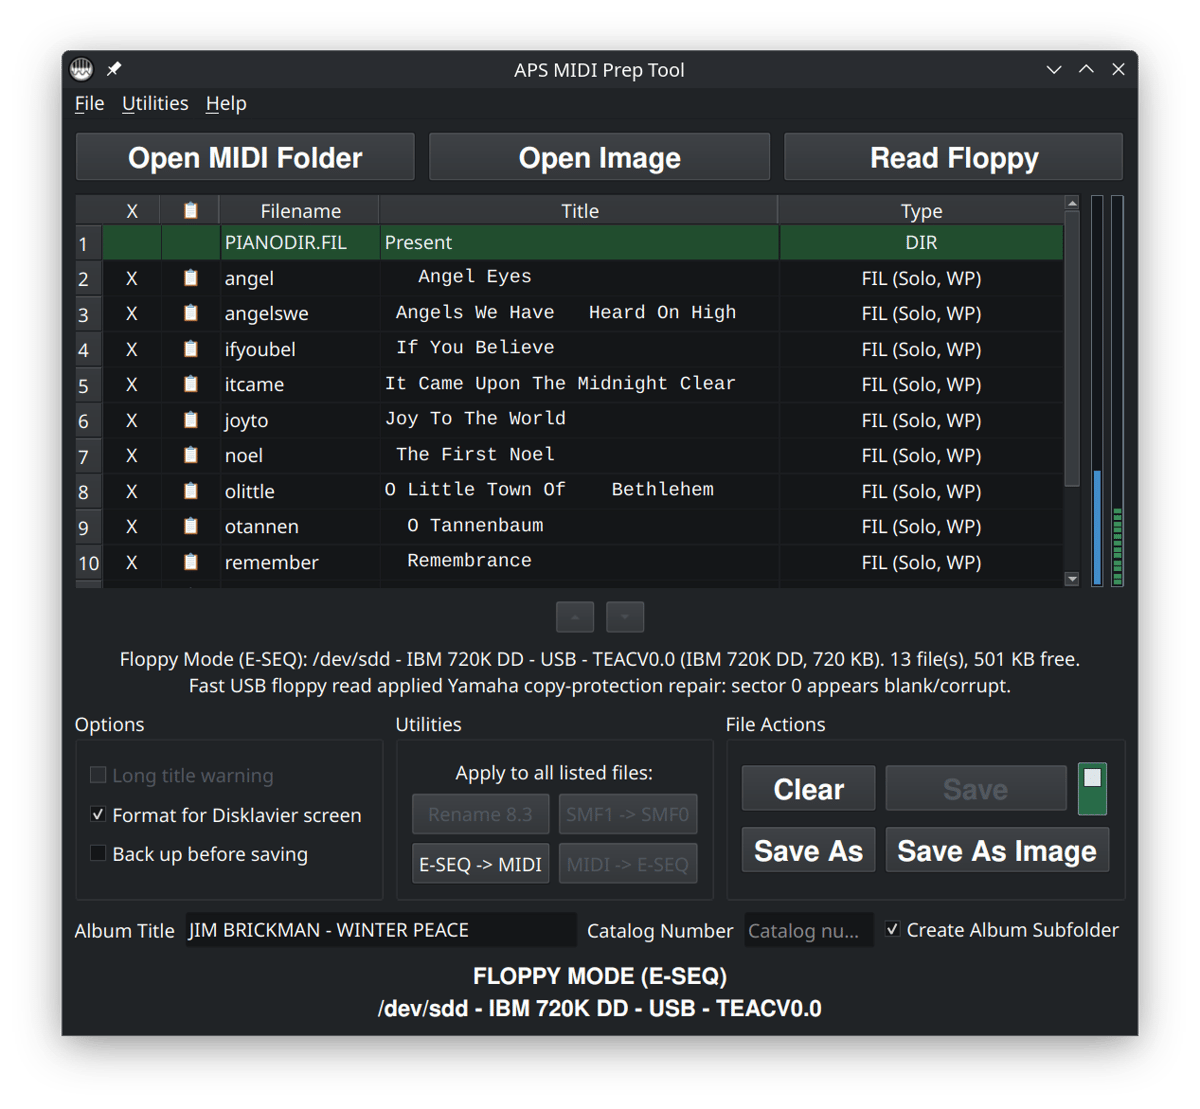
After the disk loads, APS MIDI Prep Tool will show the files inside the floppy session. At this point, you are looking at a working view of the floppy disk.
Depending on the disk, you may see MIDI files, Yamaha E-SEQ files, or a PIANODIR.FIL entry. Older Disklavier systems can be picky about this file, so it is helpful that the tool shows it separately and can refresh it when needed.
If your goal is only to copy the disk to a Nalbantov USB stick, you do not have to edit anything. You can simply read the disk, confirm that the contents look reasonable.
If you do make changes, keep them conservative. Older systems usually behave best with short filenames, short titles, and predictable formatting. The tool includes options such as Rename 8.3, long title warnings, and E-SEQ title handling for exactly this reason.
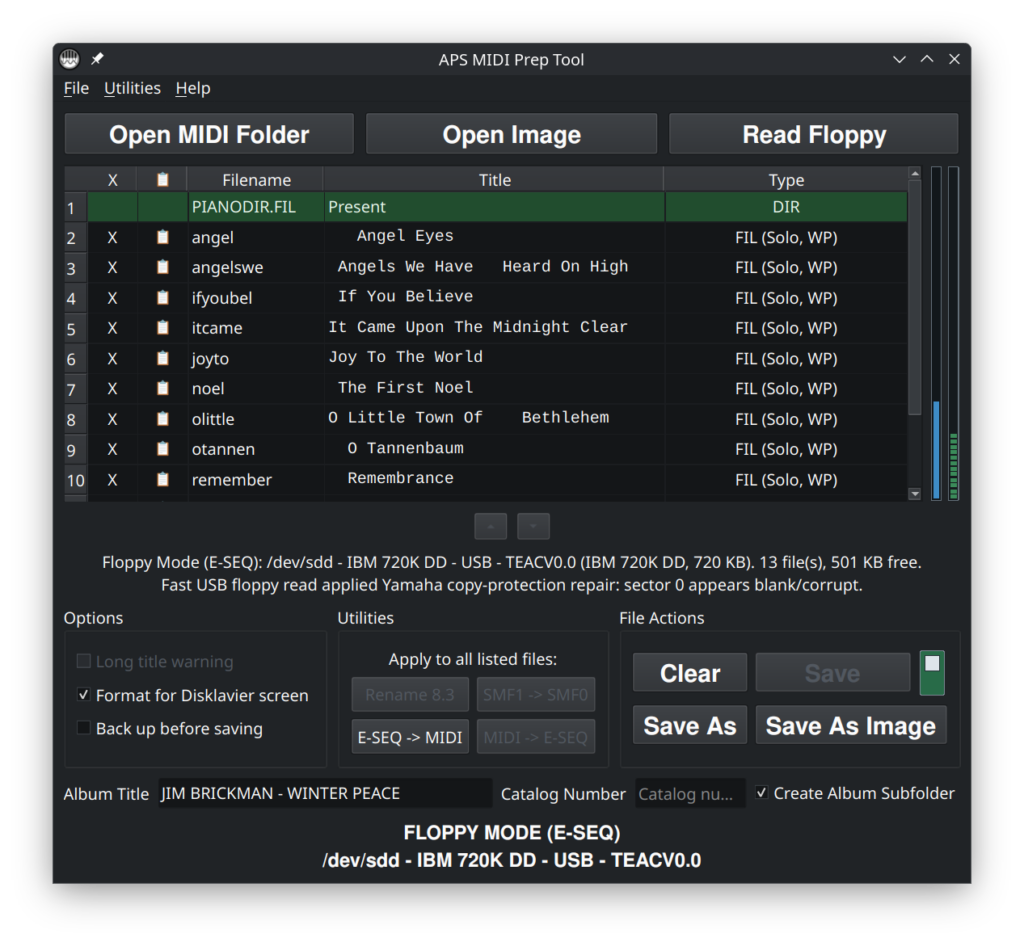
FLOPPY MODE (E-SEQ) displays the disk usage and number of E-SEQ files on the disk to the right of the main file list. It also has a write-protect switch, seen to the right of the Save button, which prevents saving directly to the disk. Note also that PIANODIR.FIL is present and displayed in green at the top.Step 5: Save the floppy as a Nalbantov image
Once the disk is loaded, use Save As Image. This is the important step. You are not just copying individual files to the USB stick; you are creating a virtual floppy image for the Nalbantov.
When choosing the output type, select HFE. This is the image format used by Nalbantov USB floppy emulator workflows.
When choosing the destination, select the Nalbantov USB stick. Pick the virtual floppy slot you want to use. If you are replacing an existing blank disk image, choose that existing filename and overwrite it only if you are absolutely sure that slot is the one you want to replace.
For a simple numerical-display Nalbantov, keep the expected slot naming convention. A name like DSKA0007.hfe may be appropriate if that is how the rest of your stick is arranged. For a Nalbantov eXtreme with a screen that supports readable names, you may have more flexibility, but I still like to keep the naming organized.
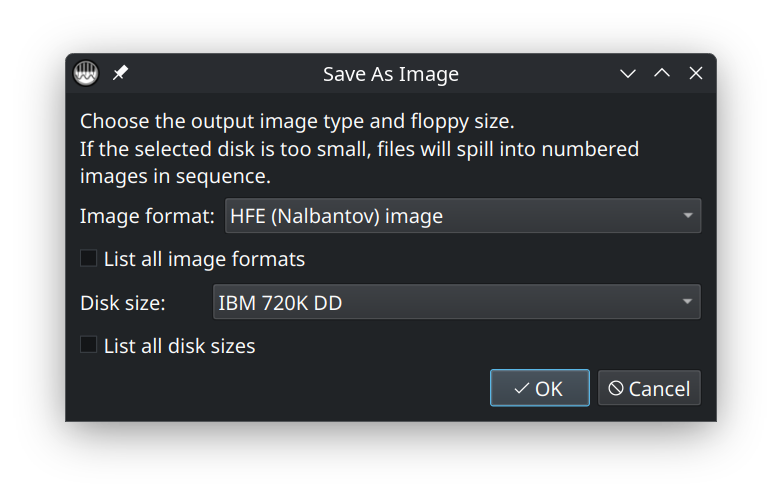
Save As Image, you’ll have the opportunity to select the disk size. For Yamaha PianoSoft disks, this will typically be IBM 720K DD.Step 6: Keep a computer backup too
After saving the image to the Nalbantov USB stick, I recommend saving a second copy to your computer. I usually keep a folder named something obvious, such as Disklavier Floppy Backups, with subfolders for each customer, piano, or disk collection.
A useful naming pattern is:
Artist or Album - Original Disk Label - Slot Number.hfe
For example:
Yamaha PianoSoft - Christmas Favorites - DSKA0012.hfe
The exact name is not critical for the computer backup, but it should be clear enough that you know what it is later. Future-you will appreciate this.
Step 7: Test it in the Disklavier
Eject the USB stick properly from the computer, then insert it into the Nalbantov. Use the Nalbantov buttons to select the virtual disk slot you just saved.
On the Disklavier, select the floppy disk source as usual. The Disklavier should behave as though a floppy disk has been inserted. Check that the songs appear, and try playing the first track.
If the songs show up and play, you are done. Make a note of the virtual disk number, label the backup on your computer, and move on to the next disk.
Troubleshooting
The computer says the Yamaha disk is blank or unformatted
Do not format it. This is normal with some Yamaha disks. Use APS MIDI Prep Tool, PPFBU, or a Greaseweazle workflow instead of relying on the operating system to understand the disk.
The disk reads on the Disklavier but APS MIDI Prep Tool can’t read it
This can be a floppy drive problem. Some USB floppy drives are not great with older disks, especially double-density disks. Try another drive if you have one. If the disk is important, consider using Greaseweazle or having the disk transferred professionally. It might also be damaged, or it might be an improperly used HD disk. Please see my full article on why floppy disks sometimes can’t be read, and what you might be able to do about it.
The Nalbantov does not see the USB stick
This is usually a USB formatting issue. The stick may be exFAT, NTFS, partitioned, too large for the setup, or otherwise formatted in a way the emulator does not like. See my guide here: Fixing Keyboard, Disklavier, and Nalbantov USB Issues.
The Nalbantov sees the slot, but the Disklavier does not like the disk
Check the image format first. For Nalbantov, you generally want .hfe, not just a folder of files and not an ordinary .img unless your particular setup expects that.
Also check the disk size. If the original was a 720 KB disk, save it as a 720 KB image. If it was a 1.44 MB disk, save it as a 1.44 MB image. The wrong size can cause very strange behavior.
The files themselves make a big difference. For instance, if you’re using a Mark I or Mark II (non-XG) Disklavier, these typically expect E-SEQ files. Make certain that the format is E-SEQ for older systems, and MIDI for newer systems. You can see my full Disklavier Compatibility Table here.
The piano reports “File not found” or asks to re-convert the disk
This is often an E-SEQ or directory problem. Older Disklaviers can be very fussy about filenames, song order, and PIANODIR.FIL. If you are working with E-SEQ files, avoid mixing MIDI and E-SEQ on the same virtual disk. Keep filenames short, avoid spaces, and let APS MIDI Prep Tool refresh PIANODIR.FIL when appropriate.
The disk has read errors
Floppy disks are old. If a disk has read errors, stop and think before repeatedly trying to read it. Every pass is a little more wear on the disk. A different drive or a Greaseweazle read may succeed where a normal USB floppy drive fails.
When I would use this workflow
This APS MIDI Prep Tool workflow is most useful when you want to move from a physical Yamaha floppy disk to a Nalbantov USB stick with the least amount of fuss. It is especially helpful when you want to preserve the disk as a virtual floppy, rather than extracting a folder of individual files and trying to rebuild the disk manually.
I still use different tools for different cases. For example, PPFBU is still a very useful tool for some Yamaha Disklavier floppy backup work. My online disk image converter is helpful when you already have an image and just need to convert it. But for this particular job—read a Yamaha floppy and save a Nalbantov-ready image—APS MIDI Prep Tool keeps the process in one place.
Need help transferring disks?
If you would rather not wrestle with old floppy disks, I also offer Yamaha floppy disk transfer and recovery. This is often the better option for a large disk collection, damaged disks, or disks that play in the piano but will not read reliably on a computer.
You can order that service here: Transfer and Recover Yamaha Floppy Disks, USB Delivery.


