This guide covers a Nalbantov image workflow: You already have a Nalbantov virtual floppy file, usually an .hfe file, and you want to add or remove songs using APS MIDI Prep Tool.
APS MIDI Prep Tool can work with ordinary MIDI folders, real floppy disks, and floppy images. This page is intentionally narrower than that. We are not copying songs directly to a normal folder here. We are opening a floppy image, changing the files inside it, and then saving an updated image for a Nalbantov USB floppy emulator.
In this guide, a “Nalbantov file” means the virtual floppy image on the USB stick, such as DSKA0001.hfe. The songs inside that image may be MIDI files, E-SEQ files, or other supporting files used by the piano.
Open Image, because Nalbantov USB sticks use virtual floppy image files rather than loose MIDI files copied directly into a folder. We can also drag and drop the images (.hfe files) directly into the window.What this workflow is for
This workflow is useful when you already have a Nalbantov HFE file and you want to make a small change to it. For example, you might want to add a few new MIDI files, remove songs you no longer need, clean up filenames, or adjust titles before putting the image back on the Nalbantov USB stick.
There are two different levels to keep in mind:
- The Nalbantov image file is the virtual floppy disk on your USB stick, often named something like
DSKA0001.hfe. This is the file the Nalbantov emulator presents to the piano as if it were a real floppy disk. - The song files inside the image are the files the piano actually plays, such as
.MID,.FIL, or related support files.
APS MIDI Prep Tool lets you open the image file, review the contents, queue additions and removals, and then save the result. That is different from simply dragging MIDI files onto the USB stick. On a Nalbantov setup, the songs usually need to be inside the virtual floppy image.
If you are trying to create a brand-new Nalbantov image from scratch, start with a known-good blank image whenever possible. This guide assumes you already have an image file to edit.
Before you start
I strongly recommend making a copy of your Nalbantov image before editing it. A floppy image is a container file. If you overwrite it by mistake, you may lose several songs at once.
- Open the Nalbantov USB stick on your computer.
- Copy the HFE file you want to edit into a working folder on your computer.
- Keep the original file on the USB stick untouched until you have tested the edited copy.
- Gather the MIDI or E-SEQ files you want to add before opening the image.
You can also check Back up before saving inside APS MIDI Prep Tool. This can create a backup when saving, but it is still best to begin with a working copy.
This is especially important if the image came from a customer archive, an older Disklavier, a copied PianoSoft disk, or a rare collection. Make one small test image first before preparing a full USB stick.
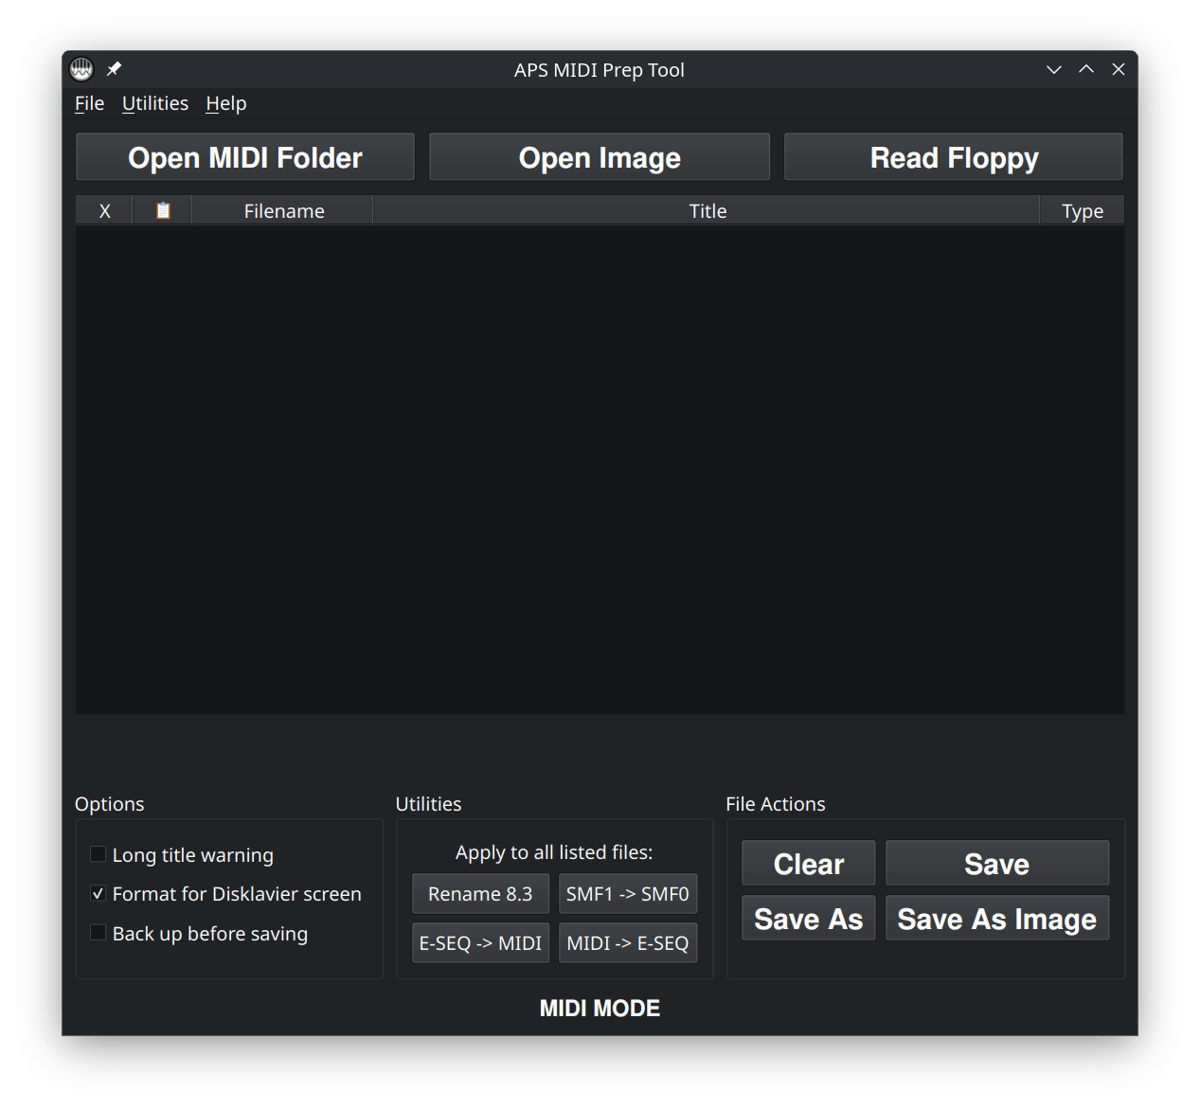
Step 1: Open APS MIDI Prep Tool
Launch APS MIDI Prep Tool. For this workflow, you do not need Open MIDI Folder unless you are only editing loose MIDI files. You also do not need Read Floppy unless you are working from an actual floppy disk or floppy drive.
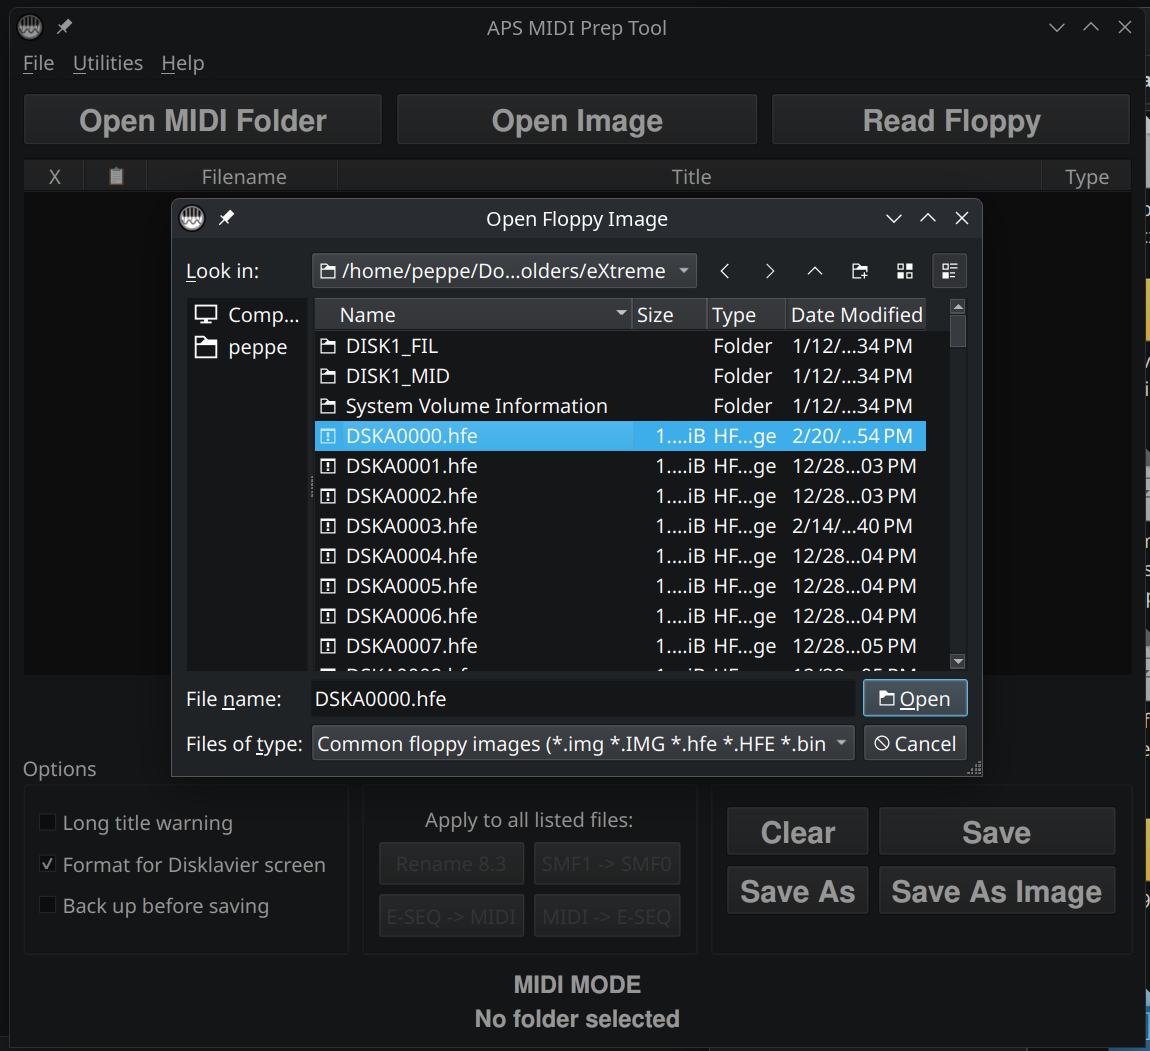
Click Open Image and choose the Nalbantov image file you copied into your working folder.
Alternatively, you can drag the image file directly into the APS MIDI Prep Tool window. If the file is a supported floppy image, the tool will open it in Image Mode.
Open Image when you want to edit a Nalbantov HFE file. You are opening the virtual floppy itself, not just a folder of MIDI files. Remember you can also drag-and-drop it into the window.Step 2: Review the files inside the image
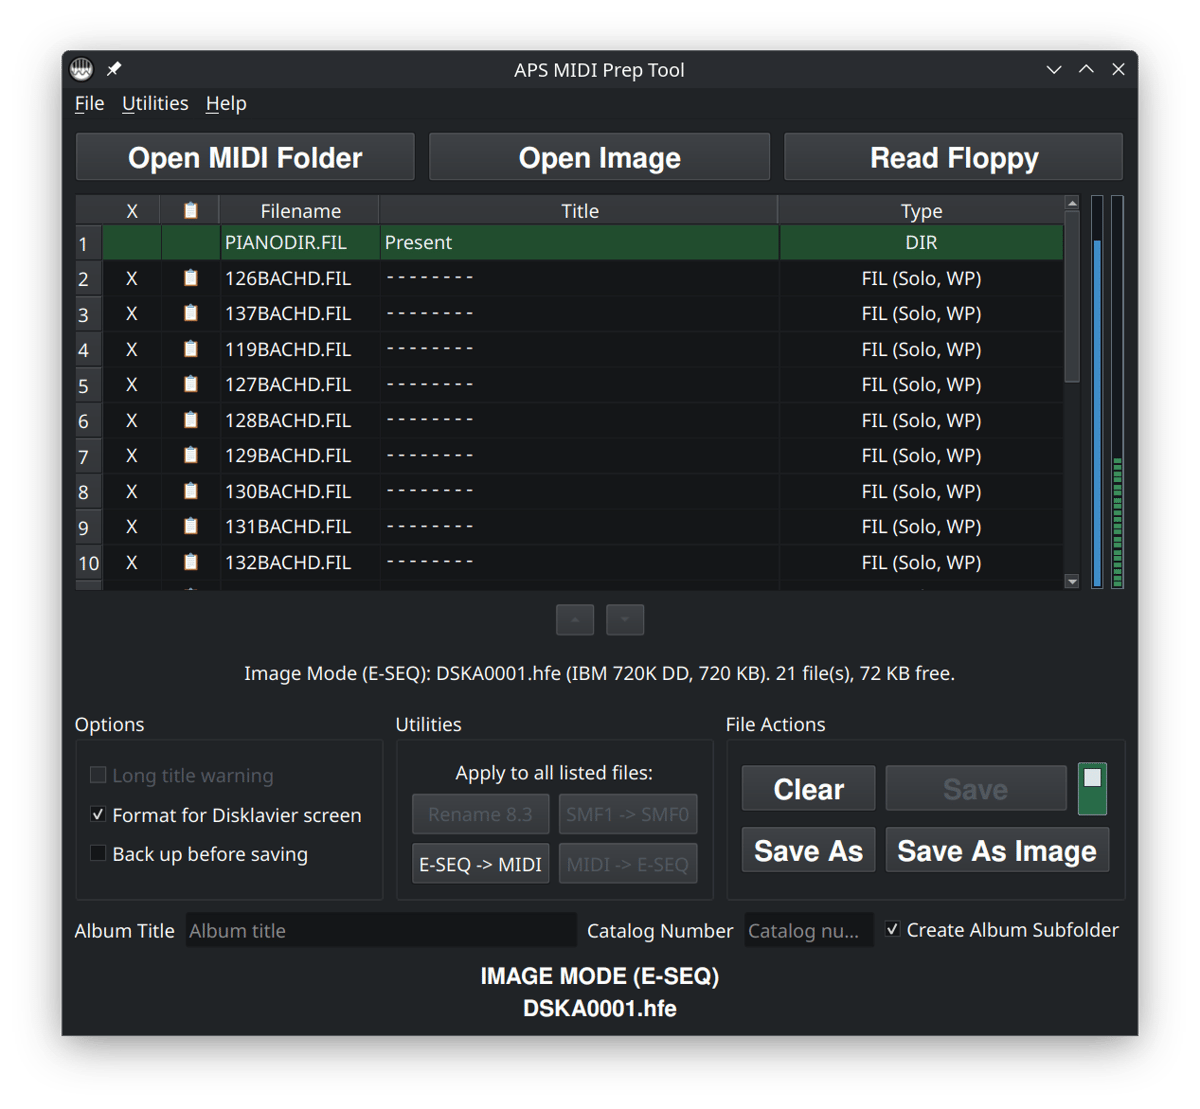
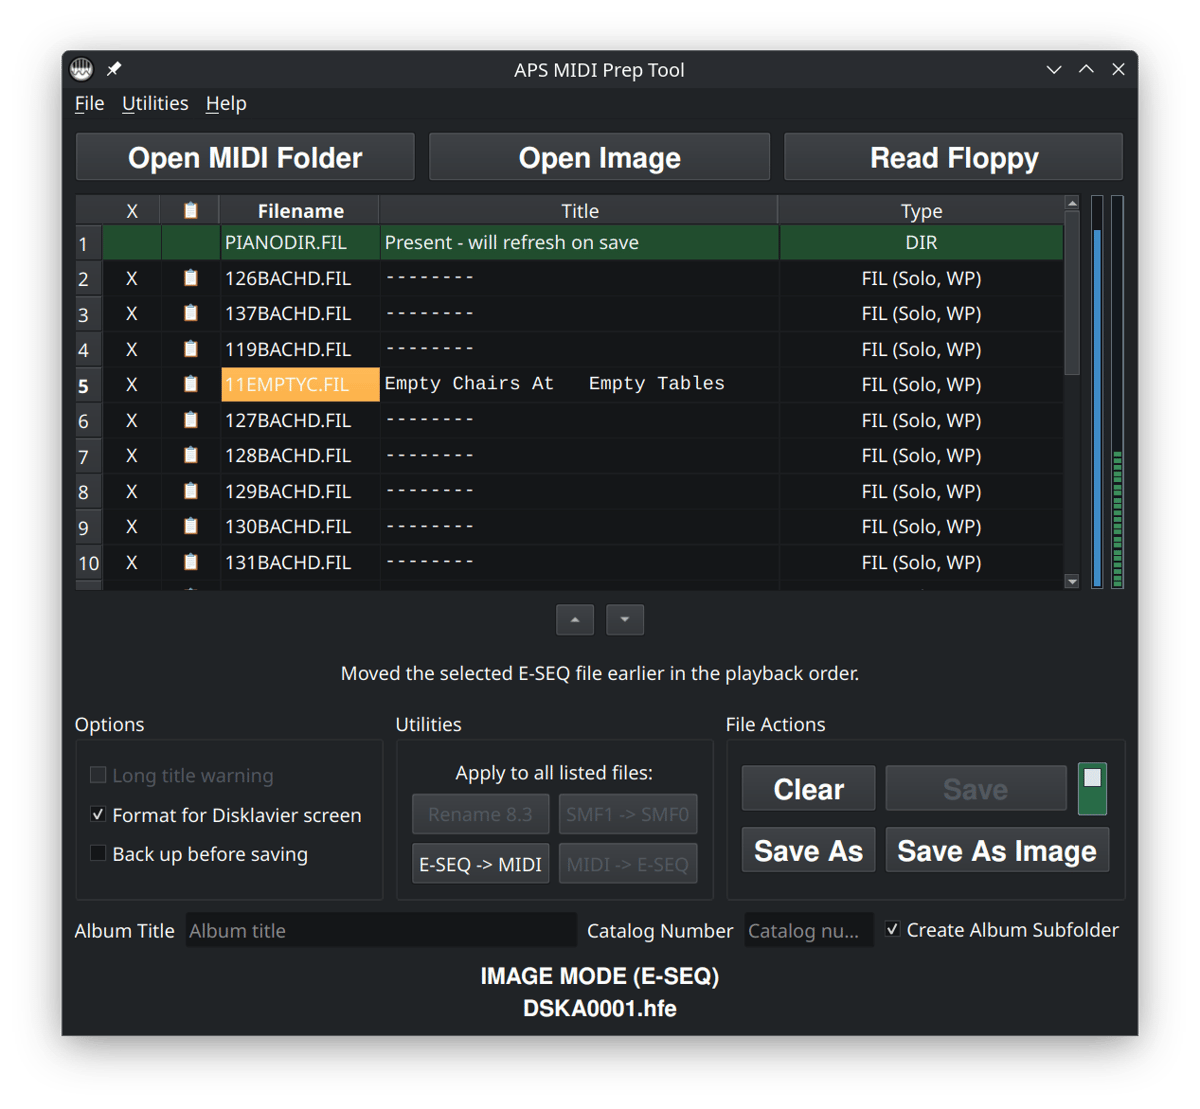
After the image loads, APS MIDI Prep Tool will show the files inside the virtual floppy. You may see MIDI files, E-SEQ files, and sometimes supporting files such as PIANODIR.FIL.
This is a good moment to make sure you opened the image you expected. Look at the filenames, the Title column, the Long warning column, and the Type column. If the image contains Yamaha E-SEQ files, the tool may also show album information or a PIANODIR.FIL status row.
Do not worry if the files inside the image have short names. Older floppy-based systems often expect short DOS-style filenames. A file named SONG001.MID may be more reliable than a long modern filename with spaces and punctuation.
Step 3: Add files to the Nalbantov image
Once the image is open, drag the files you want to add into the APS MIDI Prep Tool window. The tool will queue the files to be added to the image.
You can add one file or several files at once. The tool will check whether the files fit in the floppy image and will assign DOS-compatible filenames when needed. If a filename is too long, the tool may shorten it so it can live inside the floppy image.
Adding a file is not final until you save. At this stage, APS MIDI Prep Tool is preparing a pending change. The original HFE file is not changed just because you dragged a song into the window.
APS MIDI Prep Tool will automatically convert files to the appropriate format. If you’re in IMAGE MODE (E-SEQ), then any MIDI files you add will automatically be converted to E-SEQ. The opposite is also true: If you’re using IMAGE MODE (MIDI), any E-SEQ files will automatically be converted to MIDI when added.
If the tool skips a file, the image may not have enough free space, the filename may conflict with another file, or the file may not be appropriate for the current image. Try adding fewer files, shortening names, or starting with a blank image that has more room.
Step 4: Remove files from the Nalbantov image
To remove a file, click the X at the left side of that file’s row. APS MIDI Prep Tool will ask you to confirm the removal.
If the file was already inside the image, clicking X queues it for removal. It disappears from the list, but the original image is not changed until you save.
If the file was a new file you had just dragged in, clicking X simply cancels that pending addition.
Important: Removing a file in Image Mode is different from removing a row in ordinary MIDI Mode. In ordinary MIDI Mode, the X removes the file from the list. In Image Mode, the X can queue the file to be deleted from the image when you save.
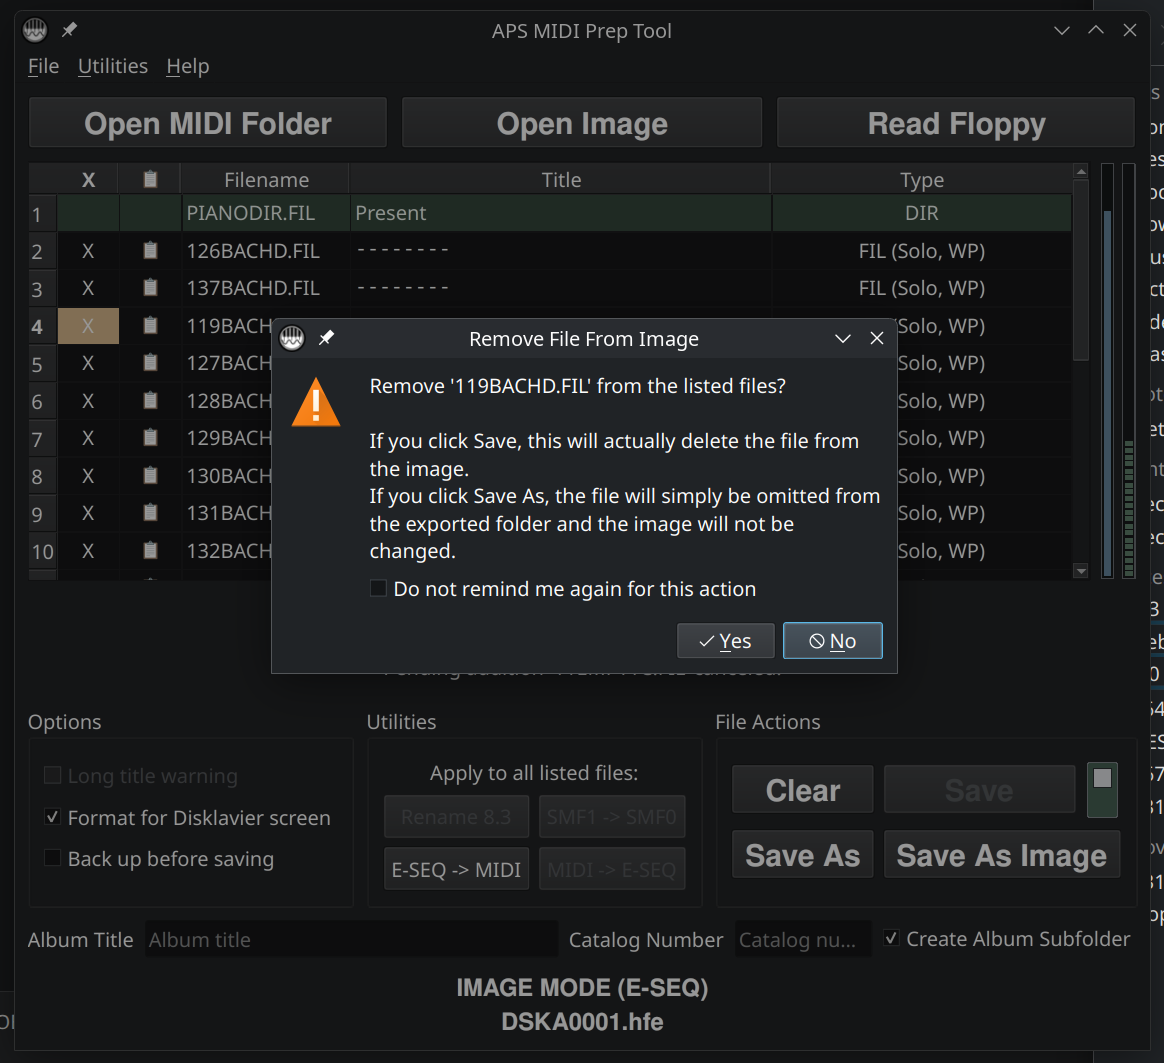
X to queue a file for removal from the image. The deletion is not actually written until you save the image.Step 5: Edit filenames and titles if needed
After adding or removing files, check the filenames and titles before saving. Older Disklavier and floppy-emulator workflows are usually happiest with short filenames, plain characters, and simple titles.
In Image Mode, you can usually double-click a filename to rename the file inside the image. The tool will enforce legacy DOS filename rules, such as an eight-character name and a three-character extension.
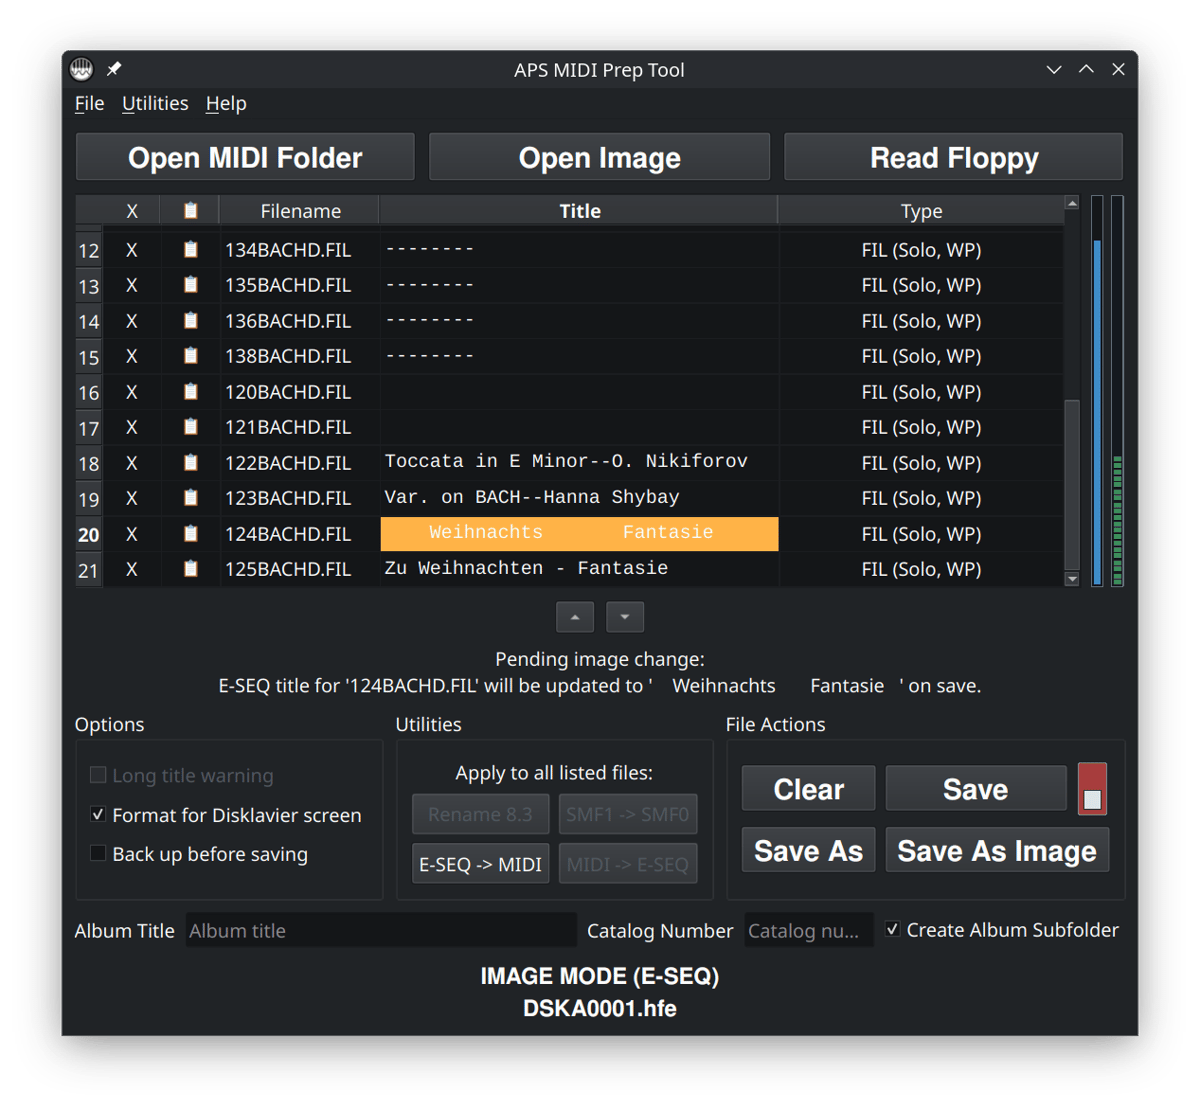
You can also click the Title column to edit the internal MIDI or E-SEQ title metadata. This is useful when the piano displays a confusing song name, a blank title, or a title that is too long for the screen.
If you are working with E-SEQ files, pay attention to PIANODIR.FIL. APS MIDI Prep Tool may offer to generate or refresh it on save. This file helps some Yamaha systems understand the song list and ordering on E-SEQ disks.

If you need titles to stay short, leave Long title warning checked. If you are preparing titles for an older Disklavier display, you may also want to use Format for Disklavier screen.
Step 6: Save the updated image
When the file list looks right, decide how you want to save the result. If you want to Save, you will have to click the toggle to the right of the save button.
- Use Save if you intentionally want to write changes back to the original image. Depending on your settings, you may need to enable the write/overwrite control before APS MIDI Prep Tool will modify the original image.
- Use Save As Image if you want to create a new updated Nalbantov image file.
- Use Save As if you want to export the files to a normal folder. This is useful for extraction, but it is not usually the right choice when your goal is to make a new Nalbantov HFE file.
For most Nalbantov workflows, I recommend Save As Image. Save the edited image with a clear name, test it, and only then replace the original file on the USB stick.
Save As Image creates an updated virtual floppy image. If you want to save back to the original image, press the Save button. In order to press this button, you’ll have to flip the write-protect toggle to the right of the Save button. When red, you’ll be able to click on the Save button and update the original image, in place, on your Nalbantov USB stick.Step 7: Copy the updated image back to the Nalbantov USB stick
After saving the updated image, copy it back to the Nalbantov USB stick. Keep the naming convention your Nalbantov expects.
If you have a Nalbantov eXtreme or another emulator with a display that shows names, you may be able to use more descriptive image names. If you have a Nalbantov Slim or another device with a numeric display, use the same naming style already present on the USB stick, such as DSKA0001.hfe, DSKA0002.hfe, or similar.
Do not delete your original image until you have tested the edited one on the actual piano. Confirm that the piano can select the virtual disk, see the files, play the songs, and display the titles in a useful way.
Common problems
The program opened the image, but I do not see the files I expected
First, make sure you opened the correct HFE file. A Nalbantov USB stick may contain many virtual floppy images, and it is easy to edit the wrong one.
If the image is blank, damaged, or not formatted in a way the tool can read, there may be little or nothing to display. In that case, start from a known-good blank image or from an image you already know works on the piano.
I dragged files in, but they were not added
Make sure the Nalbantov image is already open before dragging in the songs. If you drag an HFE file into an empty window, the tool will open that image. If you drag MIDI or E-SEQ files into an image that is already open, the tool will try to add them to that image.
If files are skipped, the image may be full, the filenames may conflict, or the files may not be suitable for the current image. Try adding fewer files, renaming them more simply, or using a fresh blank image with more free space.
I clicked X, but the file is still on my USB stick
Clicking X queues the removal. You still need to save the changed image. Use Save As Image to create a new edited HFE file, or use Save only if you intentionally want to overwrite the original image.
Also make sure you copied the updated HFE file back to the Nalbantov USB stick. Editing a copy on your computer does not automatically update the file on the USB stick.
I used Save As, but the Nalbantov does not see the result
Save As exports files to a normal folder. That can be useful if you want to extract songs, but it does not necessarily create a new Nalbantov-ready HFE image. If you want a virtual floppy file for the USB stick, use Save As Image. If you want to save the changes right to the original image on your Nalbantov USB stick, flip the write-protect toggle to the red position and click Save.
The piano does not see the updated image
Check the filename on the Nalbantov USB stick. Some Nalbantov models expect a numbered naming pattern, and the piano may not find the image if the name does not match what the emulator expects.
Also check the USB stick itself. Nalbantov and other floppy emulators can be particular about USB formatting. If the USB stick is not being recognized at all, see my related guide on FAT32 and superfloppy formatting for Nalbantov and older keyboard systems: Fixing Keyboard, Disklavier, & Nalbantov USB Issues.
The songs play, but the names look wrong on the piano
That may be a title metadata issue rather than a filename issue. Reopen the image, edit the Title column, and save a new image. For E-SEQ disks, also pay attention to PIANODIR.FIL, since some Yamaha systems use it for the displayed song list.
I see PIANODIR.FIL and I am not sure what to do with it
PIANODIR.FIL is a Yamaha song-directory file used by E-SEQ disks. In APS MIDI Prep Tool, it is usually best to let the tool manage it automatically. If the tool offers to generate or refresh PIANODIR.FIL when saving, that is usually the right choice for an E-SEQ image.


