I’ve had a couple of people reach out over the years looking for the bracket that supports the Yamaha DKC-850, otherwise known as the “hanger assembly.” The part number for this is, according to Yamaha, WT79210. Unfortunately, it’s been discontinued. However, you can use the hanger assembly for the Yamaha DKC-800, which is a perfect fit for the DKC-850.
The part number for this hanger assembly is ZE383601, and it’s readily available.
I was working on a Roland KR-370 that had been through a lightning strike, and I was looking for the BIN file to program onto a replacement EPROM (IC2). I did eventually find one, posted by a very helpful individual in the Badcaps forum.
Yamaha’s earlier floppy disks use the propriety ESEQ format. They also use a primitive form of copy protection, where the first sectors of the disks are missing. This means computers identify the disks as corrupt, requiring you to use specialized software to back up your Disklavier disks. In place of these sectors, Yamaha uses the PIANODIR.FIL file, which serves both as a file table and a song index.
Once you download DKVUTILS.ZIP from my site or theirs, you’ll need to extract it. The program that converts MIDI files to ESEQ files is MID2ESEQ.EXE. This program runs only on Windows, and does not seem to run with emulators. Reach out to me and I can assist with conversion.
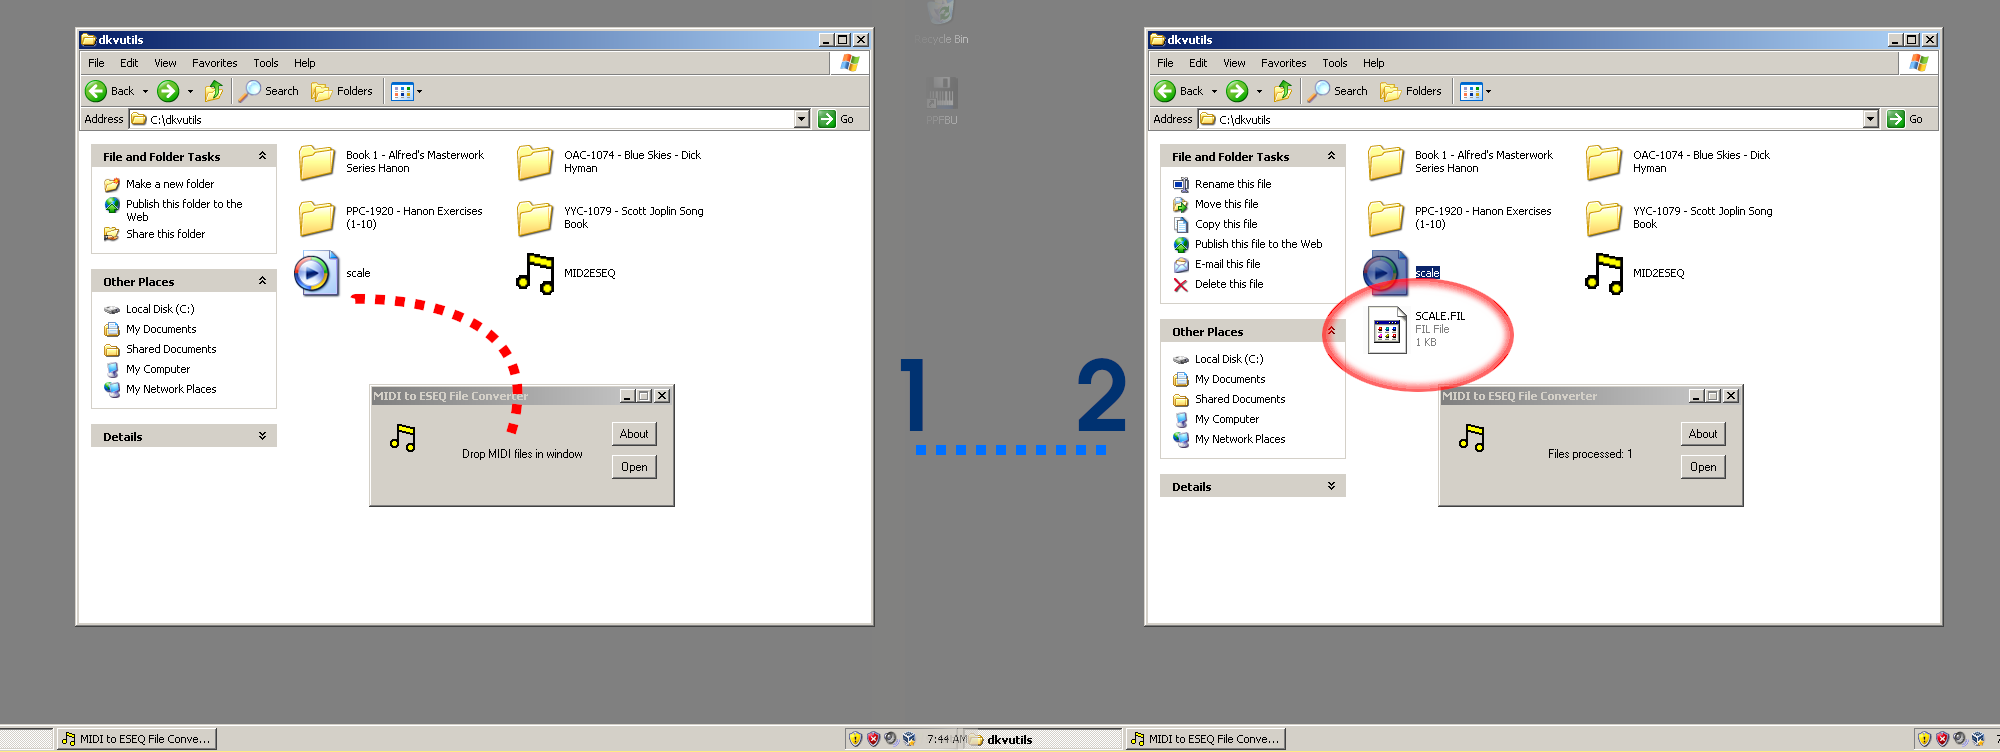
Using MID2ESEQ, just drag and drop MIDI files into the window.
If you are creating a floppy disk for use with an earlier ESEQ only Disklavier, or if you’re preparing ESEQ files for transfer to a Nalbantov USB stick, you might have to create your own PIANODIR.FIL.
Note: Please note that the filenames should be strictly eight characters long, have no spaces, and be entirely uppercase, including the FIL extension BEFORE following the process below. If you don’t do this, some pianos will be unable to read the files.
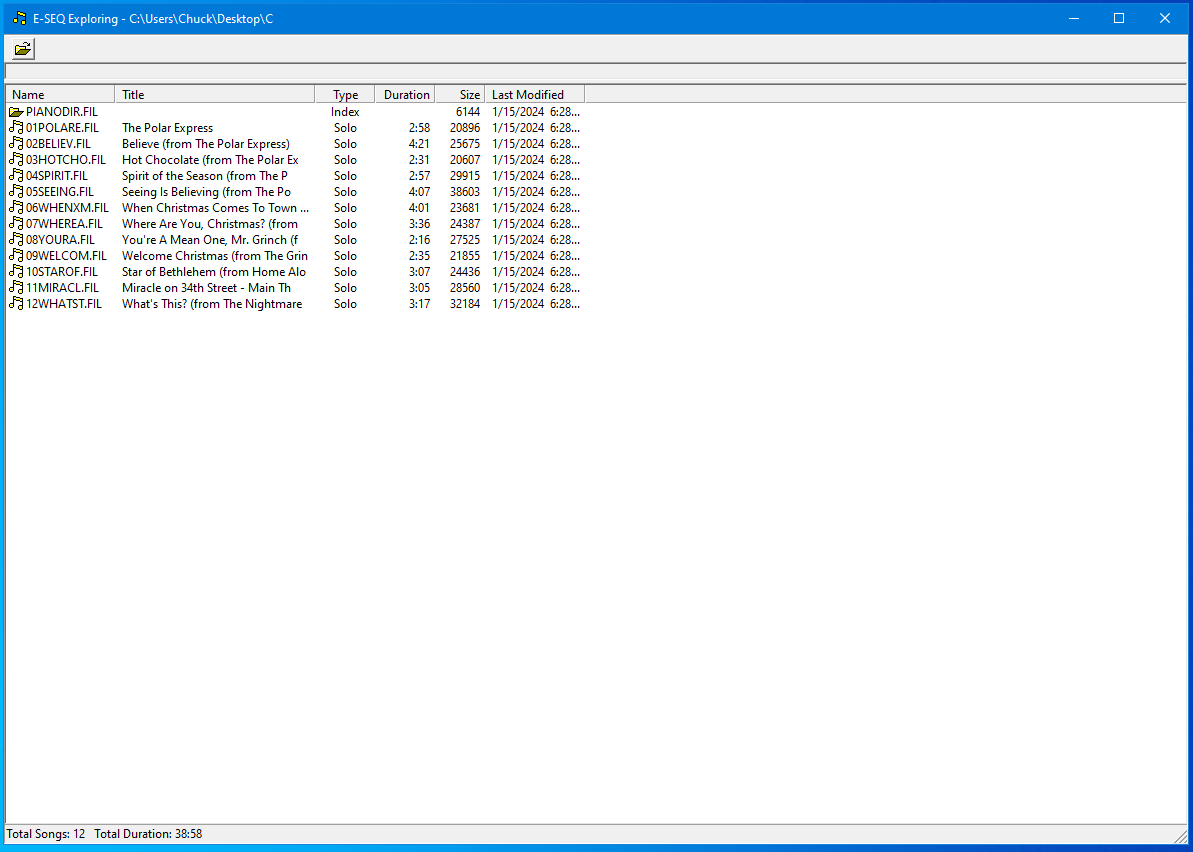
First, put all the ESEQ files you’ve created in a folder together. The DKVUTILS suite includes a program called ESEQ Explorer. Once you open the program, select the directory you’ve stored your ESEQ files in. You’ll see a screen like the one below:
Note that, if you don’t currently have a PIANODIR.FIL, there will be a red X in front of it. That means it’s not present. Right-click on it and select Create Index. The contents of that folder are now ready to be added to a disk using the Nalbantov tools.
I’ve also quoted the text file from the DKVUTILS.ZIP tool below, since they’re informative:
Yamaha Disklavier discs are always on Double Density (2DD) media, High Density (HD)discs, which are more common nowadays, will not work. Furthermore, they are formatted to 720 Kbytes not the default of 1.2 Mbytes. The original discs are copy protected. This has been achieved by placing invalid data on the first sector. As DOS and Windows always refer to this sector to check out a floppy, they will report that the discs are bad. The Yamaha machinery ignores the first sector so it reads them normally.
The music files on a Disklavier disc have the extension .FIL . They are frequently identified with titles like PIANO001.FIL but sometimes they have names similar to DOS like MUSIC1.FIL. In addition to the music files, there is an index file on the disc. This contains a list of the active music files on the disc, their titles, and pointers to their position on the disc. The index file is always called PIANODIR.FIL and always has a size of 6 Kbytes. In order to set up a Disklavier disc to function on a Disklavier, you must first copy the music files onto it in Disklavier format (ESEQ) and then run the ESEQ EXPLORER program to build the index file.
While installing and using Nalbantov drives in grand Disklaviers, I’ve run into a recurring problem. The full-size USB sticks protrude too far, and are easily damaged by pianists and passerby.
I recently had a client request I replace the stock GH3 action in her Yamaha CVP-305 with a Yamaha Natural Wood action, and I had an opportunity to do some experimenting.
The Yamaha GH3 keyboard action can be replaced with the NW-GH3 action, the GH3X action, or the NWX action. All four of the actions below seem to be interchangeable, with the features as listed:
Plastic
Wood
No Escapement
GH3
NW-GH3
Escapement
GH3X
NWX
Her favorite action was the NW-GH3. Although there’s some subjectivity, we mutually agreed that the natural wood actions were lighter than the plastic equivalents (which is a bit counter-intuitive initially), and that the escapement added perceived weight.
In other words, we found that the NW-GH3 action was the lightest action, perceptibly, and the GH3X was the heaviest.
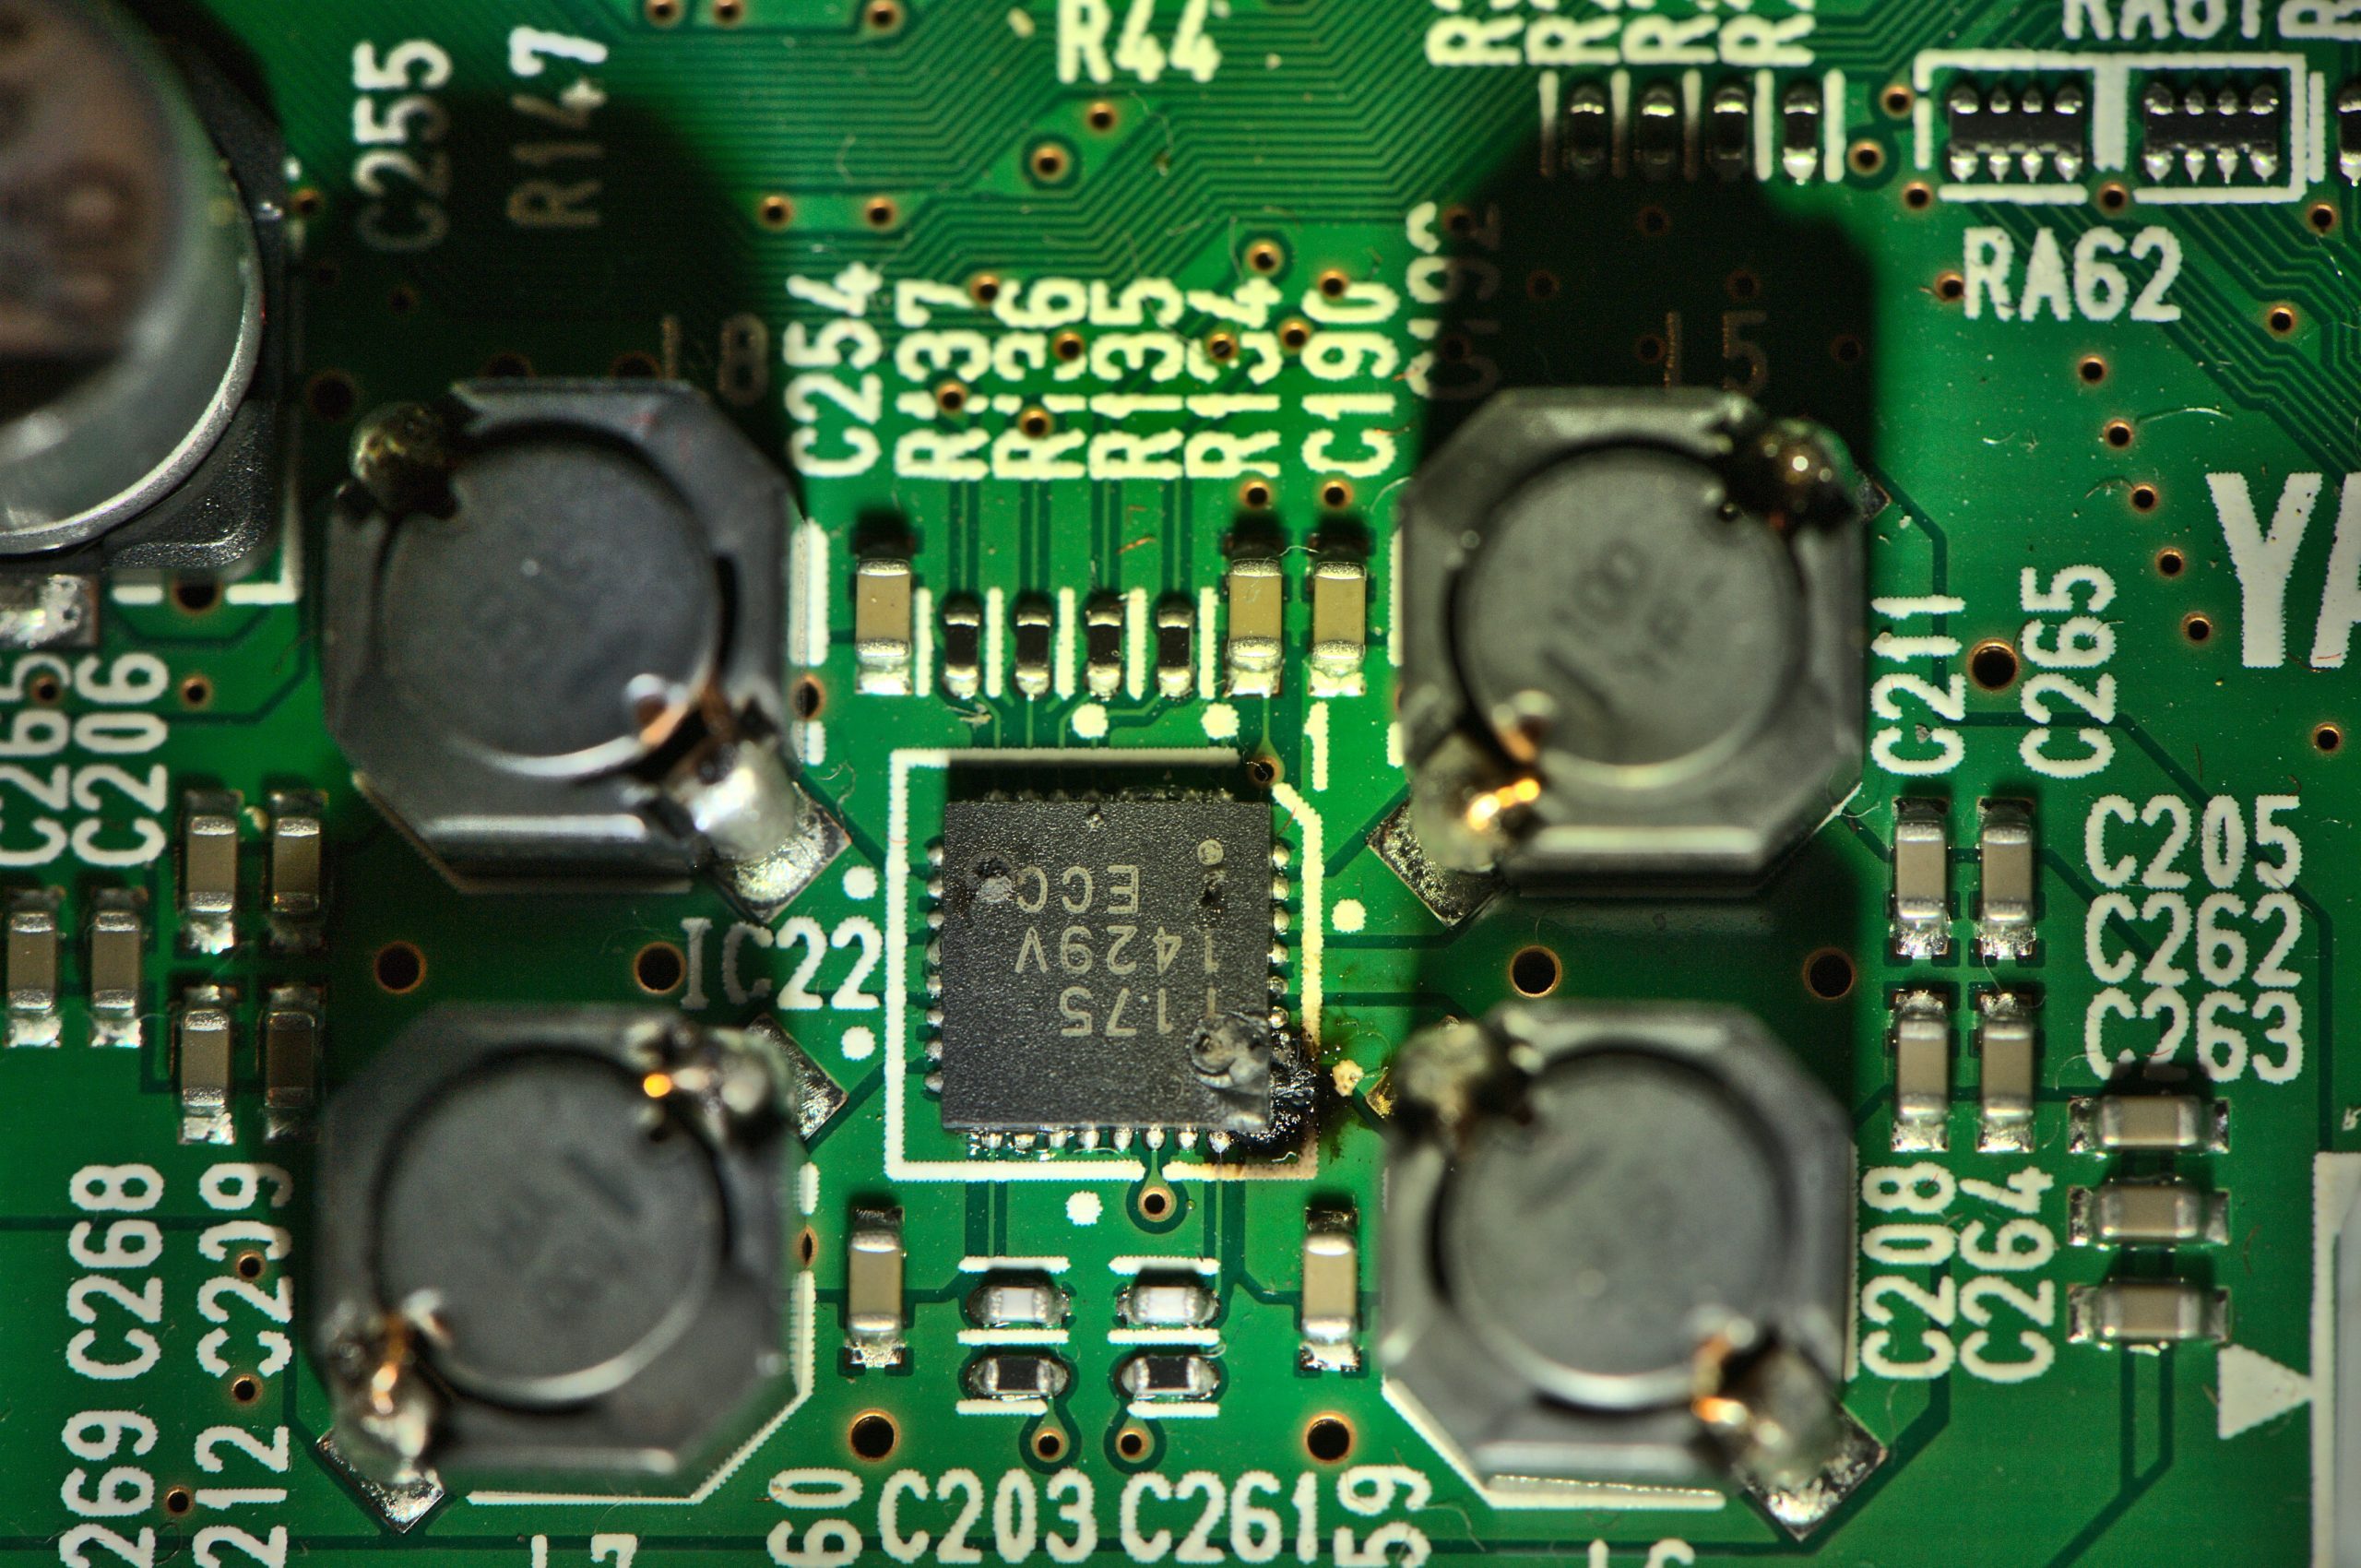
I recently had a customer report their P105 was producing no sound, although occasionally, it emitted a scratchy noise. Attached to this post is a picture of the burned out chip I found inside the unit. The solution was a replacement DM board (Yamaha #ZJ257000).
The Yamaha HQ100 is a so-called “gray-market” upright. A gray market piano is one that’s authentically manufactured by Yamaha, but is not intended for sale in a specific geographic region or country. Instead, it’s sold as “gray market” — a market that exists outside of the official distribution channels and is not authorized by the manufacturer. In this case, the HQ100 is the Japanese version of the Yamaha MX100II, with a few small modifications.
Like all Yamaha Disklavier uprights, Dampp-Chasers cannot be installed inside the cabinet. There isn’t any room. Instead, a backside system is installed between the support posts behind the piano. The back is then ensconced in a light fabric to keep the humidity-controlled air inside.
However, the HQ100 has one significant oddity: There are only two support posts. The double bucket system usually installed just doesn’t fit. So in this case, after communicating with Dampp-Chaser, I opted to install a full-size bucket on the rear of the system. A thin layer of foam or neoprene needs to be pasted to the sound-board side of the bucket, and a full-size baffle needs to be installed, but otherwise the system is installed like a typical back-side system. The dehumidifier brackets did require some bending to get them to fit properly.
For the Velcro, I used two feet of two inch wide Velcro, with the male side backed with a strip of neoprene. The picture is below:
As a professional piano tuner, I’ve had the privilege for several years of working at some the most beautiful music venues. Cadenza is nestled right in the heart of Freeport at 5 Depot St, and this venue attracts music lovers who come to enjoy live performances and the beauty of its Yamaha C7 grand piano.
From classical concerts to jazz nights, the musicians who grace its stage are some of the most talented and passionate. The piano itself is a magnificent instrument, and has been a centerpiece of the venue for many years. They take wonderful care of it. I have spent many hours tuning and caring for this beautiful instrument, and it’s well-loved by the performers who play on it.
Whether you are a music lover or simply appreciate the finer things in life, this venue and its piano are not to be missed. I highly recommend taking the time to visit and experience the magic of live music and the beauty of this magnificent instrument.
I’ve recently started recommending customers with worn-out floppy disk drives upgrade them to so-called “Floppy Disk Emulators.” There are a couple of these on the market, but it looks like the easiest to use and most reliable is the Nalbantov USB Floppy Disk Emulator. I use these regularly in Yamaha Disklaviers, but they can also be installed in keyboards. I install these quite regularly. If you do order from Nalbantov directly, make sure to use the AlexPiano for a 5% discount on orders from Nalbantov.
Why Upgrade?
There are several reasons why you might want to replace an old floppy disk drive with a USB floppy disk emulator, including:
Increased reliability: USB floppy disk emulators are more reliable than traditional floppy disk drives, as they have no moving parts and are less susceptible to mechanical failure. Most customers reach out to me after their floppy disk drive has failed.
Compatibility: USB floppy disk emulators are compatible with modern computers, which may not have floppy disk drives built-in or may no longer support floppy disks.
Speed: USB floppy disk emulators transfer data faster than traditional floppy disk drives, making it easier and quicker to transfer large amounts of data.
Convenience: USB floppy disk emulators can be easily connected and disconnected, making it easier to transfer data between different computers or to store data.
Cost-effectiveness: USB floppy disk emulators are often more cost-effective than purchasing a new floppy disk drive or repairing an old one.
I’ve found some floppy disk drives now cost more than the replacement USB emulators, especially if they’ve had minimal use. And hardly anybody knows how to actually repair a floppy drive—that’s a nearly lost art.
Operation
After the Nalbantov is installed, you can use a single USB stick to represent up to 1000 floppy disks. Because it’s a floppy disk emulator, the Disklavier actually believes you’re inserting a different floppy disk. As you switch between virtual “disks” by pressing the arrows, you’ll see the display on the Disklavier behave as though you’ve inserted a new disk. Of course, if you have more than 1000 floppy disks, you can invest in another USB stick, although I haven’t run into this particular situation yet!
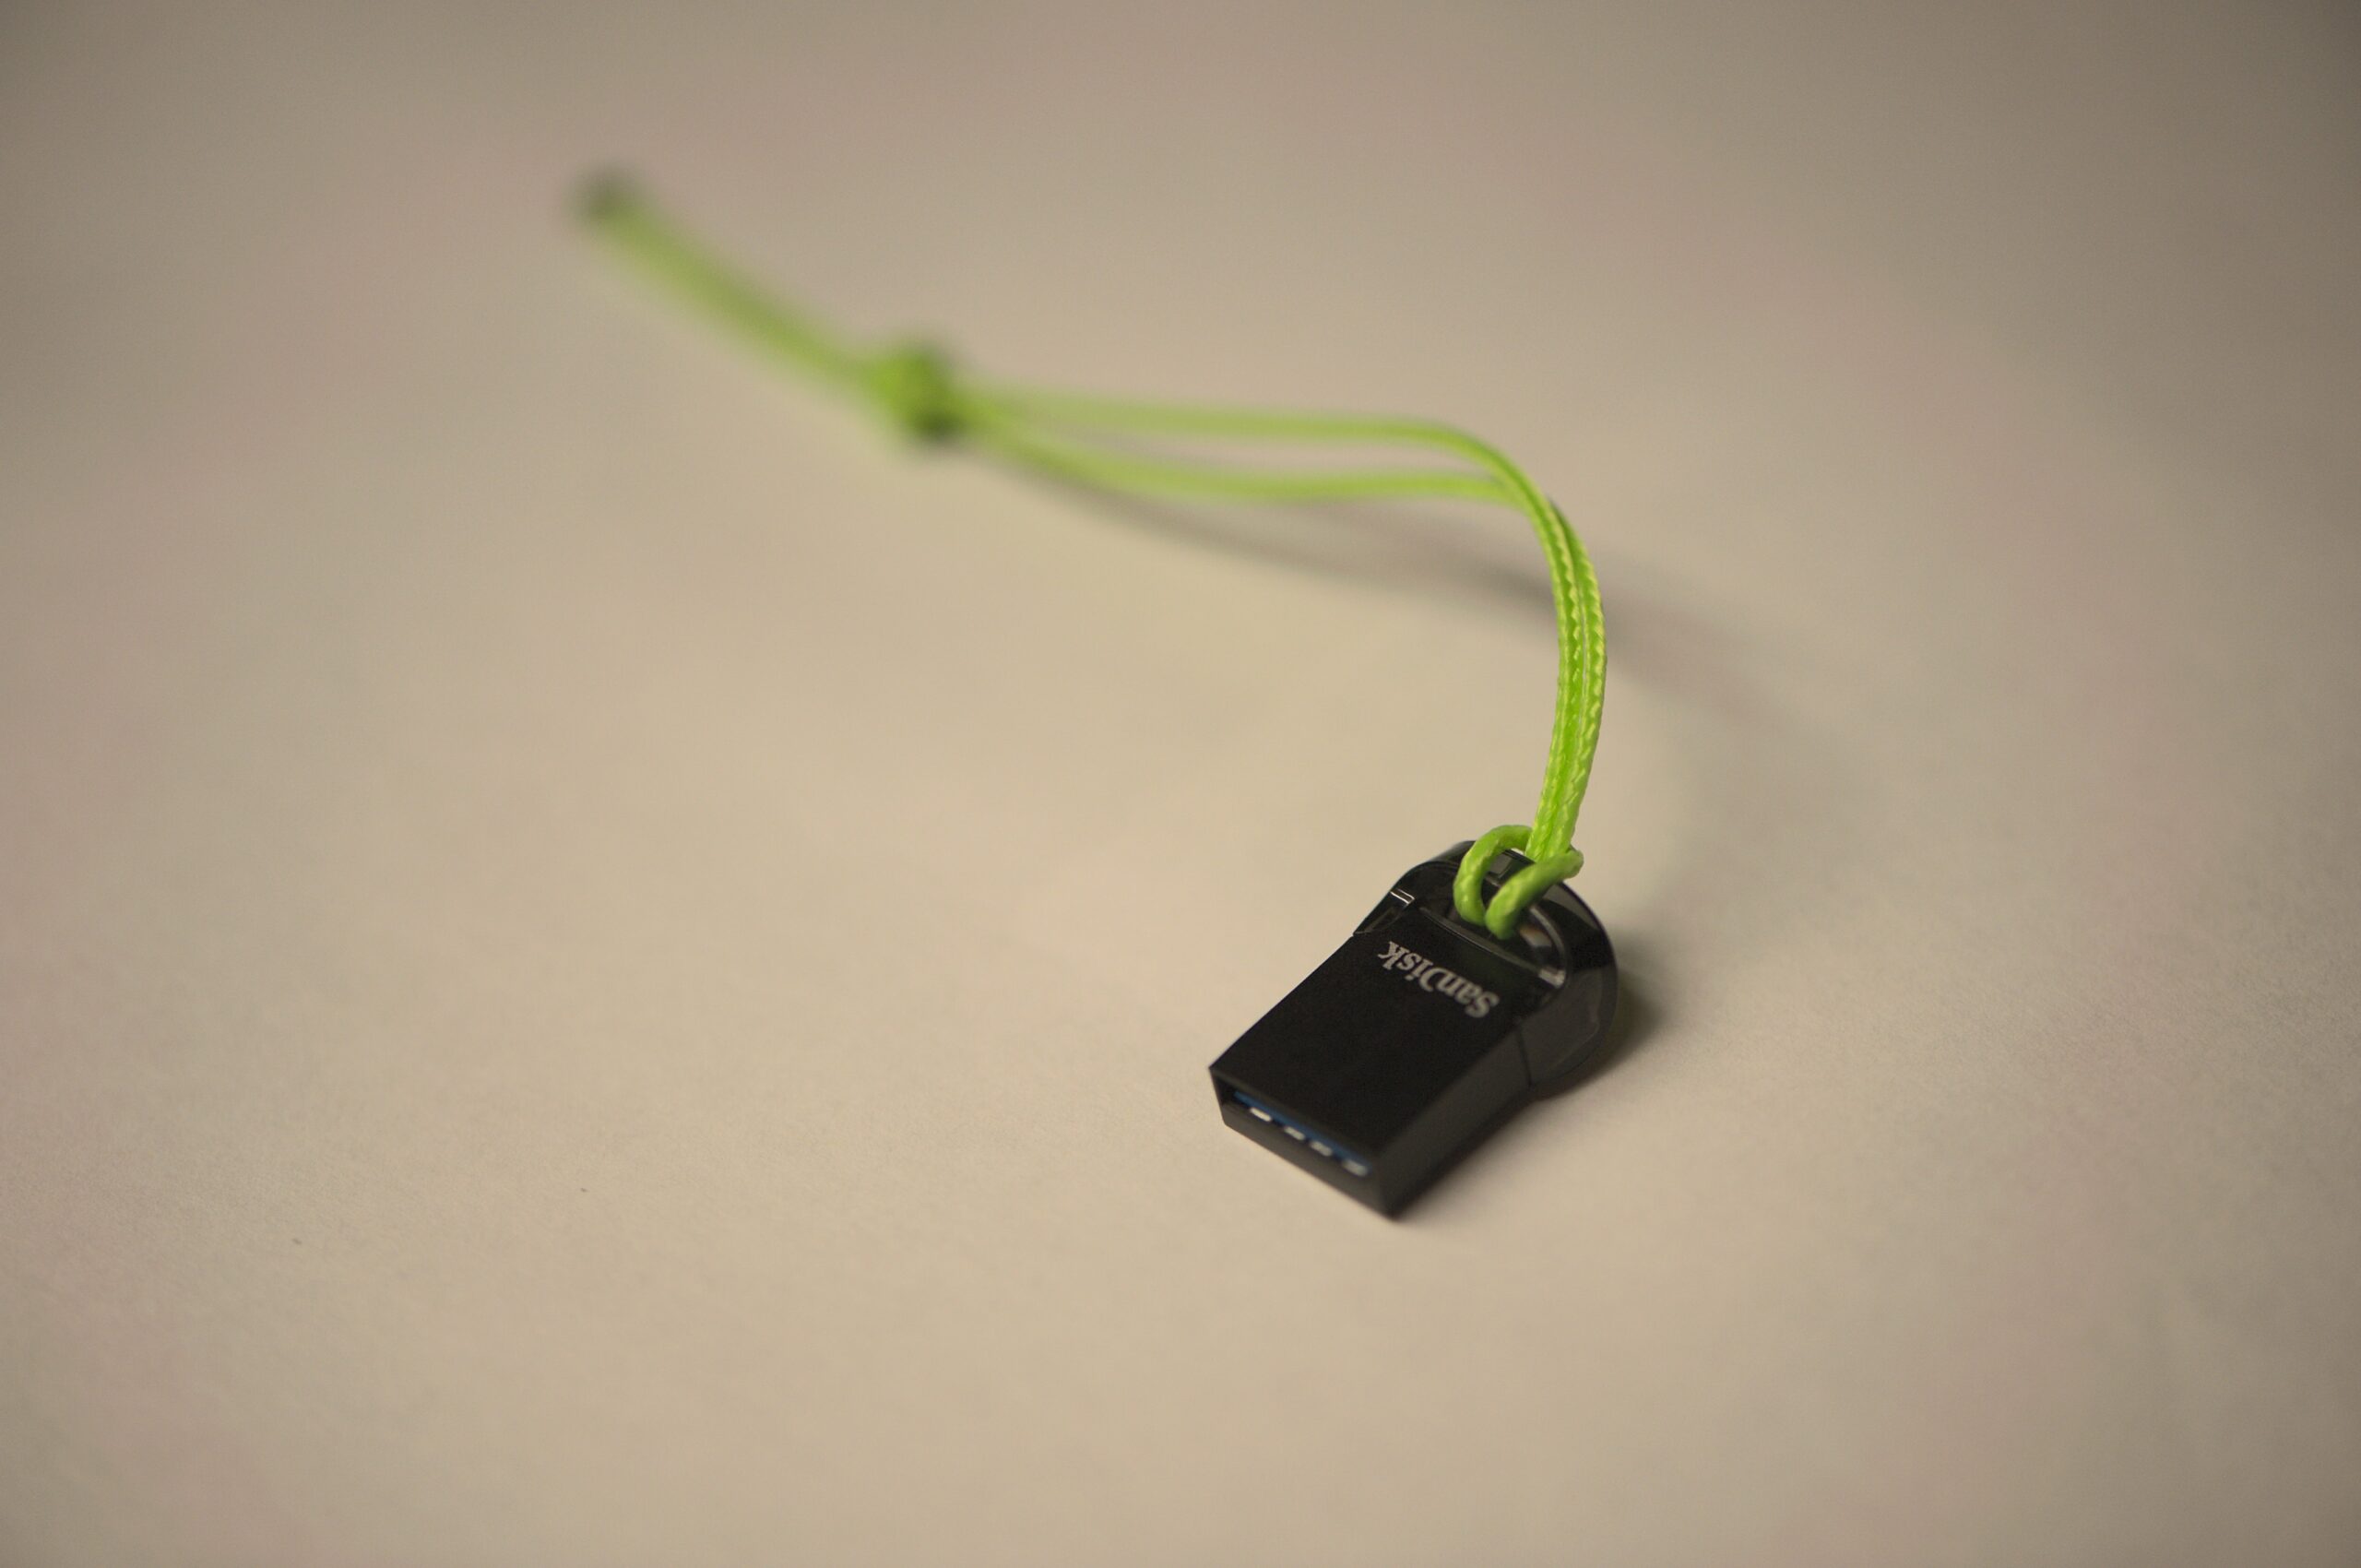
The USB stick that comes with the Nalbantov is a standard, full-size USB stick. This protrudes rather far, and I’ve now run into multiple circumstances where the drive has been damaged by an incautious pianist. See my post on the Best USB Stick for Nalbantovs. Hint: It’s the SanDisk Ultra Fit.
Installation
Some customers opt to install the Nalbantov unit themselves. Depending on the design, this is quite doable, although I don’t recommend attempting it with most Yamaha MX100II Disklaviers (see below). It is a very easy installation on, for instance, the DKC5R and the DKC500RW, just to pick a couple.
With some generations of Disklavier (most notably some MX100II uprights), the floppy disk drives are mounted behind a shaped plastic piece. In these cases, you’ll need to cut away the old plastic facing (a pair of flush-cut nippers is helpful here), install the new drive, and put some kind of buffer around it. I’ve experimented with a few different choices for something functional and attractive. Purchasing neoprene strips is a cheap solution.
New solution: There is also a drop-in replacement bezel and floppy drive mount available for purchase, which were made by another Nalbantov client. These are much prettier and easier to use, but come with a price tag.
My solution/old solution: I have a 3D model in STL format of a floppy bezel that’s sized to fit around a Nalbantov. You can 3D print this yourself, or I can mail you one. I adhere it to the replacement Nalbantov with a bit of hot glue, and then slide the whole assembly in. However, you’ll need to improvise a way to actually mount the floppy drive. I use mounting assemblies from old Yamaha slim floppy drives, but these appear to now be discontinued.
For backing up your current Disklavier floppy disks to a format that can be stored on your USB stick, see my article on Backing up Disklavier Floppy Disks. They can then be moved onto a virtual “disk” with Nalbantov’s proprietary tool.
One or more keys play at full volume even though I’m hardly pressing them!
Keyboards use very sensitive contacts to determine how fast you’re pressing the key (or the velocity). A keyboard with dirty contacts (such as the one pictured below) will misjudge velocity, and will cause the key to play at incorrect or, often, persistently loud volume. In the case of the picture below, that wood chip would cause a perpetually quiet key—if it moved to the depression directly above it, then it would cause a perpetually loud key. Cleaning is sometimes an effective option.
They can also simply wear out. If you play your keyboard for hours a day, the rubber itself will eventually degrade, as will the graphite pads on the button. In that case, they’ll need to be completely replaced, which is typically possible for keyboards that are less than ten years old, but becomes progressively more difficult with age. Replacement is usually the best option.
In desperate times, if contacts just aren’t available, you can swap contact strips from the ends of the keyboards to replace keys you play more typically. There are products like Oak Tree Vintage’s Key Contact Repair Kit, but I view these as an absolute last resort. Direct rubber contact strip repair is a desperate measure.
Here are some typical keyboard contacts from a Yamaha Clavinova. There appears to be some kind of wood shaving in one of the contacts (toward the center of the image). This will cause misfiring.
One or more keys don’t play at all.
A common cause of silent keys are bad or damaged rubber key contacts. See above. They should be cleaned or replaced.
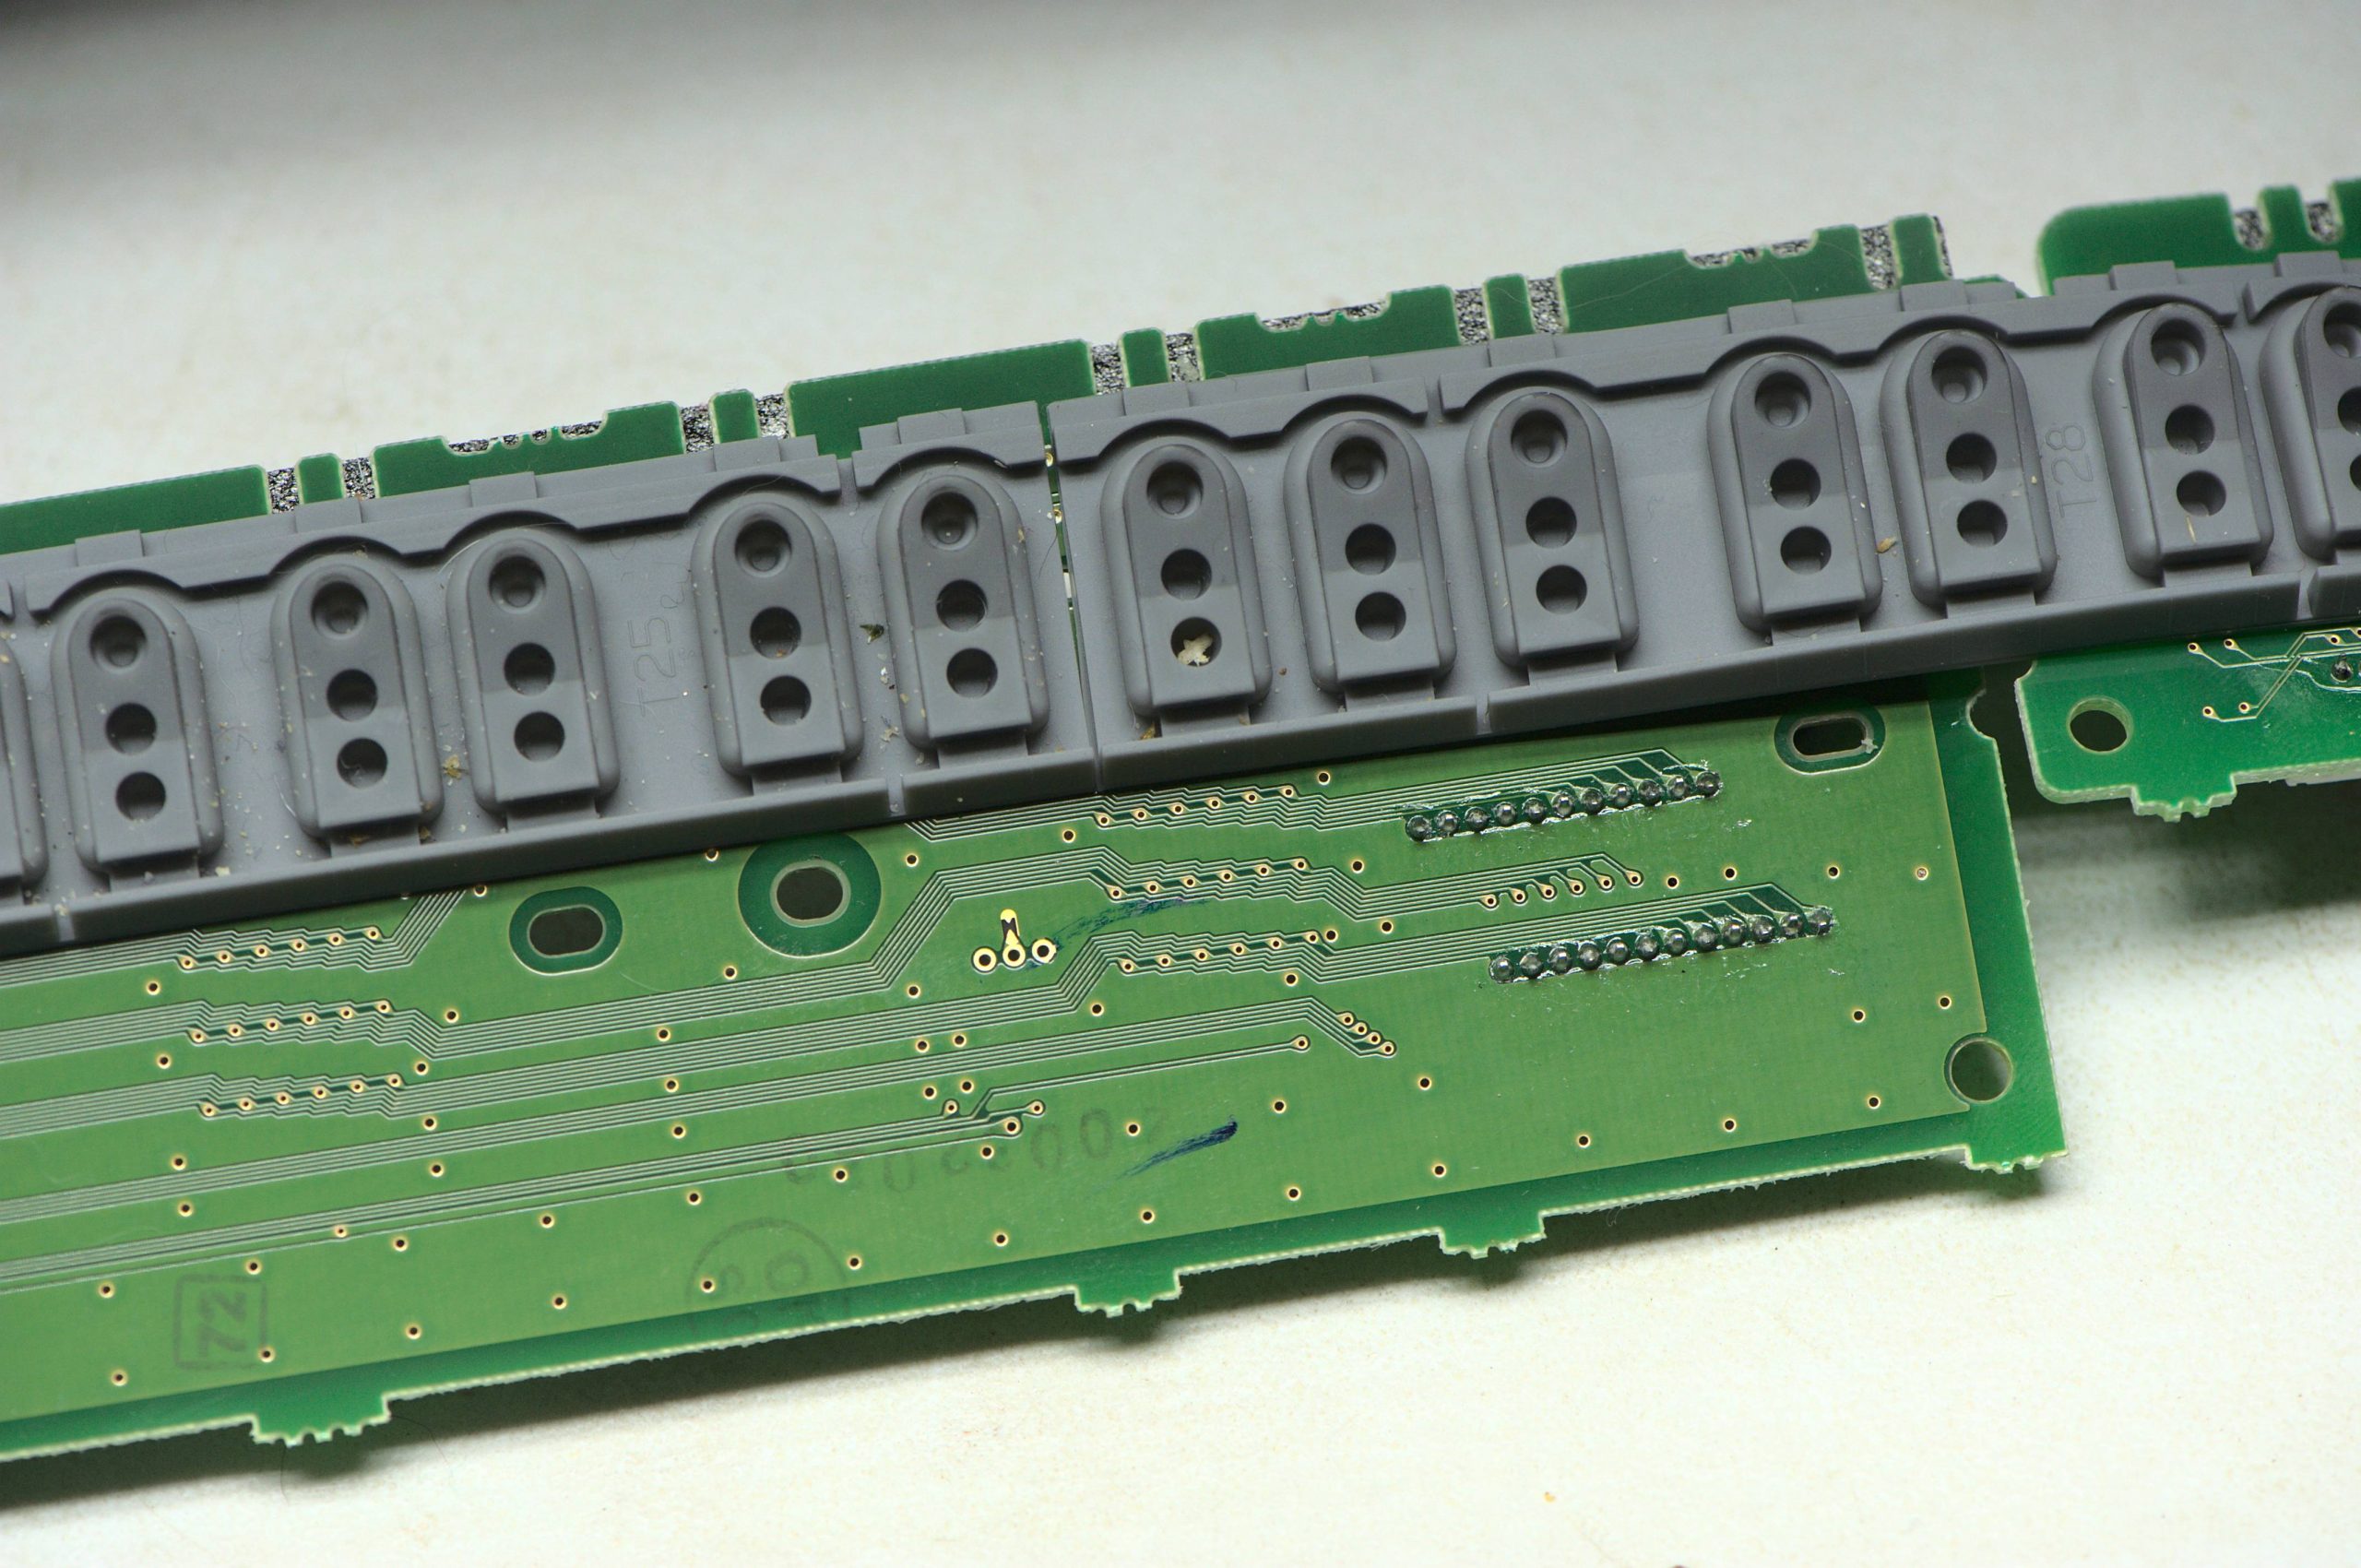
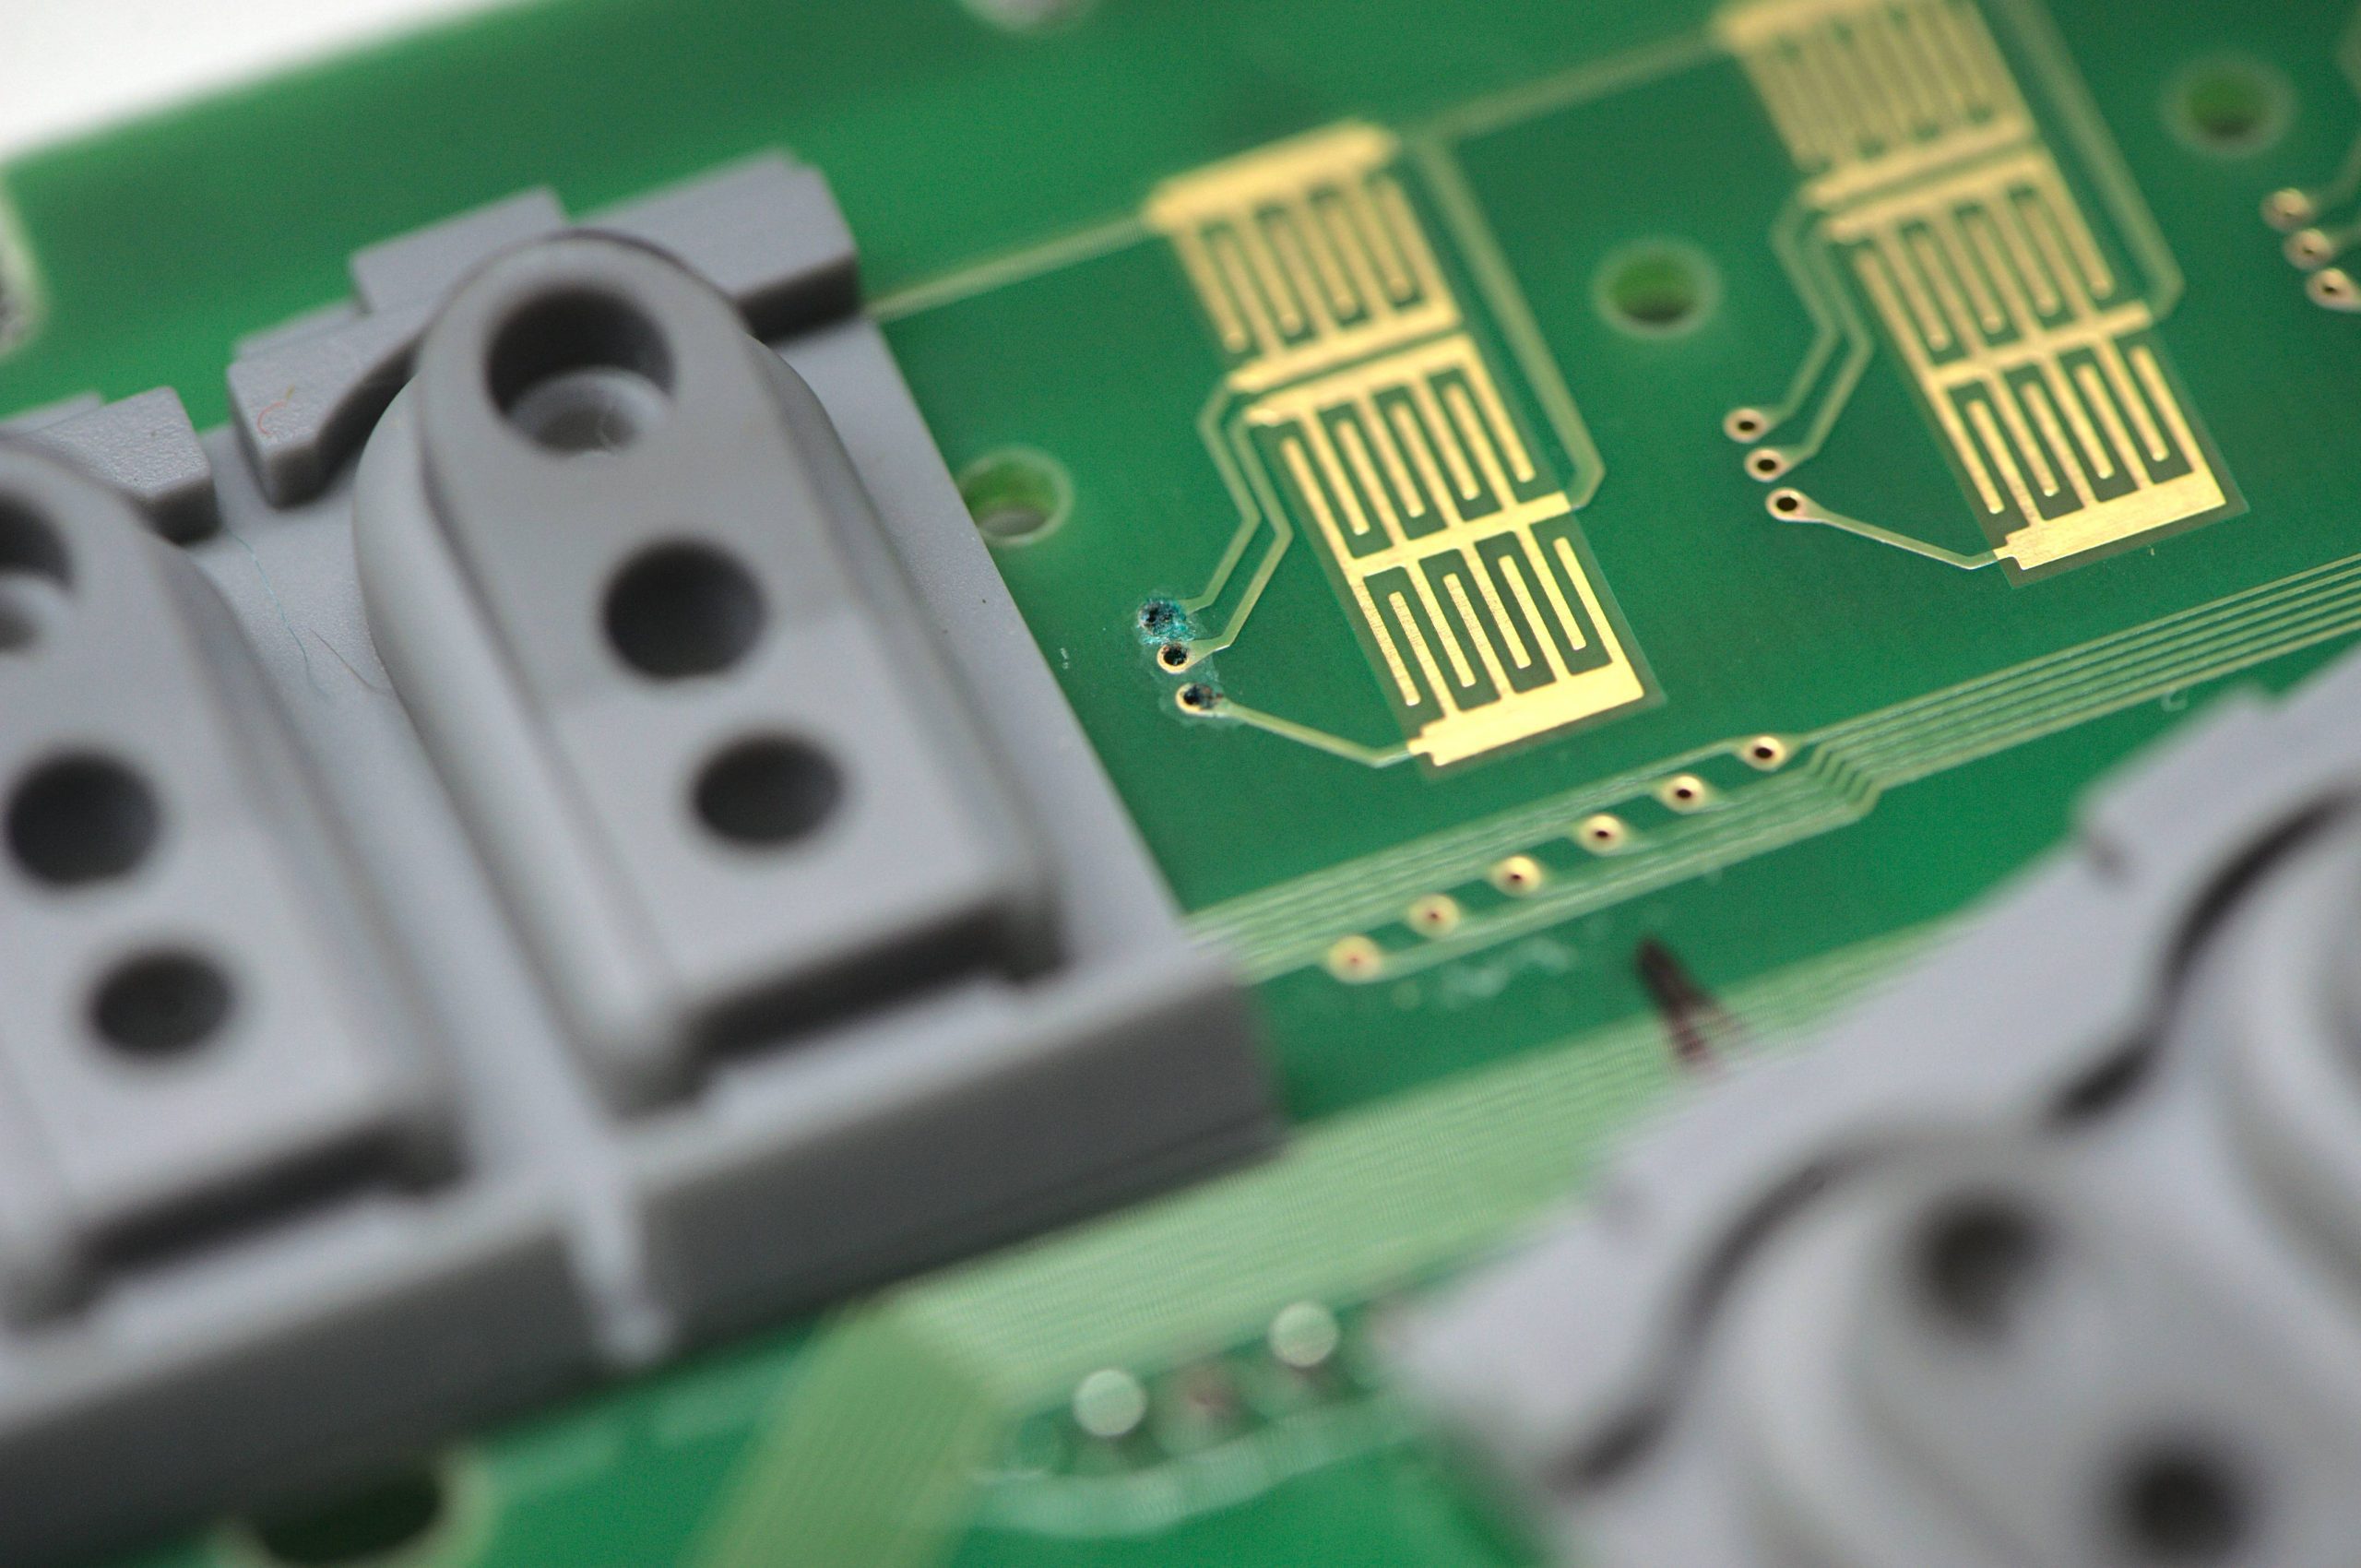
Another common cause of silent keys is a damaged or corroded key contact printed circuit board (PCB). These PCBs are, for late-model keyboards, typically available—particularly for Yamaha and Roland. They can also sometimes be repaired: In the case of the image below, some cleanup and a wire jumper fixed the problem.
If there’s sufficient corrosion on the contact circuit board, it will need replacement. In this case, I was able to add a wire jumper to bring life back to this particular board, and then coat the area to prevent further corrosion.
My keyboard doesn’t turn on!
There are many common reasons for this. The most common, in order, are damaged power cords or adapters, a blown fuse, a damaged power inlet (see below), or a damaged power switch. It can also be a sign of an electronics failure somewhere else in the keyboard.
Start by replacing the cord. That’s something fairly inexpensive you can do yourself. Try to find a direct manufacturer replacement. If you require any assistance in this, you can contact me, or you can reach out to a local piano store. In the case of a power cord with an adapter, both the voltage and the polarity have to be correct.
Somebody broke off the power inlet on the back of the keyboard.
This is a common problem. Nearly every pedal inlet for nearly every keyboard is available. I replace them regularly, particularly in schools where the cord might get forcefully pushed or pulled! Depending on the way that it was broken, there might be some collateral damage. For instance, a Roland I repaired recently had the fuse assembly ripped off when the power inlet, acting as a battering ram, scraped the electronics off the rest of the inlet circuit board. However, there’s nothing particularly complicated on there, and their story ends happily!
I’ve got a Yamaha Clavinova and some keys are sticking.
This is a very common issue in Yamaha Clavinovas from the early 2000s. Unfortunately, the tails of the keys would crack, resulting in sluggish behavior. Then they would fully break, causing a sticking key. More than once, I’ve gotten a call after a rowdy child will walk up to the keyboard and spontaneously break a dozen or so keys—it’s not their fault. These keys can be replaced.
I typically don’t recommend doing them one-by-one unless you’re going to be replacing them yourself. It’s much better to replace the entire keyboard assembly or to replace all the keys. This is an expensive repair, but it’s much less expensive than a brand new Clavinova, and if the rest of the electronics are in good shape, it’s worth considering.
I’ve got a Roland RD-xxx and one or more keys are staying down. They seem loose.
Roland RD keyboards from the 2000s and earlier used plastic hammers that crack and break. Unfortunately, Roland no longer manufactures these hammers. If you have such a keyboard, you’re at the mercy of used parts dealers and eBay. I maintain a small stockpile for customers, but this condition is usually terminal.
This is a very distressing situation for me, so if you have any further information that might assist in fabricating these or are aware of a stockpile of these, please contact me. Currently, single replacements sell up to $100 on eBay.
Cracking Roland hammers. All of these are splitting, both horizontally and vertically, around the encased lead weight. They are, unfortunately, irreplaceable.
I’ve got a Yamaha, and it makes a clacking sound when I let go of or hit a key.
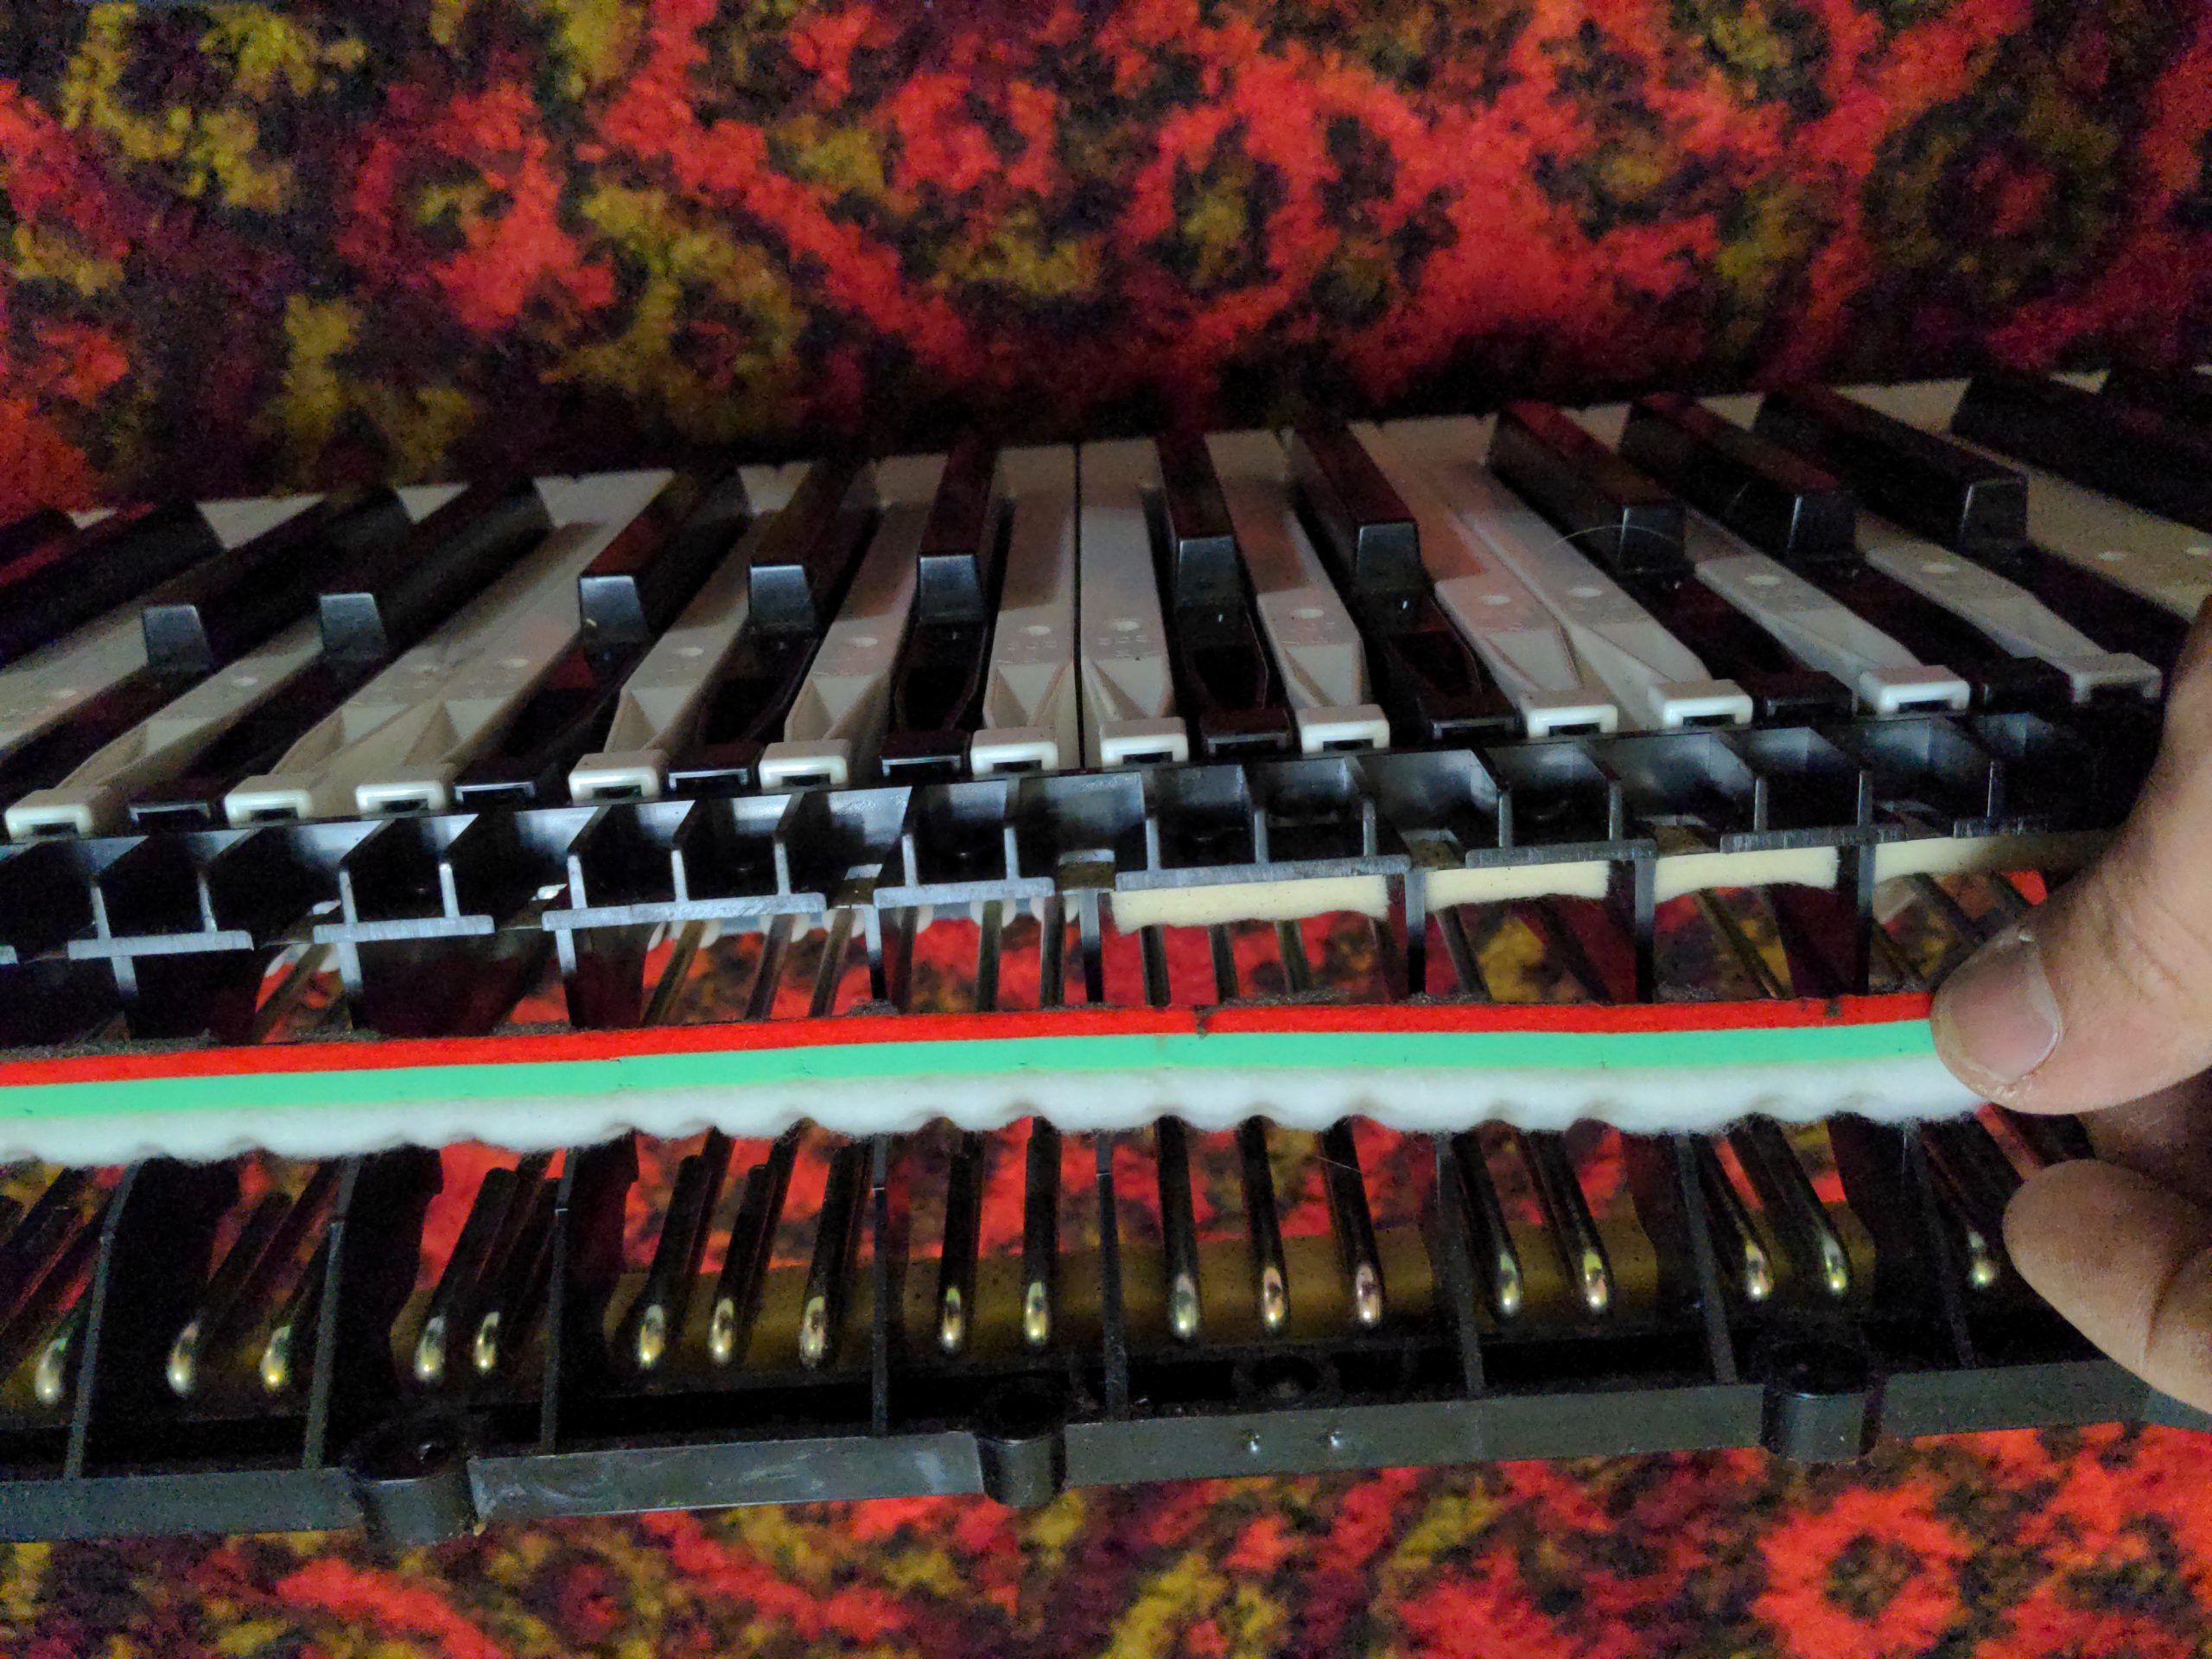
Yamaha Clavinovas and portable keyboards have a strike felt and a rest felt. In nearly all cases, rest felts will wear out within a decade. This causes keys will make a clacking sound when released. With heavier use, strike felts can also wear out. Both felts are relatively easy to replace. Both lead to a noisy keyboard.
This is a worn out hammer strike felt on a Yamaha Clavinova. (It had, in fact, already peeled off when I opened the keyboard and was resting on the hammers.) The keyboard rest felt is toward the bottom of the keyboard assembly. It’s the piece the metal hammers are resting on.