If your keyboard isn’t working, and you’re considering having it repaired by a service center, you might want to try a factory reset first. I’ve had quite a few customers come in with apparently mute keyboards that, in fact, just needed a factory reset.
Your Yamaha might have issues with a setting that got accidentally changed that you can no longer find. It might also have corrupt memory: This might be from being powered off suddenly—unplugged at an inopportune moment—or even from a static shock. A factory reset can clear that corrupted memory and restore normal function.
Yamaha uses a handful of repeatable patterns—either a menu-driven reset from the screen or a power‑on key hold. Below I’ve grouped the most common procedures.
Always back up user data first, since these resets will clear stored settings and saved files.
Hold the highest (rightmost) white key while powering on
This applies to most digital pianos and keyboards in the Clavinova/CLP/CVP/YDP series, portable P series, Piaggero/NP series, PSR/YPT series, and reface/CS/CP/YC/DX series.
If a Yamaha Clavinova or portable keyboard isn’t producing any sound, or has any other unexplained misbehavior, I follow this procedure first. This is the most common way to perform a factory reset on Yamaha Clavinovas and portable keyboards, according to Yamaha’s public FAQs. Note that it does not work on all of their instruments, but it does work on many.
With power off, hold the rightmost white key (often the highest C, depending on model) while turning the instrument on. This initializes “backup” settings (and on many models, general defaults) but typically does not delete computer‑transferred songs/styles unless stated.
Yamaha P-Series factory reset
Applies to most Yamaha P-series portable digital pianos (examples: P-45, P-125/P-125a, P-225/P-223, P-515/P-525, etc.).
Method A: Power-on reset (highest key/rightmost white key)
- Turn the instrument OFF.
- Press and hold the highest key on the keyboard (the rightmost white key).
- While holding the key, turn the power ON.
- Wait for initialization to begin/complete, then release the key.
Do not cut power during initialization. If your model has a screen or status lights, wait until it finishes before turning it off again.
Method B: Menu-based Factory Reset (models with System/Utility menus)
Some higher-end P-series instruments include an on-board menu option that can be labeled Factory Reset, Factory Set, or similar. If your P-series has a display and a Menu/Utility/System area, check for a reset command there.
If a menu reset exists on your model, it may be more comprehensive than the “highest key at power-on” method. Back up user content first whenever possible.
Yamaha CLP-Series factory reset
Applies to Yamaha Clavinova CLP digital pianos (CLP-xxx). Many CLP models support both a menu-based reset and a power-on (highest key) reset.
Method A: Menu-based Factory Set / Factory Reset (models with System Menu)
- Open Menu (or System Menu, depending on model).
- Locate Backup (or a similar settings section).
- Select Factory Set / Factory Reset and choose Execute.
- Do not power off until the operation completes.
On many CLP models, this primarily resets backed-up/system settings. Depending on the model and reset type, user songs may be preserved. Always confirm for your exact model in the manual.
Method B: Power-on reset (rightmost white key)
- Turn the instrument OFF.
- Press and hold the rightmost white key (often the top C on 88-key models).
- While holding the key, turn the power ON.
- Wait for initialization to complete, then release.
The rightmost-key method is common, but not universal. If your CLP has a screen, check for an on-screen message confirming initialization. If nothing happens, stop and consult your model’s manual.
Yamaha CVP-Series factory reset
Applies to: Yamaha Clavinova CVP digital pianos (arranger-style Clavinovas). CVP models typically offer both a power-on reset and a menu-based Factory Reset/Backup area with more options.
Method A: Menu reset (Factory Reset/Backup menu)
If your CVP has an on-screen menu system, look for a section labeled Utility or System, then Factory Reset/Backup (wording varies). This approach is typically best because it may allow more granular resets (settings-only vs. user memory content).
Method B: Power-on reset (rightmost white key)
- Turn the instrument OFF.
- Press and hold the rightmost white key (often the top C on 88-key models).
- While holding the key, turn the power ON.
- Wait until the reset completes, then release.
On CVP instruments, menu-based reset options can be more comprehensive than the power-on method. If you have important custom registrations, user styles, MIDI songs, or audio files, back up first.
Other menu-based factory resets
The factory reset option is accessible through internal menus on many models. Names differ by family, but the idea is the same. These screens typically let you choose scope (system setup, user memory, files) and sometimes create backups first.
The steps below are sourced from Yamaha’s public FAQ pages, forums, and Google Groups. I’ve personally executed some of these, but not all. Please reach out if you have anything to add!
PSR‑SX / Genos / pro arrangers
MENU → Utility → Factory Reset/Backup.
PSR‑S670 and similar
FUNCTION → I → TAB to SYSTEM → RESET; check desired items and press [7]/[8] (FACTORY RESET EXECUTE). A power‑on reset (holding the highest white key while powering on) also exists for system setup.
PSR‑A5000
MENU → Utility → Factory Reset/Backup.
MONTAGE / MONTAGE M / MODX / MODX+
UTILITY → Settings → System → Initialize All Data.
CP88/73 (stage pianos)
MENU → Job → Factory Reset.
YC61/73/88 (stage keyboards)
MENU → Job → Factory Reset.
CK61/88 (stage keyboards)
MENU → Job → Factory Reset.
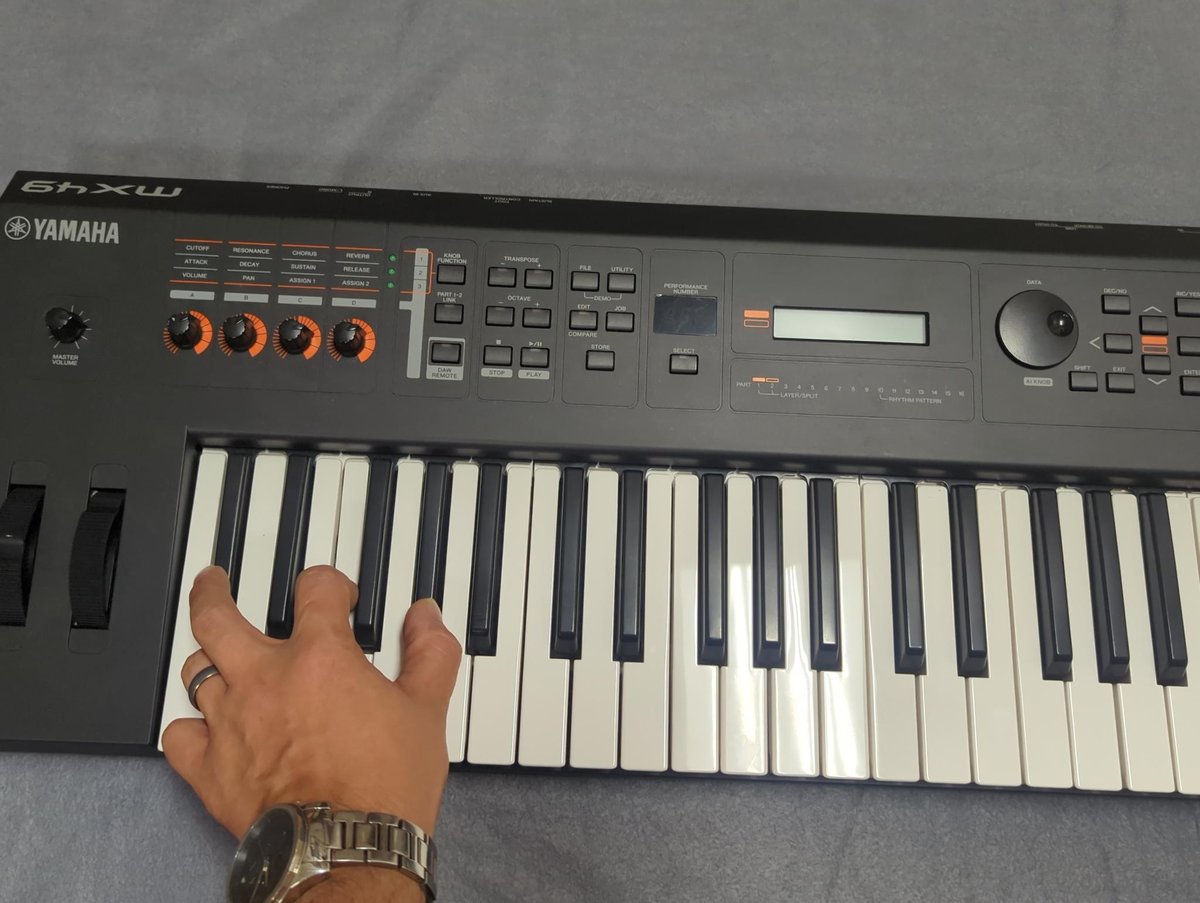
MX49/MX61/MX88
UTILITY → JOB → 02: FactrySet (as labeled)
SY55
With the power on, press and hold SELECT + EXIT + UTILITY to enter Test Mode. Press SELECT, then +1/YES to proceed. Use PAGE> until you see J31: Factory Set, then press ENTER, +1/YES to execute.
Power‑on + the highest white key plus the three highest black keys (“Flash Clear”)
This applies to most keyboards in the DGX/YPG series, PSR‑E/YPT series, and NP‑V series.
This is the common Yamaha method to clear files in flash—User Songs and Styles transferred from a computer or USB—in addition to resetting backup data. With the power off, hold the top white key and the top three black keys, then power on.
Power‑on + the highest white and highest black (“All Memory Clear”)
On some early 2000s portables (e.g., DGX‑202), Yamaha documented an All Memory Clear by holding the top white and the top black at power‑on (“All Mem CLr”). Holding only the top black cleared just loaded song data. Check the model’s manual for the exact labeling.
Test mode resets
Most Yamaha digital instruments have a Test Mode that’s accessible by pressing some combination of keys and buttons while powering on the instrument. You do not usually need to enter Test Mode to perform a factory reset.
However, in most of their instruments, you can run the factory reset this way if you need to. And in some older instruments, it might be the only option. If you need to use Test Mode, the only certain instructions will come from the service manual.
On some Yamaha keyboards, it’s accessed by pressing the C#, F, and G# two octaves below middle C, while powering on the instrument. How it’s accessed can vary considerably between instruments, and sometimes this information isn’t available to the public.
Use test mode at your own risk! Undocumented service functions can erase content without warning.

")

