I periodically receive requests from customers reporting that their keyboard or Nalbantov floppy disk emulator can’t read their USB stick. Usually, the issue is that the USB stick isn’t formatted correctly as a FAT32 device, or that it’s corrupt.
I’ve created this guide to explain how to format your USB sticks in a manner that’s readable to nearly all older keyboards and USB emulators.
Problem #1: The USB Stick isn’t Formatted FAT32
For your USB stick to work with either a Nalbantov USB emulator or an older keyboard, it must be formatted FAT32 or FAT16.
Modern operating systems often use exFAT by default instead of FAT32. Additionally, Windows computers allow you to format USB sticks in NTFS format, which also won’t work. FAT32, however, is readable in nearly all devices that are new enough to have USB ports.
On Windows, if you try to format a USB stick that’s larger than 32 GB using the native Windows software (through File Explorer), you won’t even be given the option to format it as a FAT32 device. Read about the solutions below.
Problem #2: The USB Stick is the Wrong Size
Not all USB sticks are equal. Different brands and sizes can behave quite differently.
Nalbantov officially recommends name-brand 64 GB USB sticks. In practice, quality and compatibility matter more than advertised speed alone. If you’re looking for a good USB stick, see my article on my preferred choice for USB sticks for Nalbantov USB emulators and other devices.
However, your USB stick might also be too large. Many older devices weren’t designed to work with USB sticks larger than 32 GB. If you have an older keyboard and are struggling to use your USB stick with it, consider switching to a smaller drive.
As a general rule, if you’re working with newer devices or a USB floppy disk emulator, you should use a 64 GB stick. If you’re working with an older keyboard or Disklavier, you should use a 32 GB stick.
Problem #3: The USB Stick Just Doesn’t Work
I’ve encountered multiple broken USB sticks on service calls. When using USB sticks with player pianos, they often stick out in front of the keyboard, which makes it easy to damage them. Inexpensive USB sticks are particularly susceptible to this. Verify that the USB sticks reads correctly in a computer with a working USB port.
How to Format Your USB Stick Properly
Back up anything you care about. These steps erase the stick completely. Double‑check the disk you select before hitting Enter.
Windows
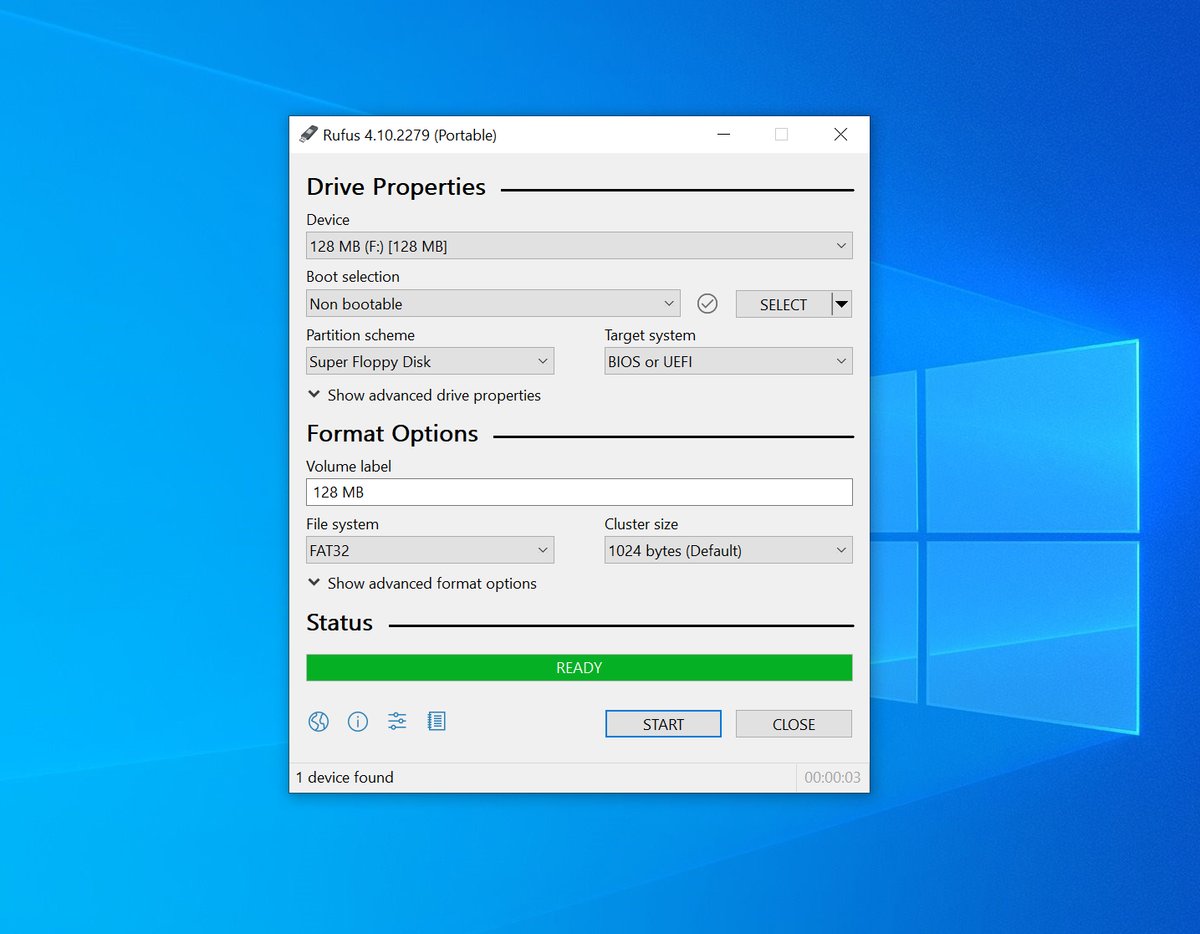
Rufus explicitly supports creating “Super Floppy Disk” layouts (no MBR/GPT) and formatting in FAT32, which is exactly what you want for devices that prefer a no-partition FAT volume.
Verify your settings using the image below:
- Device: pick your USB stick
- Boot selection: “Non-bootable”
- Partition scheme: choose Super Floppy Disk (no partition table)
- File system: FAT32
- Click Start → OK
This software is an excellent choice, as it will work with almost any USB stick.
macOS
Find the disk number: diskutil list
Unmount the whole device, then write a FAT32 file system directly to the disk (note: use rdiskN for speed):
diskutil unmountDisk /dev/diskN
sudo newfs_msdos -F 32 -v NALBANTOV /dev/rdiskN
Always carefully double-check the target disk before running these commands.
This creates a FAT32 superfloppy (no MBR/GPT). newfs_msdos is Apple’s FAT formatter and supports building FAT12/16/32 directly on a device.
Disk Utility can’t make a “no‑scheme” FAT volume; use the Terminal method above for true superfloppy.
Linux
Identify the device (not a partition): lsblk -p
Create FAT32 directly on the whole device with the “ignore partitions” switch: sudo mkfs.vfat -F 32 -I /dev/sdX
The -I flag tells mkfs.vfat to place the file system on the entire disk (superfloppy).

lsblk -p to verify the partition layout. This USB stick will not work as originally listed, as it has a partition (/dev/sdd1). After formatting, you can see that the disk now has no partitions, and is instead formatted as a superfloppy.Make certain you’re targeting the entire device (e.g., /dev/sdX), not a partition like /dev/sdX1.


