Alexander Peppe, Author at Alex's Piano Service - Page 3 of 3

Dampp-Chaser FAQs

Do Dampp-Chaser Piano Life Saver Systems help with tuning stability?

I always recommend maintaining stable humidity in the room the piano resides in, first and foremost. This is the best possible solution for the piano, although in Maine this can be challenging.

If controlling the humidity in the room is neither practical nor possible, then consider purchasing a Dampp-Chaser Piano Life Saver System. These systems can protect the most vulnerable parts of your piano and assist with tuning stability, even in unstable and extreme environments.

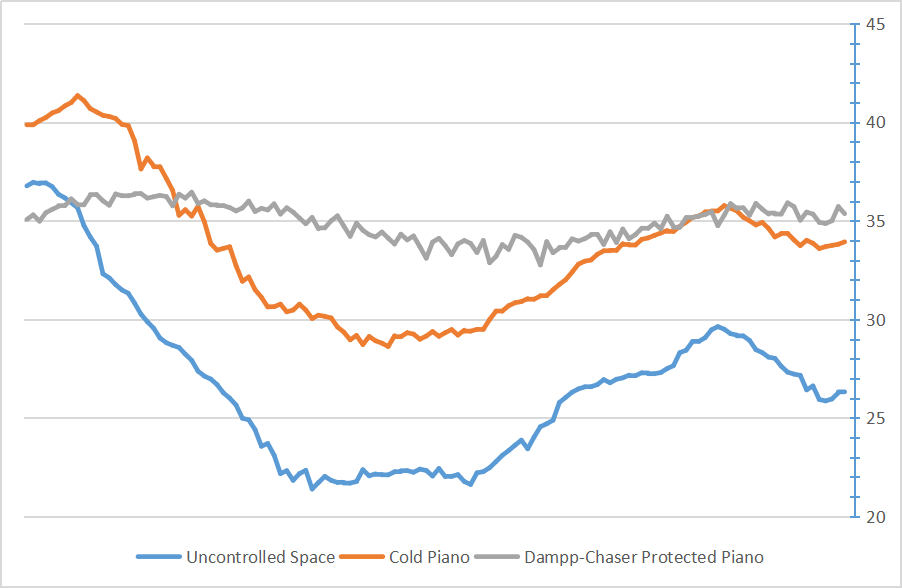
But I didn’t just take their word for it! I’ve installed remote humidity sensors in several pianos, and my finding has been that Dampp-Chasers do, in fact, keep the humidity inside pianos noticeably more stable. They’re particularly effective at keeping summer humidity under control, and are capable of bracing pianos against even the high humidity of a coastal Maine summer. The graph below depicts the performance of the system in a Vose & Sons baby grand piano located in a church:

The above piano has far more tuning stability than it did before, and the Dampp-Chaser will also protect against mold and corrosion. The piano in the above graph does have an undercover installed, and I nearly always recommend including these on grand installations.

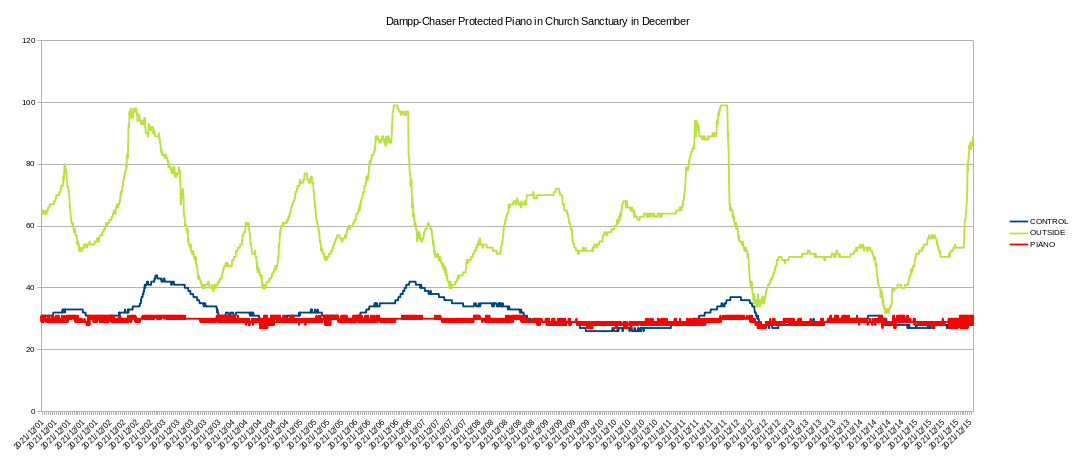
This chart shows typical wintertime performance. The green line indicates outdoor humidity (not included in the first chart). As you can see, outdoor humidity varies tremendously during the Maine winter, and routinely reaches nearly 100%. The air, once heated, dries out considerably, and you can see this relationship represented by the blue line. Finally, the red line represents the humidity as measured at the piano itself, and you can see the Dampp-Chaser effectively smooths out the variation.

Do Dampp-Chaser Piano Life Saver Systems protect my piano from extreme humidity?

One of the largest benefits of a Dampp-Chaser system is that it protects several of the main structural components of your piano from the harshest extremes. During the winter months, in some evenings the relative humidity indoors can be as low as 10%. (I’ve measured as low as 5% in some customer’s houses.) This is close to the humidity the piano might experience in Death Valley during the summer. Conversely, Maine summers can see relative humidity clearing 80%. Both of these extremes can be absolutely devastating for soundboards, bridges, and other finely constructed wooden components and glue joints.

The dehumidifier also does a superb job keeping out condensation and mold. A dehumidifier only system (about a third the cost of the full system) can be installed in pianos susceptible to mold.

However, it’s important to mention that the Dampp-Chaser system does NOT protect the pinblock. Even though the Dampp-Chaser offers significant protection to much of the piano, the humidity of the room should always be controlled to the extent possible.

Does the piano have to be tuned after the Dampp-Chaser is installed?

Generally there will be some settling after the system is installed. The usually recommendation is to wait about two weeks for the piano to settle, and then tune it.

Often with my customers, I’ll recommend timing their Dampp-Chaser install for a few weeks before their next regularly scheduled tuning.

Do I need to do anything once it’s installed?

Your only obligation is filling the humidifier when it requires it. There’s a light installed on the piano that will flash when the system needs to be filled, and it comes with a special fill bucket.

Do they wear out?

There are no moving parts, so Dampp-Chaser systems generally last decades. Once every year or so, the humidifier will require a new set of paper wicks, and I provide these for free at regular tuneups.

Why do Dampp-Chaser system installation quotes vary so much?

The Dampp-Chaser is a retail product, sold through technicians. The technician acts as both the installer and the retailer. Aside from the initial price of the product and any delivery fees, the technician will add a retail markup and then add their installation fee, which might be flat rate or hourly. Different technicians handle this pricing structure very differently, and you’ll see Dampp-Chaser quotes ranging widely. The most important detail is that your installer understands the system conceptually, and has experience adapting it to many different pianos effectively. Every Dampp-Chaser installation is a little bit unique—some very—and your installer needs to be up to the task.

Yamaha Disklavier FAQs

My Yamaha Disklavier just makes a ‘Pop’ when I press the power button and doesn’t light up. Can you fix it?

Yes! This is a common problem with older Disklaviers, and usually indicates that the power supply has failed. I can box it up and send it to Tap Electronics, who can then rebuild it. At present (1/17/23), this is a flat-rate service provided by Tap for $700. Tap Electronics is authorized by Yamaha.

My Yamaha Disklavier runs for a few seconds (or even a few minutes), but then turns off. Can you fix it?

Yes! You might have a power supply that’s dying (in which case, see the answer to the last question). However, you might simply have a damaged power button. You can test this by wiggling the power button side-to-side with your finger. When they wear out, sometimes even just the vibrations of the piano can cause them to switch on and off. These buttons aren’t terribly difficult to replace; however, they’re discontinued.

Their (discontinued) Yamaha Part number is VN388300. The switch itself is a (discontinued) ALPS SPPH23. You can see a spec sheet for the ALPS SPPH230500 here. Unfortunately, I haven’t found an exact duplicate, and would love to know if you have. I purchase bulk generic locking switches from Amazon and use sandpaper to shape them to size.

Can you set up my wireless connection / fix my terrible connection?

Yes! I wrote a definitive guide on connecting the Disklavier wirelessly. I don’t generally recommend using the native wireless adapters that come with your device, which are clumsy and confusing. I use PowerLine adapters, which allow you to broadcast your network signal right through the power lines in your house! This technology means neither you nor your piano ever have to adjust and reconfigure anything. No keeping track of passwords, no weak signals, and no need to call a technician every time you buy a new router. Just plug in your piano and marvel at its spontaneous, excellent internet connection.

This works in most homes, although in particularly large houses or houses with old wiring the PowerLine adapters might have trouble. In that case, the best device to use is a WiFi extender mounted underneath the piano.

Can you replace or upgrade old floppy drives?

Replacement is sometimes an option, and upgrading always is. Most manufacturers have stopped producing replacement drives, but they can often still be purchased second hand. eBay is a good resource.

However, I recommend upgrading to a USB floppy disk emulator. The Bulgarian company Nalbantov Electronics manufactures USB floppy disk emulators specifically for older digital pianos and players. These systems allow you to use a single USB stick in place of dozens (if not hundreds) of floppy disks. As solid-state devices these are considerably more durable and long-lasting than old-fashioned floppy drives.

With some generations of Disklavier (most notably some MX100II uprights), the floppy disk drives are mounted behind a shaped plastic piece. In these cases, you’ll need to cut away the old plastic facing (a pair of flush-cut nippers is helpful here), install the new drive, and put some kind of buffer around it. I’ve experimented with a few different choices for something functional and attractive. Purchasing neoprene strips is a cheap solution.

I have a 3D model in STL format of a floppy bezel that’s sized to fit around a Nalbantov. You can 3D print this yourself, or I can mail you one. I adhere it to the replacement Nalbantov with a little bit of hot glue, and then slide the whole assembly in.

You can read more about this on my Nalbantov Floppy Disk Drive Upgrades page.

Yamaha E3/DKC-850 Firmware Update

The Yamaha E3 (or DKC-850) firmware update is wonderfully simple, unlike its older Mark IV sibling. The entire update can be done using just a USB stick with at least 20MB of memory.

The Problem

In October of 2020, Yamaha mandated that its pianos use better encryption standards (all pianos now use TLS 1.2 instead of TLS 1.1). If you connected your piano to the internet before October of 2020, it probably automatically updated to the latest firmware. However, if you weren’t so lucky, you’ll have to perform the updates yourself.

The Solution

First, you’ll need to download a copy of the new firmware, and you’ll need a USB stick.

You can obtain this either by downloading the Yamaha E3 v3.54 file (dkv_update.bin) from my MEGA drive, or you can visit Yamaha’s website for an archived copy. Once you have the dkv_update.bin file, simply copy it on a USB stick (not in any directories or folders). Take that USB stick and insert it into your Disklavier. Now hold down the Play / Pause button and power on the system (with the Play / Pause button still held). From there, you can follow the on-screen instructions.

If you have any difficulties, I’ve attached a PDF of their instructions below. You’ll need to start with “Downloading the Update Program using a PC and USB Flash Memory” on page three.

Yamaha Mark IV Firmware Update

In order to connect your Yamaha Mark IV to the internet, you’ll need to update the firmware; otherwise, you’ll receive an error telling you it can’t connect to the internet. This is a pretty confusing error, since you might actually be properly connected. However, the Disklavier can’t tell the difference between no internet and just unable to talk to Yamaha. As far as it’s concerned, if it can’t see Yamaha, the internet may as well not exist!

The Problem

In October of 2020, Yamaha mandated that its pianos use better encryption standards (all pianos now use TLS 1.2 instead of TLS 1.1). If you connected your piano to the internet before October of 2020, it probably automatically updated to the latest firmware. However, if you weren’t so lucky, you’ll have to perform the updates yourself.

The Solution

Here’s what you’ll need to complete the update:

  1. A CD-R
  2. A CD writer
  3. A blank floppy diskette

The floppy diskette is used only by the Disklavier: You do not need to be able to write to the floppy disk from your personal computer.

You can buy blank floppy diskettes from https://www.floppydisk.com/. Amazon and eBay are also good suppliers of floppy diskettes. Personally, I like to use old Sony 2HD diskettes purchased from eBay. Although these aren’t the newest floppy diskettes available, they’re some of the most reliable I’ve been able to find.

CD-Rs are readily available on Amazon, as are CD writers.

You can also purchase both the CD-R (pre-written) and blank floppy disk from me. I sell both for $30.00 at this time. Just contact me at [email protected].

Once you’ve got your media, you’ll need to burn the updated firmware to the CD.

You can download the Yamaha Mark IV firmware 4.26 from my MEGA drive. (The correct firmware is under the Firmware / Mark IV v4.26 directory.)

Once you’ve burned this to your CD-R, you’ll need to prepare your boot floppy. Now, if you happen to have a floppy disk drive and feel like saving a little time, you can copy the floppy disk files from my MEGA drive and put them on your floppy disk. You can then skip the below step. The below is copied from Yamaha’s firmware update instruction manual (emphasis and notations mine):

Unit must be completely booted — green standby light solid green
Floppy must have the Protect tab to the Unlock position-hole is covered

1. Insert one Blank High Density Disk--HD--into the floppy drive.

2. On the PRC-100, from the "Interface Main" tap on "Next -->" located on the bottom right corner, it will take you to the next page.

3. Tap on the "Setup" icon. Tap on the "Next -->" Bottom right corner.

4. Tap on "System". Tap on "Make Install FD". It will take approximately two minutes to make the boot Disk.

5. Tap on "OK" when the "Complete" message is displayed.

6. Press on the Back button repeatedly-the button that has the U turn arrow-until you see the "Interface Main"

Once you have the media prepared, follow their instructions for performing the update (emphasis and notations mine):

1. Hold down standby button on the Media Center until the button starts flashing. The Disklavier shuts down.

2. Wait approximately 10 seconds or more, and then press standby button on the Media Center. Update of the I/O Center starts.

3. During update, the buttons on the Media Center light in sequence. Note: The update cannot be performed if the remaining capacity of the hard disk drive is too small. The CD will eject and flash. In such case, close the CD tray, reboot the I/O Center, and then increase the storage capacity, by for example deleting song data in the PianoSoft Library or CD Library by as much as the amount of data stored on one CD. After that, try reupdating.

4. The update will continue for approximately 25 minutes before the CD tray opens. Note: The CD may eject and flash. In such a case, check that there are no scratches, stains, or dirt on the CD that can lead to readout error. If the CD is defective, clean the CD and reload it. The I/O Center reboots. If the CD is defective and a replacement is required, remove the CD and press to close the CD tray. The I/O Center reboots (though updating has stopped). 

5. Wait until the CD tray opens, and then remove the CD and the floppy disk.

(Alex's Addition: You may have to wait another 30 minutes from this point for the update to finish installing. The LED indicators sequentially flash, then illuminate solid, left to right.)

And that’s it! Your firmware is updated. You can now proceed to Connecting your Disklavier to a network! If it’s already connected, you can read more about using piano radio in their Advanced Owner’s Manual (Part 2) on Chapter 8, Page 96.

Casio PX-5S No Media Error

A customer recently came to me with a Casio PX-5S that displayed “Error: No Media” after booting, and which wouldn’t produce any sound.

The Problem

The customer had already researched the issue themselves, and they had determined they needed a firmware update. He’s not alone, and Casio helpfully provides the following message to those with similar struggles: “Well, we’re not 100% certain. […] Casio has worked very hard to try to replicate this problem on units that have exhibited this behavior and have never been able to replicate it.” (See their post on Casio Music Forums.)

The Solution

The firmware can be downloaded from my MEGA directory here, if you’re looking for the PX-5S firmware specifically.

Alternatively, you can download the zipped archive from Casio directly. You’ll need to extract it.

Once you have the “update.bin” executable file, either by downloading it directly from me or by extracting their archive, you’ll put that file into the root directory of a USB stick.

Note that the USB stick must be formatted FAT32—the keyboard cannot read NTFS or exFAT.

If you download from Casio, do not put the ZIP file on your USB. Only the “update.bin” file.

At that point, you can simply plug the USB stick into the keyboard, and the update will automatically begin. It takes about fifteen minutes.

Connecting Yamaha Disklaviers to a Network

If you have a previous generation of Disklavier and haven’t updated its firmware since October 2020, it is absolutely necessary to update it before attempting to connect to the internet. Your Disklavier will tell you it isn’t connected to the internet, regardless of what you do, until the firmware is updated. I have additional information on updating the firmware on the Disklavier E3 (DKC-800 / DKC-850). I can also help with updating the firmware on the Disklavier Mark IV, and can even provide you with the media if that’s helpful.You can link directly to this page with https://setupdisklavier.com.

Yamaha Disklaviers are an innovative fusion of digital and acoustic engineering. They allow you to experience famous, concert pianists performing right in your living room, on your piano. They’re an excellent tool for both entertainment and for learning. And of course, they’re just fun to watch. Take a look at this beautiful 2009 Yamaha GC1 Disklavier playing Billy Joel’s Piano Man that I recorded last summer.

They do have one drawback: Connecting them to Wi-Fi networks can be confusing and difficult. Is your Disklavier acting as an access point, or is it connecting to your Wi-Fi? Is it doing both? Can you tell from the instructions what you’re expected to do? Do you even have all the parts you need?

I’m sharing an incredibly elegant, simple way to hook up Yamaha Disklaviers. You don’t have to worry about reconnecting it if you change your Wi-Fi password or buy a new router. You can set it up quickly, and it works in most houses.

First, your supplies:

A little redundant labeling makes all the difference. And Small-Caps adds some style.

1. NexusLink PowerLine Ethernet Adapters

These devices allow you to network through the electrical lines in a house. Your piano will believe it has a physical connection, and you won’t need to do any further configuration!

These devices are effortless to use once they’re paired: All you have to do to keep your piano connected is plug them in! They’re also encrypted and safe.

Make certain that the adapters are plugged directly into outlets, or into the surge protector below. Power conditioners, universal power supplies, or even higher-end surge protectors interfere with their signal. Similarly, they must be plugged into circuits that are in the same breaker box. Multiple breaker boxes or sub-panels can interfere with the signal.

Before I go to a customer’s house, I label one of them with “Piano,” printed in 18pt text on a piece of plain white paper and covered with tape. It’s much less likely to get unplugged this way!

I took it apart so that you don’t have to!

2. GE Designer 3-Outlet Surge Protector (pair)

This is an 8-foot extension cord with a three port power strip on the end. It calls itself a surge protector, but doesn’t do any regulation or conditioning which might interfere with the NexusLink signal.

I did a tear-down of the device to make sure there were no surprises: Surge protection is achieved through a metal oxide varistor, and there is no voltage regulation beyond that.

3. Black CAT6 Ethernet Cables (1 foot and 3 feet)

With piano work, subtlety is a must. Anywhere black or concealed equipment can be used, I use it. One foot has always been enough for me. More cord just means more to hide.

4. 3m Dual Lock Reclosable Fastener

These are strong, interlocking fasteners that aren’t vulnerable to vibration, and are strong enough to hold up the end of the extension cord.

And now, we get started…

A basic diagram of the installation.

1. Prepare and Pair NexusLink Adapters Beforehand

Remove the two NexusLink Adapters from their box and plug them both into the outlets where you intend for them to go. One will be next to the router and, and the other will be plugged into the extension cord you intend to put underneath the piano. No Ethernet connections are necessary at this time.

If the green connection lights on your NexusLinks turn on (the top light on each adapter), that means they’ve found one another, and are now communicating through your household power. Great!

Now you can secure their connection to each other. On the bottom of each unit (near the Ethernet jack) there’s a small configuration button. Hold it down for three seconds, and the bottom of the three lights—labeled with a padlock—will begin to blink. Now press the same button on the other NexusLink for three seconds. After a short period of time, the padlock lights will turn solid. Then, some seconds later, the connection lights should turn solid as well.

These two NexusLinks are now a permanently bonded pair. No matter where you put them, they’ll find one another. In fact, they’re so tightly paired that they’ll even ignore other NexusLinks.

2. Run the extension cord up underneath the piano

A NexusLink plugged into a power strip, with a ghastly yellow Ethernet plugged into it.

With the Disklavier turned off, unplug the Disklavier.

Pick a good spot to mount the power strip underneath the piano. This is usually parallel to the floor on the side of one of the wooden beams adjacent to the Disklavier controller. (Also, make certain if there is a Dampp-Chaser installed, make sure the NexusLink isn’t near the humidistat, where the small amount of heat it produces might cause less accurate readings.)

Wipe the area down with alcohol. Take two pieces of your Scotch Interlocking Fastener and, after removing the backing, affix both to the back of the power strip. Mount the power strip to the beam.

If possible, try to route the power cord over a beam. This will keep it a more secure in the event it gets pulled on. You can even loop it around the beam once if you have enough cord.

3. Plug everything in

Plug your other NexusLink PowerLine Ethernet Adapter into the bottom port of the three of your power strip. Run a short length of Ethernet cord to your Disklavier controller. If possible, loop the Ethernet cord up over the beam to apply a bit of tension. Pianos produce plenty of shaking and vibration, so keep things as secure as possible. Use no more cable than you need.

Now plug the Disklavier power into the power strip (and the Dampp-Chaser as well if one is installed). This extension cord is comfortably rated for the power consumption of all three devices.

At this time, both the green connection lights should be on, and both the padlock lights, meaning the NexusLink Adapters have discovered one another. If this isn’t the case, skip to the troubleshooting below.

Use zip-ties, twist ties, and other appropriate cable management to bundle everything up and out of sight. Stick-on conduit can be used to run cords along the beams if precise positioning is needed, such as if the piano is positioned next to a low couch or somewhere else people might easily see underneath. I’ll actually sit in various chairs in the room and look at the piano.

You’re all done! If it doesn’t work immediately, read on.

No connection! What went wrong?

First: It’s probably a power strip or Universal Power Supply (UPS)

Do not plug either PowerLine adapter into a power strip or surge protector if you can avoid it. These often filter out the signal. Only simple power strips (like the GE one I recommend) will not block the signal. When in doubt, plug directly into the wall. And don’t forget to check the adapter that’s near your router. This also needs to be plugged directly into the wall.

Second: It might be the outlet

If the outlet isn’t receiving power, it won’t work. Make sure that the outlet can power other devices, and that it isn’t controlled by a switch.

Third: It might be the breaker boxes

If the house has multiple breaker boxes, then the devices might not be able to see each other. In this case, try different outlets. You can try changing outlets both near the piano and near the router.

If none of the available outlets work, you’ll need to try a different approach. This article is specifically on the PowerLine adapter technique, but you’ll need to consider using a Wi-Fi bridge, since the PowerLine adapters won’t work for you.