
The E3’s DKC-800 control unit can be repurposed as a DKC-850 upgrade system with nothing more than the correct power adapter, a single DIP‑switch change, and one adjustment to your settings.
Now that the DKC-850 upgrade kit is discontinued, this approach is one potential way to bring your old Mark I, II, or III Disklavier into the modern era! It can be installed by piggybacking, as described on my Disklavier upgrade page. In some models, such as the Mark II and III, it can be installed as replacement with the addition of an adapter cable.
The DKC-800 control unit is currently still available from Yamaha new with part number WN755510. At the time of this writing (7/21/25), the system costs $1,623.14 retail with a 12-16 week back-order. Note that it doesn’t include any accessories: No power adapter, bracket, or remote control. Depending on your setup, you’ll have to add these—as described below.
Why add this system to your older Disklavier? It unlocks Disklavier Radio (Yamaha’s internet streaming service), allows you to use USB sticks easily and without emulators, and lets you connect the DKC-800 to external speakers.
I learned much of this information from Richie Hayes and Joey Ruggero at Yamaha. Richie has several videos outlining this process as well.
Please be aware that if you purchase the DKC-800 system new from Yamaha, this will void your warranty. Modifying a DKC-800 for use as an upgrade system is not endorsed by Yamaha, and both the modification of the DKC-800 and the use of a conversion cable will void the warranty of the control unit.
Although I do have a Disclaimer that applies to all of my repair advice, please be especially aware that you do the below at your own risk! This process involves adjusting very tiny DIP switches in the middle of a very expensive piece of equipment.
Check Eligibility
If you have a used DKC-800, there’s a risk it doesn’t have the switches we need. A mid‑2010s DKC-800 usually has DIP switches; earlier units sometimes don’t. Remove the top cover and confirm there is a small four‑position DIP bank on the main CPU board, underneath the CD drive. If you ordered a DKC-800 recently, there will be, so this isn’t a cause for concern!
Hardware You’ll Need
Some links in this article are affiliate links. As an Amazon Associate I earn from qualifying purchases. Your click fuels hours of reviewing old service manuals—at zero added cost to you.
Order a PPR-200E remote control, if you don’t have one. The remote control is mandatory. This is still available from Yamaha as part WN570900, but is also backordered. The remote control can still be regularly found on eBay. The remote uses infrared, and will simply work with any DKC-800 or 850. You don’t have to pair it or do any other configuration. You can also use a Flipper Zero in place of the remote control.
The DKC-800 can still be controlled through Yamaha’s Disklavier app, but this will not allow you to change the PianoType settings described below.
Phillips screwdriver and ESD strap for safe board handling. There are a total of 13 screws to remove. There are plenty of tiny integrated circuits on this board, and it would be a shame to destroy one with a static shock when you’re this close to a Disklavier upgrade!
The PJP-PS02 power adapter. This is Yamaha part number ZT935300. See my article on power adapters for the DKC-800 and DKC-850. Now’s a good time to consider adding a surge protector! Make sure to get the proper power adapter. I’ve gotten emails from people who watched YouTube videos on how to save a few dollars with a cheaper adapter, and had stuttering and random shutdowns as a result.
For Add-On / Piggybacked Installations
You’ll need a pair of MIDI cables. Although you can get by with only one cable, if you do want to record, you’ll need a pair. You can purchase a pair of cables from Amazon.
For Replacing the Original Controller
If you’re installing the DKC-800 as a replacement control unit, you’ll need the Yamaha conversion cable supplied with retail DKC‑850 kits or available aftermarket. The conversion cable allows you to use the system as a replacement, rather than piggybacking it with your current system. Because Yamaha has discontinued the cable, you’ll need to have one custom‑made. Contact Richie Hayes for assistance, as he’s the expert on building these!
If you opt to purchase a conversion cable and replace your original system, you’ll also need a bracket. See my article on DKC-800/850 brackets here. The part number for this bracket is ZE383601.
Step 1. Open the DKC-800 and Remove the CD Drive
Remove the nine exterior screws, then lift off the top cover. You’ll see several circuit boards, and the CD drive. The CD drive blocks access to the dip switches, and you’ll need to remove it.
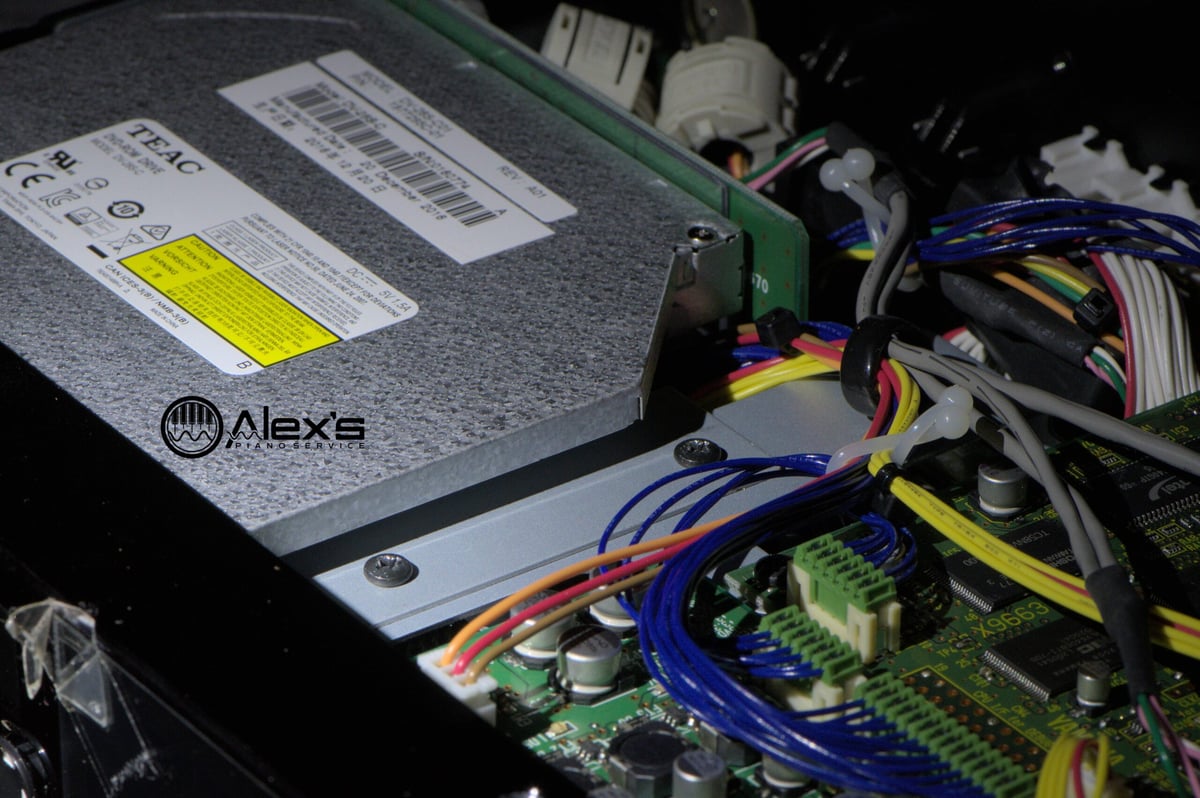
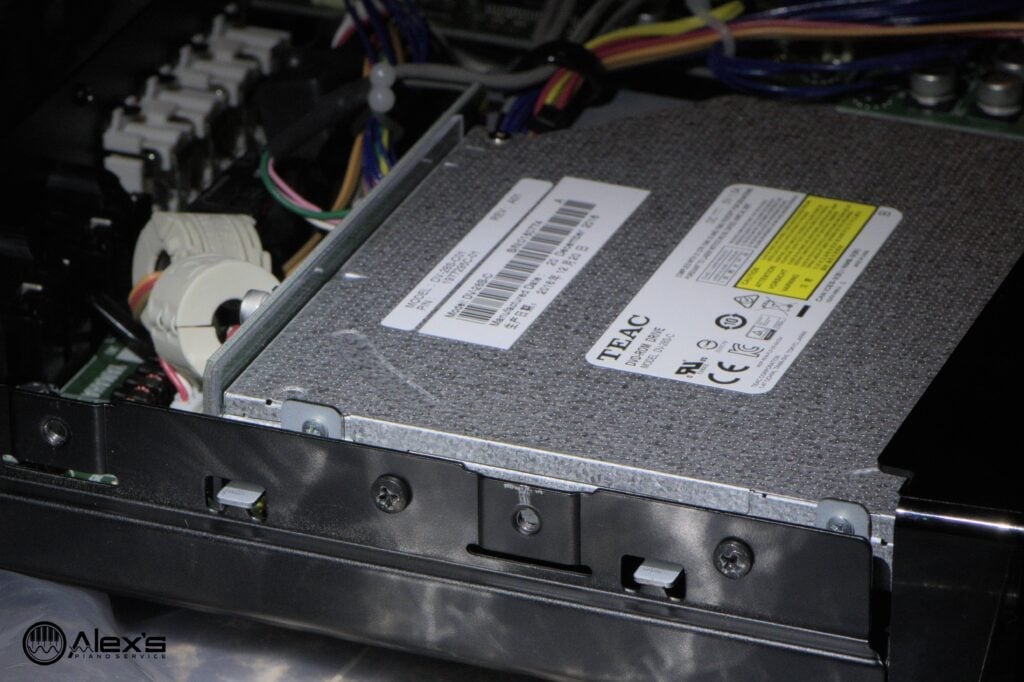
Once the CD drive is unscrewed from its bracket, you can slide it sideways (toward the inside of the case) a short distance, releasing it. You can then lift it up and move it out of the way, without disconnecting any of the wires.
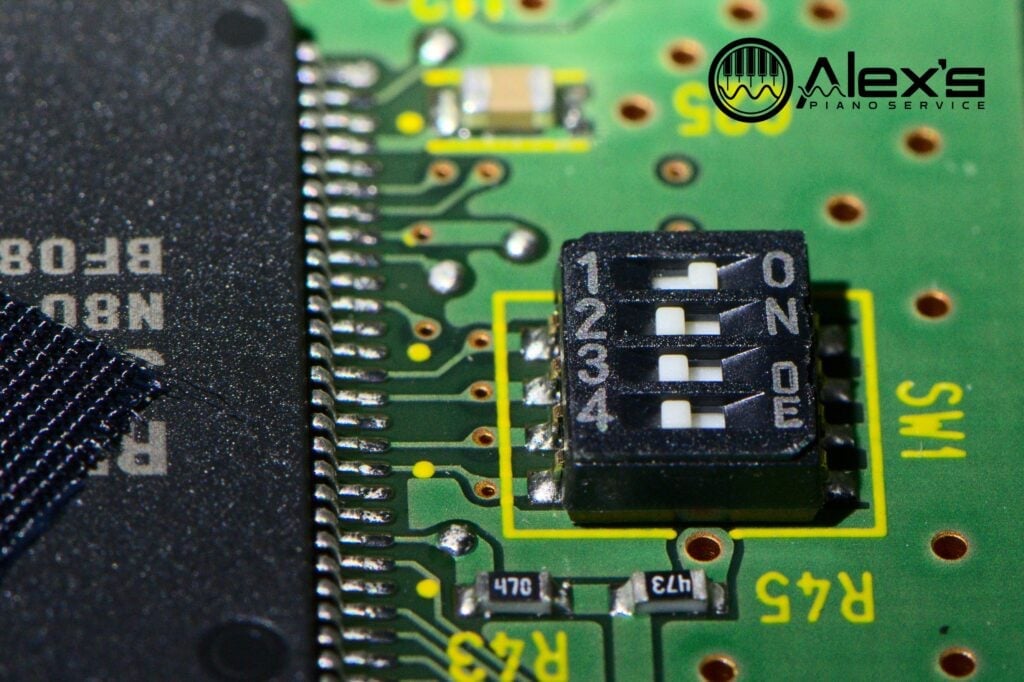
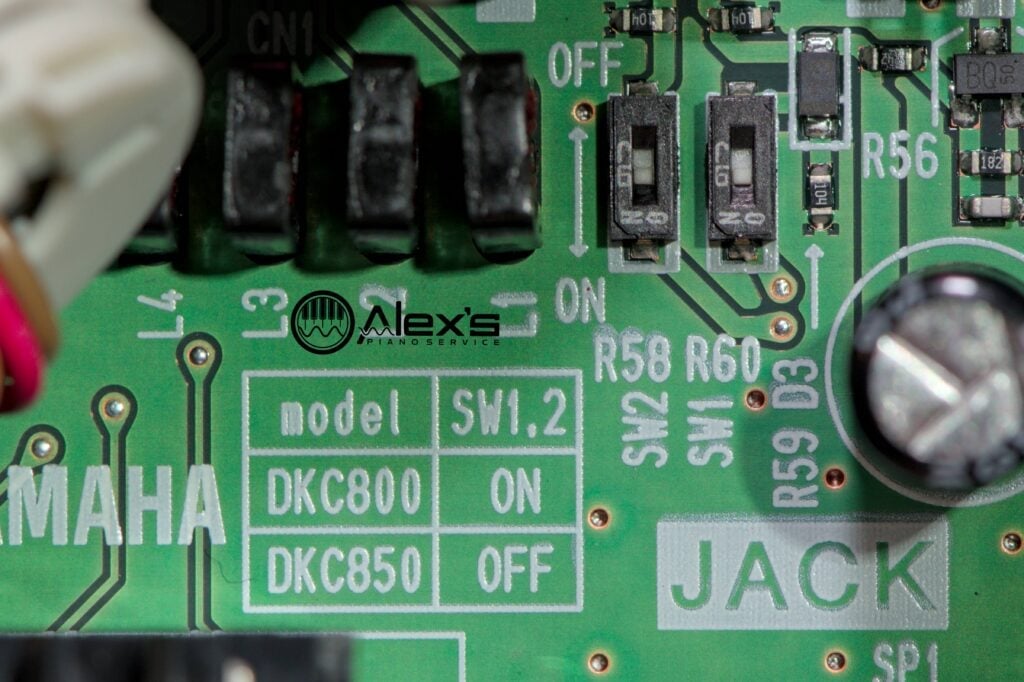
Step 2. Flip Three DIP Switches
This is the key step!
- On the main board, set DIP #1 on SW1 to the ON side of the switch. It will be the only switch of the four in a different position. DIP #2-#4 should remain in their original positions.
- At the rear of the case, on the jack board, flip SW1 and SW2 to the OFF position. These switches are next to each other, and sit immediately above a helpful label which indicates ON for DKC-800 or OFF for DKC-850.
- Leave all other DIP positions unchanged.
- Remount the CD drive.
- Re‑assemble the case.
Step 3. Connect it to the Disklavier
If you’re connecting the system as a piggyback unit, then connect the DKC-800 to power. Then route the MIDI cables between the DKC-800 OUT to the MIDI IN of your current system. Similarly, connect the MIDI OUT of your current system to the DKC-800.
If you’re installing the system as a replacement, then disconnect the old control unit. Connect your adapter cable to both the original cable end, and the back of your DKC-800. Warning: Never connect or disconnect the piano cable with the power on.
Step 4. Set “PianoType”
If you’re installing the DKC-800 as an “add-on” system (or piggybacking it), then you’ll need to change this setting as well:
- Power up the system.
- On the IR remote press System ► PianoType.
- Select Add if you’re adding (piggybacking) the new DKC‑800 in addition to your original Disklavier control unit. Please note that, when installed this way, Disklavier Radio and other Internet Direct Connection services will not work (see the DKC-850 operators manual). In this case, please get some conversion cables!
- The controller will reboot and store the setting.
The Add‑On flag ensures the firmware routes MIDI and audio correctly for your wiring scenario.
At this point, your DKC-800 should function just like a DKC-850 upgrade system.
Connecting your DKC-800 to the Internet
I have a full article on connecting your Disklavier to the internet. With the DKC-800, I highly recommend the instructions in my article on how to easily connect your Yamaha Disklavier to Wi-Fi. Using a small wireless bridge device is by far the easiest method of which I’m aware.
FAQ
Does this work with Silent Piano?
Yes, this does work with silent piano. You will need to connect the OUTPUT RCA ports on the DKC-800/850 to the AUX IN jacks on your piano.
Why doesn’t Disklavier Radio / Internet Direct Connection work when piggybacked?
Neither the original DKC-850 nor this converted DKC-800 work with Piano Radio when connected as an add-on. Yamaha’s DKC-850 operation manual indicates that Internet Direct Connection (IDC) (which includes Disklavier Radio) is available only when the piano’s control unit has been replaced—not when the unit is connected via MIDI cables in Add mode (“piggybacked”).
I’ve had several customers reach out to me because they’ve attempted this, and received error messages. To use Disklavier Radio, the proper approach is to connect the DKC-800/850 in place of the original controller using either Yamaha’s original adapter cable, or an adapter cable purchased from Richie Hayes.
Do I need the PPR-200E remote to change PianoType (or can I do it from the app)?
Yes, a PPR-200E remote control is required to change the piano type. The only alternative is to use a Flipper Zero or similar device. This remote control is Yamaha part WN570900.
Can I use a different power adapter, or do I need the PJP‑PS02/PJP‑PS04 replacement?
I highly recommend using the original power adapter. The DKC-800/850 is very particular about its power source, and you might have difficulty with playback using a third-party adapter, even if the system seems to power on correctly. Some technicians recommend using this Kastar power adapter, alongside this DC tip set, and this does seem to work. However, if possible, I’d still recommend obtaining an original adapter, which is Yamaha part ZT935300.


Hello Alexander,
Do you have either a DKC-850 or DKC-800 controller? I have checked EBay, several Yamaha dealers in large cities to no avail.
I have a Yamaha C7 Disklavier piano with thr DKC-500R XG controller that works fine.
I most like will keep my current controller and piggy back the new controller,
Will the DCD1 be a partial upgrade providing the ability to play Yamaha PianoSoft cd’s.Does it do anything else as an upgrade. Will the DCD1 provide any features of the DKC-850 or 800 controllers?
Hello Roger! They are still available through Yamaha 24×7. The part number for the DKC-800 controller is WN755510. They’re in stock at the moment (10:00 PM on 10/11/25). You can adapt it for use as a DKC-850 using my conversion instructions here. Note that this is not endorsed by Yamaha and voids the warranty. There’s another caveat with the brand-new controllers: Yamaha changed the DKC-800 so that it can no longer use Disklavier Radio when piggybacked (used as an “Add on”). But it does still work when used with a conversion cable. If you want further assistance with this, please contact me by email, and I can put together a parts list and plan.
The DCD1 will add the ability to play CDs, and also to play accompanying audio tracks, rather than just the tone generator music of the DKC-500RXG. And yes, that does also mean the audio side of PianoStream.
Thank you!
Hello Alex,
I have a friend that will sell me his used DKC-850 for $200.00! All I need is a power supply and conversion cable from Richie.
Per you recommendation to buy the Yamaha power adapter on the 24/7 website, it costs almost $80.00. I searched for the generic MU24-Y120200-A and found this on Amazon for about $20:00. Amazon link, ITE MU24-Y120200-A1 12V 2A Power Supply Adapter, P/N 0432-02L800, Compatible with Cisco SG350-10 Switch https://a.co/d/98iAhrZ
The only difference in the model number is the letter B120200 verses the letter Y120200 plus it has an eight foot cord. OMNIHIL 8 Feet AC/DC Power Adapter Compatible with Leader Electronics LEI Power Supply MU24-B120200-A1 Power Supply Adaptor.
Here are the specifications,
Top highlights
Brand OMNIHIL
Connector Type Barrel Connector
Special Feature Short Circuit Protection
Input Voltage 240 Volts
Specification Met UL
Power Source Corded Electric
Adapter Rating: World Wide 100V ~ 240V 50/60Hz – UL
Amazon link, OMNIHIL 8 Feet AC/DC Power Adapter Compatible with Leader Electronics LEI Power Supply MU24-B120200-A1 Power Supply Adaptor https://a.co/d/8SslPzF
Will either of these adapters work ok?
Again, your website is a wealth of all things Disklavier. Thank you for putting so much detail for me as I am lost since piano technician Carol Beigel from the former Yamaha Users Group DUG retired.
Roger Davis
Hello Roger, and thank you for the kind words! That’s certainly a great deal on a DKC-850!
I actually ordered one of these ITE adapters on Amazon just to find out if it would fit. What I discovered is that, although it’s the correct rating and the transformer is identical, the barrel adapter on the end isn’t the right size. You could buy a tip adapter kit—something like this one from SoulBay. I believe the correct adapter is the 5.0 × 1.1 mm yellow one with a core pin. (The DKC-800 inlet measures 6 mm ID for the inlet as a whole, with a 1 mm pinhole.)
That second link—the off-brand OMNIHIL—I wouldn’t mess with at all. I’ve fixed too many melted inlets and damaged units to recommend anything but name-brand, and the ITE adapters are very good.
I also just emailed you—and thank you again!
Hi Alexander, Do you know if Yamaha placed their library of Disklavier floppy disk artists to be accessed via Disklavier Radio? I hope so because there was someone on eBay selling a dozen of Disklavier floppy artists that I didn’t have and I passed on buying them thinking that they would be available on Disklavier Radio.
Roger Davis
Hello Roger. I can tell you that much of their former PianoSoft inventory is on Disklavier Radio, but I don’t believe the entire inventory is on there. I assume most of it is, and if you bought a large lot of floppy disks, the majority would be duplicated. So I’d be disinclined to purchase lots of disks unless you’re prospecting for a rare one. (Or for those folks out there that still have floppy disk drives, of course.)
When customers upgrade to the DKC-900, Yamaha offers to send them files compatible files for USB for all of their floppy disks. However, it’s sometimes that case that Yamaha can’t provide them with the files—which is why a lot of these disks get sent to me. This is why I think they don’t have every song on file.
Thank you!