
You might be adding PianoStream to a piano that already has occupied MIDI ports, such as a Disklavier with an added DCD1 or MU50/MU80. In those cases, you’ll sometimes see the suggestion to use a MIDI Y-cable to “share” a port. It can sometimes work, but it’s not a robust way to solve the real problem (splitting and/or merging MIDI streams).
Why? MIDI DIN is a 5 mA current-loop interface, and the MIDI spec explicitly states that one output shall drive one and only one input. It’s almost like splicing to heads onto a USB cable. It might work, but it’s not trustworthy. (MIDI electrical standard update CA-033 spells this out directly.)
A small MIDI router/merge interface (like the CME U4MIDI WC) is a much cleaner answer. It can actively split, merge, and route MIDI without loading the line or “clobbering” one device with another. CME also supports saving routing presets. The interface can run standalone (no computer required) once configured.
This article is about connecting your Disklavier to Bluetooth using the CME U4MIDI or similar device. If you’re looking for an article about PianoStream in general, or if you’re looking for a general Disklavier and PianoStream compatibility table, I have separate pages for those.
What you’ll use
CME U4MIDI WC + WIDI Core (Note that this includes both the U4MIDI WC and the WIDI Core. These can be purchased separately, but you must have both for this strategy to work. Note also that although this has USB, it’s a USB client, not a USB host: You cannot plug USB keyboards into it for use with the Disklavier.)
Two standard 5-pin DIN MIDI cables
A USB power adapter (or power via your computer’s USB) for the U4MIDI. These are ubiquitous—you might already have an extra one!
Initial setup and firmware update
Installing the WIDI Core
This looks challenging, but it’s very doable. CME’s U4MIDI manual notes that the two screws are located under the bottom label. Remember to discharge static and insert the module carefully.
- Disconnect all cables from the U4MIDI.
- Remove the two screws under the bottom label and open the shell.
- Discharge static (CME even suggests washing hands) and insert the WIDI Core into the expansion socket carefully.
- Reassemble and re-screw the case.

CME warns that incorrect insertion direction/position, plugging/unplugging with power on, and static electricity can cause malfunction or damage.
Downloading the CME software
The U4MIDI uses UxMIDI Tools (HxMIDI Tools is for CME’s USB-host “H” devices). CME publishes UxMIDI Tools downloads for Windows, macOS, Linux, iOS, and Android.
You can download all CME tools, including the UxMIDI tools, directly from their support page.
CME’s own U4MIDI manual also points you to CME support for UxMIDI Tools and explains that UxMIDI Tools is used for routing/mapping/filtering and firmware updates.
Updating the firmware
U4MIDI firmware: UxMIDI Tools can detect whether your U4MIDI is on the latest firmware and prompt an update; manual updates are also available from within the firmware page. CME recommends restarting the unit after each firmware upgrade.
Your U4MIDI is now ready to use!
Routing your U4MIDI
Inside UxMIDI Tools, you’ll use the MIDI Router to define which inputs go to which outputs. The U4MIDI’s manual describes the router as the place to “view and configure the signal flow of MIDI messages.”
The changes in routing are committed the moment you make them. You don’t actually have click Save or move the files anywhere. They’re committed, and will be retained even after the U4MIDI is disconnected from the computer.
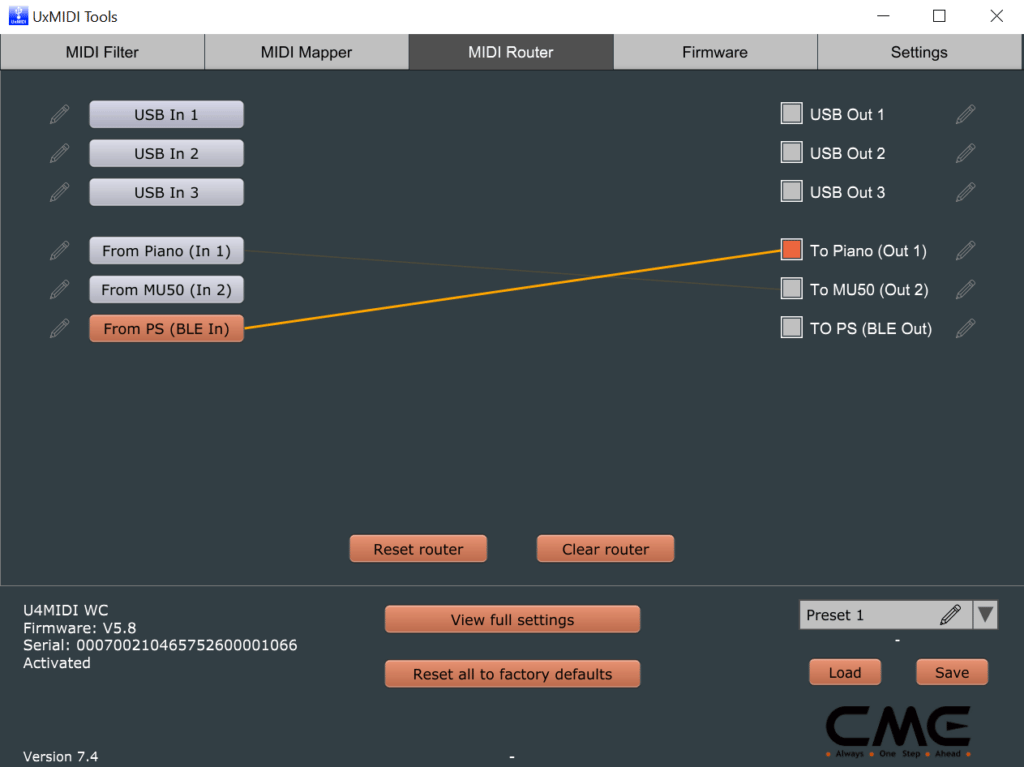
Connecting BLE MIDI alongside the MU50/MU80
In this case, the U4MIDI is acting in place of a Y-cable. A tone generator like a MU50/MU80 is typically a receiver in the chain, so we mainly need to keep its feed intact while adding PianoStream.
The U4MIDI is explicitly designed for splitting/merging/routing and can store your settings for standalone use after configuration.
Physical cable connections
Connect MIDI cables from the piano’s MIDI OUT to INPUT MIDI 1, and OUTPUT MIDI 1 to the piano’s MIDI IN.
Connect MIDI cables from OUTPUT MIDI 2 to the MU50’s MIDI IN.
MIDI Router connections
Inside the MIDI Router tool, connect In 1 to Out 2, and BLE In to Out 1.
Connecting PianoStream alongside the DCD1
The DCD1 scenario is different because it uses two-way MIDI communication. (Yamaha/PianoSmart update instructions for the DCD1 emphasize that two MIDI cables are required for 2‑way communication.)
We need both the DCD1 and PianoStream to be able to send to the piano—without interfering with each other, and without creating MIDI loops. This is exactly what an active MIDI router/merge device is for.
Physical cable connections
Connect MIDI cables from the piano’s MIDI OUT to INPUT MIDI 1, and OUTPUT MIDI 1 to the piano’s MIDI IN.
Connect MIDI cables from the DCD1’s MIDI OUT to INPUT MIDI 2, and OUTPUT MIDI 2 to the DCD1’s MIDI IN
MIDI Router connections
Inside the MIDI Router tool, connect Out 2 to In 1, and Out 1 to BLE In. Now connect Out 1 to In 2 as well.
Computer at the same time
You can leave the U4MIDI connected via USB-C to your computer while it’s also routing MIDI between the piano, DCD1, and Bluetooth (WIDI Core). In this case, also route In 1 to USB Out 1, and USB In 1 to Out 1. You can see these labeled in the image below.
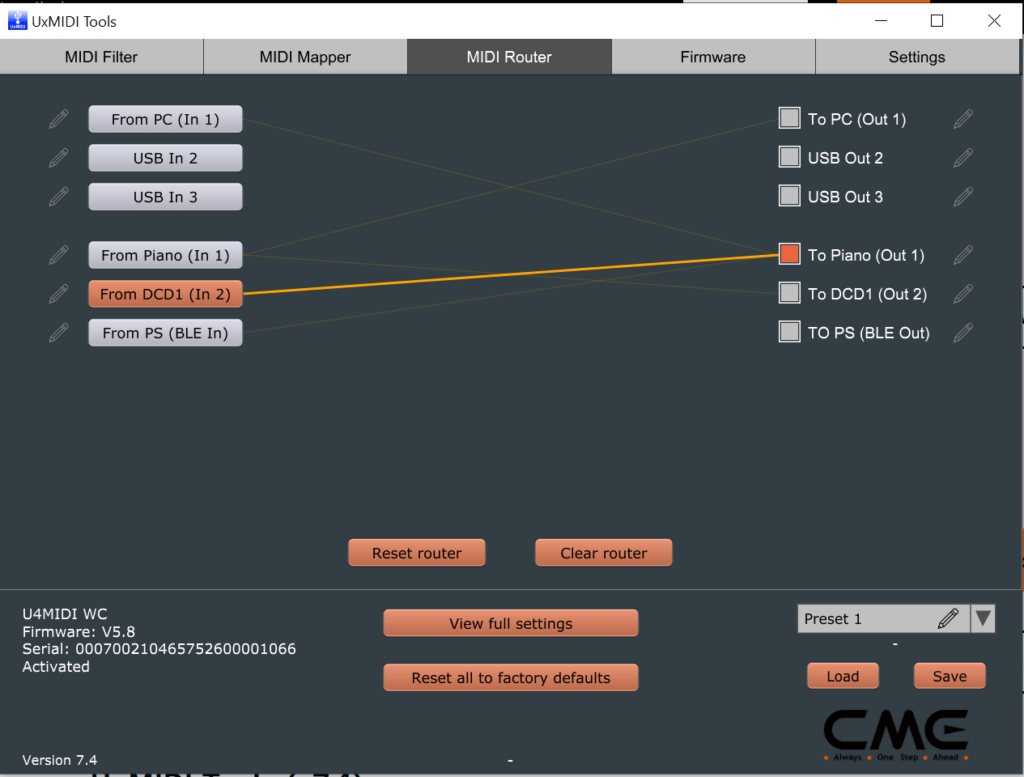
Be careful not to create any loops! Definitely don’t route In 1 to Out 1, for instance, and don’t blindly route “everything to everywhere.” MIDI loops are a well-known failure mode on Disklaviers, and can cause back-and-forth data behavior.
Troubleshooting
Stuck notes / long or disordered notes
This is usually a MIDI loop or an unintended routing path. CME’s FAQ section for U4MIDI calls out “MIDI loopbacks” as a likely cause of long/disordered notes and suggests resetting to factory defaults if needed.
“All notes off” panic button
U4MIDI supports assigning its button to send an All Notes Off message (helpful if something hangs during testing).
Bluetooth pairing problems
If Bluetooth devices don’t show up or keep auto-connecting to the “wrong” thing, CME’s support guidance recommends updating firmware, clearing old Bluetooth pairings/caches, and factory reset after updates if needed.
Difficulties with PianoStream playback
It might be that the U4MIDI is working properly. On some Disklavier models, you might need a floppy disk inserted to use PianoStream, for instance. Please see my complete article on PianoStream problem-solving and solutions.
Can I use a MIDI splitter/Y‑cable on a Disklavier?
I do not recommend using a Y-cable, even though PianoStream’s DCD1 installation suggests it. I understand why it’s recommended: It’s inexpensive and straightforward, and in practice it generally works. But it’s at odds with the MIDI electrical specification, and isn’t how I configure for my clients.
It’s also limiting, since the U4MIDI lets you to deliberately control where signal is routed. For instance, using a Y-cable will makes it difficult to capture piano MIDI output. This might not matter with the DCD1, but it will matter with other piggybacked systems such as the DKC-850.


